DIY “Thank You” Window Projection Tutorial | #ProjectThankYou
Show your thanks to all the amazing heroes keeping us safe from coronavirus by projecting in your windows. Download free “thank you” video animations. Perfect for #ThankYouThursday. #StayHome and project your thanks #WithMe.
Share your projections with the hashtag #ProjectThankYou
You can download all the animations for free at this link
➜ https://www.lumabox.com/tutorial-resources/#project-thank-you
They are 100% free for personal use. For commercial use please contact info@lumabox.com.
MapMap (free projection mapping software) can be downloaded here
➜ https://mapmapteam.github.io
The projector I’m using:
(Newer model)
US - https://amzn.to/39ocqJE
UK - https://amzn.to/39kOC9x
The budget projector I mention under £75/$70
US - https://amzn.to/2wLLeaG
UK - https://amzn.to/3cfAIr8
Disclaimer: As an Amazon Associate I earn from qualifying purchases. It helps me keep this channel going and providing tutorials like this for free.
………………………………………………………
Timecodes:
00:24 Basic Window Projection
03:00 Projection Mapping a Window with MapMap
………………………………………………………
Show your thanks to all the amazing heroes keeping us safe throughout the Covid19 outbreak by projecting messages of gratitude in your windows.
You’re going to need a projector. You don’t need an expensive, high specification projector to do this; you can use a budget projector which can be picked up for under £100.
I’m using a MacBook Pro and connecting it using a Mini DisplayPort to HDMI cable. Check which display outputs you have coming out of your machine and which connections you have in the back of your projector to decide what cable you need.
You want to cover the glass in your window with paper. Ordinary white printer paper is perfect. Try to get as snug a fit as possible without too much much creasing or bulging.
Then wait for the sun to go down…
Plug your projector into a power source and position it in a table, shelf or other flat, stable surface facing the window. Try to get it roughly pointing towards the centre of the window. You also want the projector to be above the level of the window sill, otherwise the window sill cast a shadow on the window and block our projections.
The most basic way to do this is simply to mirror your computer screen with the projector and play the video. To turn on Mirror Displays on a Mac, go to System Preferences, Display and in the Arrangement tab, make sure Mirror Displays is on. Windows users need to right click on the Desktop and choose Display Settings. Under Multiple Displays, choose Duplicate.
If you play a video and go to full screen mode, it outputs from the projector. However, you will probably encounter the problem of the projection being much bigger than the window and skewed.
One way around this is to position your projector more centrally to the window and as square on to the window as possible. If you are lucky, you might find the perfect position. There are also often some settings on the projector that allow you to distort the output to compensate the distortion produced by projecting at an angle.
However, there is a better solution and that’s a bit of basic projection mapping with my user-friendly free projection mapping software called MapMap…
………………………………………………………
Got questions? Looking for ideas & inspiration? Join our projection mapping Facebook community:
➜ https://www.facebook.com/groups/projectionmappinghub
………………………………………………………
Website ➜ https://www.lumabox.com
Facebook ➜ https://www.facebook.com/lumaboxcreative
Twitter ➜ https://twitter.com/lumaboxcreative
Instagram ➜ https://www.instagram.com/lumaboxcreative
Pinterest ➜ https://www.pinterest.co.uk/lumaboxcreative
Видео DIY “Thank You” Window Projection Tutorial | #ProjectThankYou канала Luma Box
Показать
Комментарии отсутствуют
Информация о видео
Другие видео канала
 Claws Tearing | After Effects Quick Product Tutorial
 Lightning Strikes & Flashes | After Effects Quick Animation Tutorial
 Audio 7/10 House Projection Mapping for Beginners
 Spiders | After Effects Quick Product Tutorial
 1️⃣ Get started projection mapping with LumaMap
 Light Rays (No Plugins) | After Effects Quick Animation Tutorial
 Resolume Arena 6 Tutorial | Learn Cake Mapping (4/6) Automated Playback
 LumaMap: Start to Finish ⏩
 2023 Halloween House Projection Mapping Show
 Behind the Scenes Gingerbread Projection
 Cloth Tearing | After Effects Quick Product Tutorial
 Lightform LF2 & LF2+ Set Up | Step-by-Step Tutorial
 🚘 Custom Car Mode: Unlocked
 👻 Get spooky this Halloween 🎃
 Level Up Your Lightform Designs with Blend Modes | Creator Tutorial
 Make a Mapping Guide for House Projection - LumaMap Lite Tutorial
 Projection Mapping Powered by AI. Coming This Week. Teaser 2
 Ribbon | After Effects Quick Product Tutorial
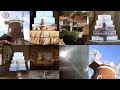 Luma Bakery at Cley Windmill
 Liquid Drip Effect (CHEAT) | After Effects Quick Animation Tutorial
 Blood Dripping | After Effects Quick Product Tutorial