(DIY) How to make a tepee tent and decorate with flowers?
First of all, a big thank you for watching and liking our previous video tutorials and thank you for patiently waiting for this new video.
Please comment if you have any questions and don't forget to LIKE, SHARE & SUBSCRIBE to my channel for more updates.
This is a follow up video to our previous video tutorials, please check the links below;
(DIY) How to setup a Floral Backdrop tutorial
https://www.youtube.com/watch?v=kqpygI3mQl0
(DIY) How to style your backdrop - Tutorial
https://www.youtube.com/watch?v=D_u6_sfoc50
(DIY) How to setup a double drapery backdrop tutorial
https://www.youtube.com/watch?v=LvWGfs3r1ao&t=26s
(DIY) How to setup a single drapery backdrop tutorial
https://www.youtube.com/watch?v=y0rw2s5-_E4&t=21s
(DIY) Heavy Duty Pipe and Drape Backdrop stand assembly tutorial
https://www.youtube.com/watch?v=eR_737HlxN8
We will guide you how to setup a teepee tent and decorate with flowers.
Items Needed
1.) 7 Pcs of 1x3x8 lumber (easily available at hardware stores)
You need to cut 3 pieces into;
1 Piece of 1x3x6 for the back and 2 pieces of 1x3x5 for the sides.
2.) Zip Ties
3.) Drapes
4.) Floral arrangement (Watch our previous video on how to create a floral arrangement https://www.youtube.com/watch?v=kqpygI3mQl0)
Instructions
- Start by drilling top holes for the 4 standing wood pieces. Position the holes in the middle of wood keeping them approximately 1-1.5 ft away from the end of wood.
- Once done, take 2 wood pieces and put one piece over the other and align the holes. Use zip ties or nut and bolt set to attach and hold, and tighten the pieces together. Repeat this step for the remaining 2 pieces.
- Now we need to drill the holes on the other/bottom end of the 4 standing wood pieces. We will again position the holes in the middle, however, this time the gap should be approximately 5cm away from the end of wood.
- Its time for the side support (left, right & back). It is very important to have proper support at the bottom, otherwise the tent will fall down and may cause injury.
- We will be using 2 pieces of 1x3x5 for the sides and 1 piece of 1x3x6 for the back, to connect to the bottom of tent. You will need to drill holes on these as well. Repeat instructions as mentioned in step 3 to drill the holes on both ends of the 3 wood pieces.
- Once the holes are done, we need to align the holes for the side pieces (1x3x5) with the bottom holes of the standing pieces and use zip ties or nut and bolt set to attach and hold, and tighten the pieces together.
- Position the standing wood pieces 6ft apart and opposite to each other. Tilt them at an angle of approximately 45 degrees that will bring the top parts closer. Using zip ties, connect the top. Once tied together, major structure is complete.
- Although, major work is done to create the tent structure, however it is always a good idea to make the structure more sturdy. You can achieve this by attaching the back support wood (1x3x6) using zip ties. You cannot use the nut and bolt set here.
- Once the sturdy structure is complete, it is time now for some drapery and florals. You can use different variety and colours of drapes to cover the tent. You can add a touch of flowers by putting them at the top, right in the middle. Watch our previous video on how to create a floral arrangement (
https://www.youtube.com/watch?v=kqpygI3mQl0)
Don't forget to check out our more upcoming video guides.
Facebook - https://www.facebook.com/groups/1627152347308832
Instagram - https://instagram.com/youreventdecorators?igshid=18xxewje7jq43
Видео (DIY) How to make a tepee tent and decorate with flowers? канала Your Event Decorators
Показать
Комментарии отсутствуют
Информация о видео
Другие видео канала
 Diy - Quick & Easy Tent Setup Diy - Floral Tent
 How to make a DIY garden canopy from a €2 Hoola hoop
 Making a Children's Play Tent ⛺️
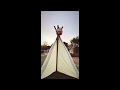 Easy DIY Teepee
 DIY CANOPY Idea | Create your Cozy Corner in 7 Minutes!
 Luxury Picnic: DIY Canopy & Tee Pee!
 How to DIY the perfect curtain tent for glamping
 How to Build a Teepee | The Pioneers
 DIY Simple Teepee Tent for my niece during quarantine | Life as a Homebody 🇮🇩 Indonesia
 DIY Kids Tent | Living Room Decor Ideas On A Budget | Lower Sitting Area Decor #diytent
 How to Build a Teepee Tent / Easy DIY Under 1 Hour / Kids Party Idea
 How to Make a Blanket Fort - Three Ways!
 EASY DIY TEEPEE USING ONLY HOT GLUE AND STRING | Brittany Pino
 How to make a Bohemian Tent
 SEE HOW I Turned Shower Curtains into a Headboard! DIY shower curtain headboard
 DIY- PVC pipe canopy decor , diy- Picnic Decor Diy- Haldi/Mayoun Decor
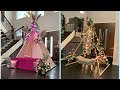 DIY - How to make Cheap Wooden Tent DIY - Wooden Tent Decor DIY -Outdoor Mehndi & Sangeet Decor
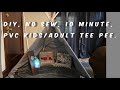 How to make easy PVC tee-pee/fort! (No sewing involved)
 SUPER EASY DIY TEEPEE TENT TUTORIAL- NO SEW~ NO TOOLS!
 3 DIY CANOPY Ideas | 2 BOHO Style Living Room MAKEOVER | Bed Canopy