- Популярные видео
- Авто
- Видео-блоги
- ДТП, аварии
- Для маленьких
- Еда, напитки
- Животные
- Закон и право
- Знаменитости
- Игры
- Искусство
- Комедии
- Красота, мода
- Кулинария, рецепты
- Люди
- Мото
- Музыка
- Мультфильмы
- Наука, технологии
- Новости
- Образование
- Политика
- Праздники
- Приколы
- Природа
- Происшествия
- Путешествия
- Развлечения
- Ржач
- Семья
- Сериалы
- Спорт
- Стиль жизни
- ТВ передачи
- Танцы
- Технологии
- Товары
- Ужасы
- Фильмы
- Шоу-бизнес
- Юмор
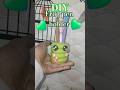
DIY keychain 🙋♀️🙋♀️.#diy #shorts #viralshort.
🔑 Clay Keychain – Easy DIY Guide
Making a clay keychain is simple, fun, and perfect for beginners.
🧱 Best Clay to Use
Air-dry clay – No baking needed, just let it dry 24–48 hrs.
Polymer clay – Bake in a home oven (stronger and more durable).
🛠 Materials Needed
Clay
Rolling pin
Toothpick or skewer
Small cutter/knife
Keychain ring
Acrylic paints
Clear varnish or sealant
Jump ring (small metal ring)
👣 Step-by-Step Instructions
1️⃣ Shape Your Design
Roll out clay about 0.5 cm thick. Cut into shapes like:
Heart ❤️
Star ⭐
Letter initials
Mini animal
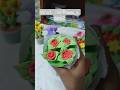
Flower
2️⃣ Make the Hole
Use a toothpick to make a hole near the top (don’t place it too close to the edge).
3️⃣ Dry or Bake
Air-dry clay: Let dry 24–48 hours.
Polymer clay: Bake according to package instructions (usually 110–130°C for 15–30 minutes).
4️⃣ Paint & Decorate
Once dry, paint with acrylic colors. Add glitter or small details.
5️⃣ Seal
Apply clear varnish for shine and durability.
6️⃣ Attach Hardware
Insert a jump ring through the hole and connect it to the keychain ring.
💡 Cute Clay Keychain Ideas
Name initial with small flower
Cartoon face
Tiny fruit (strawberry, lemon)
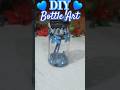
Mini donut
Zodiac sign symbol
If you'd like, tell me:
🎨 What design you want
👶 Is it for kids or adults?
🎁 Is it for a gift or to sell?
I can give you a custom step-by-step design idea!
Видео DIY keychain 🙋♀️🙋♀️.#diy #shorts #viralshort. канала Nohas world
Making a clay keychain is simple, fun, and perfect for beginners.
🧱 Best Clay to Use
Air-dry clay – No baking needed, just let it dry 24–48 hrs.
Polymer clay – Bake in a home oven (stronger and more durable).
🛠 Materials Needed
Clay
Rolling pin
Toothpick or skewer
Small cutter/knife
Keychain ring
Acrylic paints
Clear varnish or sealant
Jump ring (small metal ring)
👣 Step-by-Step Instructions
1️⃣ Shape Your Design
Roll out clay about 0.5 cm thick. Cut into shapes like:
Heart ❤️
Star ⭐
Letter initials
Mini animal
Flower
2️⃣ Make the Hole
Use a toothpick to make a hole near the top (don’t place it too close to the edge).
3️⃣ Dry or Bake
Air-dry clay: Let dry 24–48 hours.
Polymer clay: Bake according to package instructions (usually 110–130°C for 15–30 minutes).
4️⃣ Paint & Decorate
Once dry, paint with acrylic colors. Add glitter or small details.
5️⃣ Seal
Apply clear varnish for shine and durability.
6️⃣ Attach Hardware
Insert a jump ring through the hole and connect it to the keychain ring.
💡 Cute Clay Keychain Ideas
Name initial with small flower
Cartoon face
Tiny fruit (strawberry, lemon)
Mini donut
Zodiac sign symbol
If you'd like, tell me:
🎨 What design you want
👶 Is it for kids or adults?
🎁 Is it for a gift or to sell?
I can give you a custom step-by-step design idea!
Видео DIY keychain 🙋♀️🙋♀️.#diy #shorts #viralshort. канала Nohas world
Комментарии отсутствуют
Информация о видео
17 февраля 2026 г. 15:20:21
00:00:37
Другие видео канала