#128 Nextion and Arduino Timing and Control Part 1
There is an error in this video if you want to add hours to the timer. You need to add a 3rd variable (va2) and change the code on the start button to:
va0.val=hour.val*3600
va2.val+=min.val*60
va0.val+=va2.val
va0.val+=sec.val
covx va0.val,va1.txt,8,0
prints va1.txt,8
When I compute the minutes in the video I use --- "va0.val+=min.val*60"
This statement adds va0.val to the min.val and then multiplies by 60 instead of multiplying the min.val by 60 and then adding the value.
You can not put parentheses around the formula like the va0.val+=(min.val*60) you will need to add a variable va2 as an integer then add va2.val=min.val*60 then on the next line add va0.val+=va2.val.
I hope that makes sense. I had no idea that the Nextion treated += like that. I learned this based on a comment. Thanks, OB Steve! I usually go through the math but I got a little too careless on this one.
This video covers setting up a timer on the Nextion. Sending the value to the Arduino. Then turning on an LED for the configured amount of time.
If you enjoy the content considering donating a cup of coffee at https://ko-fi.com/cheapcontrols
You can sort and find videos better on at www.cheapcontrols.com
I have started a group on Facebook to make it easier to interact with user-requested videos. Consider looking it up. https://www.facebook.com/pg/cheapcontrols/groups/?ref=page_internal
Видео #128 Nextion and Arduino Timing and Control Part 1 канала Cheap Controls
Показать
Комментарии отсутствуют
Информация о видео
Другие видео канала
 #117 Nextion Internal Real Time Clock RTC
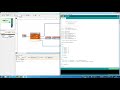 Nextion Adding Buttons and Moving Values
 #116 IN-Depth Nextion Arduino Control of heaters(LEDS) with Feedback Tutorial
 Arduino návody | LCD displej Nextion 2.8"
 Understanding Serial Protocols
 Pressure Sensor - Arduino
 Arduino Visual Programming, with XOD.io
 Timer Interrupt ISR + Examples | Arduino101 | Set Registers & Modes
 Contrôler HOME ASSISTANT avec un Écran Tactile
 159 Drawing on a Nextion Display. Little more advanced at the 9 minute mark
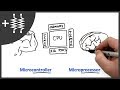 Arduino vs. Raspberry Pi - Which is best? | AddOhms #7
 1-WIRE DS18B20 TEMPERATURE SENSOR - Arduino tutorial #6
 Nextion touch TFT display examples | Digital power supply - part 1
 #62 Nextion Display - Timers Tutorial - no nextion.h library tutorial
 DIY Weather Station & WiFi Sensor Station || ESP8266, Nextion LCD
 Huge Nextion Touchscreen Display Examples | Video | Gauges | RTC
 Урок 17 Блоки Часов реального времени в программе Flprog
 Flprog и Nextion - Разгон до первой космической
 How to Make One Button Have the Functionality of Two or More with Arduino
 NEXTION Tutorial #1 - Der Editor und seine Elemente (Grundlagen)