Build Your First PyQt6 App with VS Code | Step-by-Step Python GUI Tutorial for Beginners
📄 Description:
Welcome to my Python GUI tutorial! 👋 In this video, you'll learn how to build your first PyQt6 application from scratch using VS Code. We'll set up everything together, from creating a virtual environment to writing the full Python code for a simple greeting app. Perfect for beginners looking to dive into PyQt6 and start building powerful desktop apps!
➔ What You'll Learn:
1. Setting up your workspace:
- Open VS Code.
- Go to the File menu ➔ Add Folder to Workspace...
- Create a new folder and name it: AI_PyQt6_App.
- Open this folder in your workspace.
2. Setting up the virtual environment:
- Open the Terminal menu ➔ New Terminal.
- In the Terminal panel, choose Git Bash (or your preferred terminal).
- Type the following command to create a virtual environment:
💻 Windows:
python -m venv .venv_AI
💻MacOS/Linux:
python3 -m venv .venv_AI
- To activate your virtual environment:
source .venv_AI/Scripts/activate
3. Install PyQt6:
- First, upgrade pip:
python -m pip install --upgrade pip
- Then install PyQt6:
pip install PyQt6
4. Check installed modules:
- To verify your environment is set up correctly:
pip list
🚀 Build a Simple Greeting App:
Now let's write a PyQt6 app that greets the user by their name! We'll create a form with:
- A text input field (name_input)
- A "Greet" button (greet_button)
- A label (greeting_label) to display the greeting.
💻 Full Python Script:
from PyQt6.QtWidgets import QApplication, QWidget, QLabel, QPushButton, QVBoxLayout, QLineEdit
import sys
def greet():
name = name_input.text()
greeting_label.setText(f"Hello, {name}!")
app = QApplication(sys.argv)
window = QWidget()
window.setWindowTitle("My First PyQt6 App")
# Widgets
name_input = QLineEdit()
name_input.setPlaceholderText("Enter your name")
greet_button = QPushButton("Greet")
greet_button.clicked.connect(greet)
greeting_label = QLabel("")
# Layout
layout = QVBoxLayout()
layout.addWidget(name_input)
layout.addWidget(greet_button)
layout.addWidget(greeting_label)
window.setLayout(layout)
window.show()
sys.exit(app.exec())
➔ Pro Tips:
Make sure your .venv_AI environment is activated every time you work on the project.
PyQt6 allows you to build professional desktop applications with Python—this is just the beginning!
➔ Don't forget to LIKE, COMMENT, and SUBSCRIBE for more awesome Python tutorials! 🚀
#python #PyQt6 #VSCode #PythonTutorial #GUI #Beginners #Coding #Programming
Видео Build Your First PyQt6 App with VS Code | Step-by-Step Python GUI Tutorial for Beginners канала Sek Socheat
Комментарии отсутствуют
Информация о видео
21 ч. 13 мин. назад
00:34:22
Другие видео канала
 November 19, 2017: International Student Friendship Football match between Cambodia and Tanzania
 កម្មវិធីជួបជុំពិសារអាហារថ្ងៃត្រង់ របស់និស្សិតខ្មែរនៅក្រុងវូហាន ថ្ងៃចូលឆ្នាំខ្មែរ ឆ្នាំច ព.ស ២៥៦២
 យុទ្ធសាស្ត្រកសាងវប្បធម៌នយោបាយ ដើម្បីធានាដល់និរន្តរភាពរបស់គណបក្សនយោបាយនៅកម្ពុជា
 ភាពខុសគ្នារវាងផ្នត់គំនិតរីកចម្រើន និងផ្នត់គំនិតមិនរីកចម្រើនរបស់មេដឹកនាំនយោបាយ និងប្រទេសជាតិ
 Setting Up a Virtual Environment for Your Python Project: Step-by-Step Guide via CMD Line
 ដំណើរចុះពីកំពូលប្រាសាទអង្គរវត្ត
 សកម្មភាពយុវជនហ៊្វុនស៊ិនប៉ិច
 ថ្នាក់ដឹកនាំគណបក្សហ៊្វុនស៊ិនប៉ិចអញ្ជើញគោរពវិញ្ញាណខន្តសម្ដេច ជា ស៊ីម
 កម្មវិធីជួបជុំនិស្សិតខ្មែរ នៅទីក្រុងវូហាន ប្រារព្ធបុណ្យចូលឆ្នាំថ្មី ឆ្នាំច ព.ស ២៥៦២ គ.ស ២០១៨
 516 Samuth រាត្រីនៅបាត់ដំបង YouTubevia torchbrowser com
 ហាត់លេងកីឡាវាយកូនបាល់លើតុរវាងលោក សុក ដាណា (Sok Dana) និងលោក ប៊ុន ពិសិដ្ឋ (Bun Piseth)
 International Students of Cambodia - Loas (Friendship Football Match) in HUST, China - 3rd Video
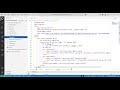 Web Application of User Management using Python + Flask + MySQL + HTML + CSS + JS
 ហាត់លេងកីឡាវាយកូនបាល់លើតុរវាងលោក យីវ សុលក្សណ៍ (Yiv Soleak) និងលោក សេក សុជាតិ (Sek Socheat)
 អាគារចក្រវាឡ៍ចម្លែកនៅភ្នំពេញ
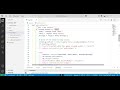 App Flask Development
 ការប្រកួតបាល់ទាត់មិត្តភាពរវាងនិស្សិតកម្ពុជា vs និស្សិតវៀតណាម នៅទីក្រុងវូហាន ប្រទេសចិន
 ការងារមនុស្សធម៌ចែកទឹកសុទ្ធ
 International Students of Cambodia - Loas (Friendship Football Match) in HUST, China - 4th Video
 សកម្មភាពមនុស្សធម៌របស់យុវជន