Step-by-Step Guide to Measuring Your Countertop for Remodeling
From Granite & Marble Specialties, here’s a step-by-step guide to properly measuring your kitchen or bathroom countertops for remodeling. Regardless of what material you're considering (granite, wood, marble, or quartz), you'll need to provide your material supplier and installer an accurate measurement in order to get the most accurate quote.
Tools you'll need before you begin:
- Paper
- Pencil or Pen
- Tape Measure (in inches)
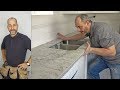
First, create a rough sketch of your room's layout. You'll want to label all appliances, fixtures, or ledges that might get in the way once installation is performed. The shape of the room is important, as are the shapes of the countertops. The most common shapes are L-shapes, U-shapes, or galley style countertops. Be sure to label and measure the island as well.
Then, box out each section and number them for future reference. This will help your installer keep track of each piece of material they'll need to cut.
Second, when you actually measure your countertops, don't measure from the backsplash. It needs to be measured separately. Start from the wall and measure to the outer edge of your countertops. Get as close as you can to the nearest 1/8 inch. This will give you the measurement for the width. Do this for each section of your kitchen, as some older homes have irregularly-shaped or misshapen countertops.
To measure the length, start from the far edge and measure to the nearest other edge. If you're measuring at an L-shape, measure to the nearest seam or section of the countertop.
To measure the backsplash, measure from corner to corner. If you have a full backsplash, measure from the beginning of the counter to the underside of the cabinets. Standard 4-inch backsplashes should be measured from corner to corner.
Islands are a separate measurement entirely. Though it's the same method as before, you need to measure for the overhang in the seating area. If you have a curved island, find the center of the curve and make a square in your drawing. This will let the installer know where to form the curve.
Third, calculate the square footage based on your measurements. Multiply length by width for each piece, and then add those together for the total amount. Next, convert them to square feet. Take the total number of inches and divide by 144 (12x12=144).
Be sure to check your work and ensure your measurements are as accurate as possible. Though your sketch doesn't have to be perfect, being as detailed as possible will help avoid headaches until the installer comes and takes measurements themselves.
Check out the accompanying blog post for more detailed information and images!
Visit Granite & Marble Specialties online: http://granitemarblewa.com/
On Facebook: https://www.facebook.com/pages/Granite-Marble-Specialties/
Google Plus: https://plus.google.com/100725268627969451386/about
Pinterest: https://www.pinterest.com/gmspecialties/
Yelp: http://www.yelp.com/biz/granite-and-marble-specialties-kent-2
Houzz: http://www.houzz.com/ideabooks/users/granitemarblespecialties
Instagram: https://instagram.com/granite_countertop_seattle/
Subscribe on YouTube: https://www.youtube.com/channel/UCN_VO-pKblTuEIH8i1WUGCw
Видео Step-by-Step Guide to Measuring Your Countertop for Remodeling канала Granite & Marble Specialties
Tools you'll need before you begin:
- Paper
- Pencil or Pen
- Tape Measure (in inches)
First, create a rough sketch of your room's layout. You'll want to label all appliances, fixtures, or ledges that might get in the way once installation is performed. The shape of the room is important, as are the shapes of the countertops. The most common shapes are L-shapes, U-shapes, or galley style countertops. Be sure to label and measure the island as well.
Then, box out each section and number them for future reference. This will help your installer keep track of each piece of material they'll need to cut.
Second, when you actually measure your countertops, don't measure from the backsplash. It needs to be measured separately. Start from the wall and measure to the outer edge of your countertops. Get as close as you can to the nearest 1/8 inch. This will give you the measurement for the width. Do this for each section of your kitchen, as some older homes have irregularly-shaped or misshapen countertops.
To measure the length, start from the far edge and measure to the nearest other edge. If you're measuring at an L-shape, measure to the nearest seam or section of the countertop.
To measure the backsplash, measure from corner to corner. If you have a full backsplash, measure from the beginning of the counter to the underside of the cabinets. Standard 4-inch backsplashes should be measured from corner to corner.
Islands are a separate measurement entirely. Though it's the same method as before, you need to measure for the overhang in the seating area. If you have a curved island, find the center of the curve and make a square in your drawing. This will let the installer know where to form the curve.
Third, calculate the square footage based on your measurements. Multiply length by width for each piece, and then add those together for the total amount. Next, convert them to square feet. Take the total number of inches and divide by 144 (12x12=144).
Be sure to check your work and ensure your measurements are as accurate as possible. Though your sketch doesn't have to be perfect, being as detailed as possible will help avoid headaches until the installer comes and takes measurements themselves.
Check out the accompanying blog post for more detailed information and images!
Visit Granite & Marble Specialties online: http://granitemarblewa.com/
On Facebook: https://www.facebook.com/pages/Granite-Marble-Specialties/
Google Plus: https://plus.google.com/100725268627969451386/about
Pinterest: https://www.pinterest.com/gmspecialties/
Yelp: http://www.yelp.com/biz/granite-and-marble-specialties-kent-2
Houzz: http://www.houzz.com/ideabooks/users/granitemarblespecialties
Instagram: https://instagram.com/granite_countertop_seattle/
Subscribe on YouTube: https://www.youtube.com/channel/UCN_VO-pKblTuEIH8i1WUGCw
Видео Step-by-Step Guide to Measuring Your Countertop for Remodeling канала Granite & Marble Specialties
Показать
Комментарии отсутствуют
Информация о видео
10 апреля 2015 г. 0:40:20
00:06:20
Другие видео канала
 How to Update Your Old Counter tops to Quartz
 How To Seal Your Granite Countertop
 Before you buy Cambria Quartz in 2021 - What You Need to Know
 Post form Laminate Countertops
 KINRAZ- A Basic Size Kitchen Cabinet Wall Layout
 Spray on Countertops | Stone Coat Epoxy
 How to Measure Your Kitchen Cabinets
 Quartz vs. Granite Countertops: An Easy Guide to Understanding the Difference
 DIY How to Paint Your Kitchen Cabinets A to Z
 Stain & Burn Test: Quartz vs Granite vs Marble - with Anatolia Granite & Marble in Knoxville, TN
 Make a Perfect 45 Degree/Miter Cut in a Laminate Countertop
 How to Clean Granite Countertops
 How to Measure Countertops In Square Feet: Stone Countertop Measurements
 Use Epoxy To Coat Existing Countertops To Make Them Look Like Real Stone Step By Step Explained
 The Granite Vs Quartz Question
 How to Install Laminate Countertops
 Quartz vs Granite vs Marble: How to choose the right countertop
 How To Install Butcher Block Countertops | DIY Kitchen Remodel
 Flexijet - Measuring a kitchen for countertops
 How To Install Laminate Countertops | Step By Step