- Популярные видео
- Авто
- Видео-блоги
- ДТП, аварии
- Для маленьких
- Еда, напитки
- Животные
- Закон и право
- Знаменитости
- Игры
- Искусство
- Комедии
- Красота, мода
- Кулинария, рецепты
- Люди
- Мото
- Музыка
- Мультфильмы
- Наука, технологии
- Новости
- Образование
- Политика
- Праздники
- Приколы
- Природа
- Происшествия
- Путешествия
- Развлечения
- Ржач
- Семья
- Сериалы
- Спорт
- Стиль жизни
- ТВ передачи
- Танцы
- Технологии
- Товары
- Ужасы
- Фильмы
- Шоу-бизнес
- Юмор
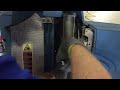
How To Assemble the 403Z Shroud Assembly
Learn how to assemble the 403Z shroud assembly using disposable mixers, O‑rings, and nozzles.
This video provides a step-by-step overview of shroud assembly for the 403Z dispensing gun, including correct component orientation and assembly order from back to front. Designed for operators, maintenance teams, and engineers working with the HG Adhesive Dispensing 403Z applicator, this guide also highlights best practices to help prevent leaks, reduce wear, and promote reliable dispensing performance.
What you’ll learn in this video:
* Overview of the 403Z shroud assembly components
* How to install disposable mixers correctly
* Proper placement and orientation of O-rings
* Correct nozzle installation and alignment
* Assembly order from back to front
* Best practices for reliable dispensing performance
Timestamps
0:00 403Z Shroud & Disposable Parts Overview
0:30 Step-By-Step Component Installion & Setup
1:14 403Z Shroud Assembly from Back to Front
Why proper shroud assembly matters
Correct assembly of the 403Z shroud ensures proper sealing, prevents material leakage, and supports accurate mixing of two-component adhesives. Proper installation can also help extend the life of disposable components and ensure long-lasting, dependable performance in industrial dispensing applications.
Need more support with your dispensing system or application setup?
Contact our team for expert support and recommendations:
https://go.appliedproducts.com/contact-us?utm_source=youtube&utm_medium=referral&utm_campaign=403Z+Shroud+Assembly+Overview
#HGadhesivedispensing #2Kadhesivedispensing #403Zshroud #shroudassembly
Видео How To Assemble the 403Z Shroud Assembly канала APPLIED Adhesives
Комментарии отсутствуют
Информация о видео
17 апреля 2026 г. 21:05:07
00:01:56
Другие видео канала