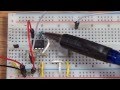
Arduino Uno Tachometer RPM using 3144 Hall Effect Sensor
Here we look at the 3144 hall effect sensor and how it can be used to make a simple tachometer with the Arduino Uno and a 1602 LCD display
Here's the code for the UNO. IMPORTANT - Utube won't let me include angled brackets in the description so when you paste the code into your editor do a find/replace for...
[ANGLED_BRACKET_LESS_THAN] replace with left pointing angled bracket [ANGLED_BRACKET_GREATER_THAN] replace with right pointing angled bracket.
#include [ANGLED_BRACKET_LESS_THAN]LiquidCrystal_I2C.h[ANGLED_BRACKET_GREATER_THAN]
#define DISPLAY_W 16
LiquidCrystal_I2C lcd(0x27,DISPLAY_W,2); // set the LCD address to 0x27 for a 16 chars and 2 line display
//SDA is Analog pin 4 on UNO
//SCL is Analog pin 5 on UNO
float revolutions=0;
int rpm=0; // max value 32,767 16 bit
long startTime=0;
long elapsedTime;
void setup()
{
pinMode(2, INPUT_PULLUP); // set pin to input
lcd.init();
lcd.backlight();
lcd.setCursor(0,0);
lcd.print("RPM :");
}
void loop() {
revolutions=0; rpm=0;
startTime=millis();
attachInterrupt(digitalPinToInterrupt(2),interruptFunction,RISING);
delay(1000);
detachInterrupt(2);
//now let's see how many counts we've had from the hall effect sensor and calc the RPM
elapsedTime=millis()-startTime; //finds the time, should be very close to 1 sec
if(revolutions[ANGLED_BRACKET_GREATER_THAN]0)
{
rpm=(max(1, revolutions) * 60000) / elapsedTime; //calculates rpm
}
lcd.setCursor(0,0);
String outMsg = String("RPM :") + rpm;
fillMessage2DisplayWidth(outMsg);
lcd.print(outMsg);
}
void interruptFunction() //interrupt service routine
{
revolutions++;
}
void fillMessage2DisplayWidth(String & message)
{
if(message.length()[ANGLED_BRACKET_LESS_THAN]DISPLAY_W+1)
{
while(message.length()[ANGLED_BRACKET_LESS_THAN]DISPLAY_W)
{
message+=" ";
}
return;
}
//message is too wide for 1 line of the display, truncate it
message = message.substring(0, DISPLAY_W-1);
}
Видео Arduino Uno Tachometer RPM using 3144 Hall Effect Sensor канала Clockatronic
Показать
Комментарии отсутствуют
Информация о видео
Другие видео канала
 Using a Hall Effect Sensor to Make a Tachometer
 How to Control LCD Displays | Arduino Tutorial
 Hall-Effect Sensor Levitator
 Transistor / MOSFET tutorial
 Hall Effect Sensor Replacement & Installation
 Using the IR Receiver
 OpenJoystick - Hall effect sensor test
 ACS712 Measuring up to 31 Amps solar panel current ADC
 Salvaging Hall Effect Sensors and Neodymium Magnets - Build an RPM-meter
 ACS712 Low-Noise 2100 VRMS Hall-Effect Current Sensor IC
 Electronics 101: The Hall Effect explained
 Power Monitoring System using Arduino and LCD Display
 How to Bench Test Cam, Crank, Speed sensor (Hall effect type)
 B3354 - Rotational-Spead Measurements
 Magnetic Sensor Induction Simulator
 Hall effect sensor tutorial - 3D printer end stops
 Hall Sensor Testing
 Electronic Devices: Hall-Effect.
 RPM / Rev Counter- Frequency Meter with wiring and code + Hall Effect
 Testing CAM or CamShaft Position Sensor Hall Effect Type