- Популярные видео
- Авто
- Видео-блоги
- ДТП, аварии
- Для маленьких
- Еда, напитки
- Животные
- Закон и право
- Знаменитости
- Игры
- Искусство
- Комедии
- Красота, мода
- Кулинария, рецепты
- Люди
- Мото
- Музыка
- Мультфильмы
- Наука, технологии
- Новости
- Образование
- Политика
- Праздники
- Приколы
- Природа
- Происшествия
- Путешествия
- Развлечения
- Ржач
- Семья
- Сериалы
- Спорт
- Стиль жизни
- ТВ передачи
- Танцы
- Технологии
- Товары
- Ужасы
- Фильмы
- Шоу-бизнес
- Юмор
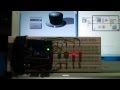
How to make scheduled control of 5 relays with OLED display on ESP32 (Wokwi) with Arduino IoT Cloud?
How to make scheduled control of 5 relays with OLED display connected to ESP32 (Wokwi simulation) using Arduino IoT Cloud?
Here are the steps:
1. Open this wokwi project: https://wokwi.com/projects/396738675898696705
2. Open Arduino IoT Cloud in: https://cloud.arduino.cc, create an account and Sign In.
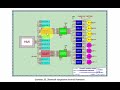
3. Create a Thing, add 5 variables with CloudSchedule type, name them respectively jadwal1, jadwal2, jadwal3, jadwal4, and jadwal5, make access permission: Read & Write, and Update: On change.
4.After adding variables to the Thing, the next step is to connect the Thing to a Device. Select Device: ESP32 Dev Module, save the ID and Secret Key Device. Replace the Device ID and Secret Key code in the Wokwi program with the new ID and Secret Key Device.
5. Create a Dashboard, select the Scheduler widget, set the start time, duration and recurrence time, press the view button (eye image) to run the Dashboard
6. Run the Wokwi simulation. Note that the ON/OFF of the five relays follows the Scheduler widget settings, and the OLED display can show the condition and ON time of the relays.
For further information, please visit this blog: https://bermainwokwi.blogspot.com/p/koneksi-dengan-arduino-iot-cloud.html#tiga
Видео How to make scheduled control of 5 relays with OLED display on ESP32 (Wokwi) with Arduino IoT Cloud? канала dian artanto
Here are the steps:
1. Open this wokwi project: https://wokwi.com/projects/396738675898696705
2. Open Arduino IoT Cloud in: https://cloud.arduino.cc, create an account and Sign In.
3. Create a Thing, add 5 variables with CloudSchedule type, name them respectively jadwal1, jadwal2, jadwal3, jadwal4, and jadwal5, make access permission: Read & Write, and Update: On change.
4.After adding variables to the Thing, the next step is to connect the Thing to a Device. Select Device: ESP32 Dev Module, save the ID and Secret Key Device. Replace the Device ID and Secret Key code in the Wokwi program with the new ID and Secret Key Device.
5. Create a Dashboard, select the Scheduler widget, set the start time, duration and recurrence time, press the view button (eye image) to run the Dashboard
6. Run the Wokwi simulation. Note that the ON/OFF of the five relays follows the Scheduler widget settings, and the OLED display can show the condition and ON time of the relays.
For further information, please visit this blog: https://bermainwokwi.blogspot.com/p/koneksi-dengan-arduino-iot-cloud.html#tiga
Видео How to make scheduled control of 5 relays with OLED display on ESP32 (Wokwi) with Arduino IoT Cloud? канала dian artanto
Комментарии отсутствуют
Информация о видео
3 мая 2024 г. 8:53:21
00:01:00
Другие видео канала