ABB RobotStudio - Simple Tutorial (Create Tool, Pick and Place, etc.)
Thanks for watching. If you liked this video, make sure to subscribe for more!
https://www.youtube.com/romanparak?sub_confirmation=1
The video demonstrates a few simple examples in ABB RobotStudio:
Step 0) Import the designed Gripper (end effector) from Inventor / Solidworks (.sat file) into ABB RobotStudio.
Step 1) Check the workspace and ensure that the robotic tool grabs all objects.
Step 2) Designing the Positioner for Object 1.
Step 3 - 4) Designing the Attacher, Detacher for Object 1 and creating a trajectory for a simple Pick and Place operation.
Step 5) The result of the task with all objects.
Information about the project can be found at (GitHub):
https://github.com/rparak/ABB-RobotStudo-Tutorial-Simple
Contact:
Roman.Parak@outlook.com
Institute of Automation and Computer Science:
http://uai.fme.vutbr.cz
Tags:
#RobotStudio #DigitalTwin #ABB #Industrial #Automation #Robotics #Simulation #Education
Видео ABB RobotStudio - Simple Tutorial (Create Tool, Pick and Place, etc.) канала Roman Parak
Показать
Комментарии отсутствуют
Информация о видео
Другие видео канала
 Tutorial 2 Using ABB library for gripper and targets
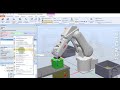 RobotStudio: Actividad pick and place con SmartComponets personalizados.
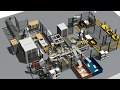 Plasma TV assembly line simulation - RobotStudio
 ABB Tutorial - Multiple Work Objects
 Lab 2 - Creating and Changing Work Object Coordinate Frames
 RobotStudio - Práctica nº 14A: Pick and place mediante objetos inteligentes
 ABB IRB120 Calibration Videos
 ABB RobotStudio : Simple Pick And Place - External Axis Tutorial
 RobotStudio - Pick and Place (Part 1)
 3. Creating a simple program using the pendant
 How to Create Robot System with Positioner in RobotStudio
 RobotStudio Tutorial | Getting Started 3
 ABB ROBOTSTUDIO IRB 140 WELDING
 RobotStudio - Práctica nº 16 Movimiento de objetos mediante componentes inteligentes
 RobotStudio - Signals
 ABB RobotStudio - How to create Mechanism Tool
 RobotStudio Drawing on paper 1 - basic tutorial
 ABB Robot Studio - Tutorial Pick and Place
 RobotStudio Tutorial | Getting Started 1
 Lesson 9 ABB Robot Studio Creating a Tool and Tool Centre Point (TCP)