Risograph Printing Tutorial - VCUarts GOlab
aAn Introduction To Risograph Printing
Falling somewhere between photocopying and screenprinting, the process of risograph printing (or riso) is a simple and economical way for artists and designers to self-publish. The GOlab manages a RISO EZ391 Digital Duplicator and a wide variety of color drums for walk-in or scheduled riso printing appointments.
The risograph is a digital duplicator made specifically for high volume printing. It prints one color at a time, using an emulsion ink made from raw ingredients such as soy oil or rice bran. The original image is sent directly from a PC or scanned by the machine and then burnished into the master sheet using tiny heat spots on a thermal plate. You may then duplicate or print a copy of that image many times from the same master sheet. This process yields a high-quality print, without the time investment required of silkscreening, and provides a more sustainable option for low environmental impact printing.
The risograph is self-operated and requires an appointment, with GOlab staff providing technical support. The GOlab does not provide paper for the risograph, so please remember to bring your own smooth, uncoated paper stock. The max printable area for the riso is fixed at 11 inches by 17 inches, but the machine may accommodate paper sizes up to 12 by 18.
REQUIRED TOOLS:
The riso printing process requires you to bring your own stack of paper. If you are planning to manually scan your black and white originals, as opposed to sending directly from our PC, please bring those as well.
Part 1. Making a Master
Step 1 - Load Paper
Jog your paper to into a very neat stack and load it into the paper tray to the left of the machine. Adjust the guides to fit snugly to the stack and lock them by flipping the lock switch down and to the left. Select the paper feed pressure using the green switch above the paper tray. Normal (to the left) is for standard copy paper. Card (to the right) is reserved for thick or smooth-surface paper.
Step 2 - Load Original
Locate the foolscap marks which correspond to your paper size and then place your original between these marks on the scanner bed. Close the lid.
Step 3 - Select Scanning Level
Select your scanning levels. Most folks are happy with the Auto setting, but if your file is printing too light or dark, feel free to adjust your levels and make a new master.
Step 4 - Select Image Processing Settings
Select your image processing settings. If you are making a print that is made up of only text, we suggest selecting “LINE”. If it is an image based print, we suggest “PHOTO”. You may also select both options at the same time, if your file has both. If you are making a print from a file illustrated with clear pencil or pen marks, you may want to use the “PENCIL” setting.
Step 5 - Dot Processing
If you are printing on “PHOTO” mode and would like your image to be processed with dot screening (or a halftone pattern), you may select “FINE” or “COARSE” in the dot processing settings. The “COARSE” setting is equivalent to 53 lines per inch, whereas the “FINE” setting registers at about 106 lpi.
Step 6 - Idling
MAKE SURE IDLING IS TURNED ON! Idling action prevents the machine from printing the first several copies with faint ink after the Print Drum (Cylinder) has been exchanged or the machine has not been used for an extended period of time. Idling action before the master-making process assures consistent print quality from the start.
The riso should be in “Mastermaking” mode. Press start to make your first proof.
Part 2. Printing
Step 1 - Adjusting Settings
Check your first master. If the machine jams, locate the “Print Speed” setting and reduce the speed. If the ink is too dense or light on the page, you may adjust this in the “Print Density” setting. If you need to adjust the vertical position of the page, you may do this using the “Print Position” setting to shift the position of your print up or down by 0.5 mm on the page.
Step 2 - Making Copies
If all looks well, enter the number of copies you would like to make and press Start. To avoid jams, we suggest printing in shifts of 10 copies.
Part 3. Finishing Tips
Step 1. Dry Times
Collect all of your copies and lay them on the drying rack for 2 hours. Because riso ink is emulsion ink made from raw materials, it never truly dries. If you run your copies through the machine too quickly after printing your first layer, the existing ink may smudge and imprint on the roller. The roller could then streak your prints in an unsightly pattern. Please wait 2 hours between layers, including double sided.
Step 2. Cleaning Up Prints
Riso printing is characteristically unique. Each print will have its own quirks. After you have printed all of your colors and layers, you may try to remove any small marks, streaks, smudges, or imperfections in your print by meticulously using a white eraser.
Видео Risograph Printing Tutorial - VCUarts GOlab канала VCU GOLAB
Показать
Комментарии отсутствуют
Информация о видео
Другие видео канала
 ALL ABOUT RISO | olivia and pindot | risograph
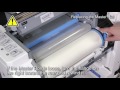 RISO SF Instruction of Replacing the Master Roll <RISO>
 Digital Colouring and Prepress for Risograph Printing
 clothes/T-shirt/fabric silicone ink Embossing Process, silicone embossing Machine Operation Tutorial
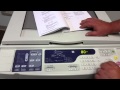 User Code Set up
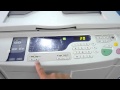 Duplicadora Digital - RISO RZ 230 - VENTA
 What makes Risograph printing so unique? An interview with Perfectly Acceptable Press.
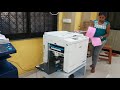 Riso SF9350
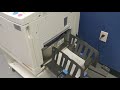 Riso Duplicator Double Sided Copies
 NO Photoshop Risograph Zine Tutorial | olivia and pindot
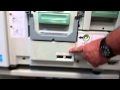 Supply Replacement and Paper Jam Clearing
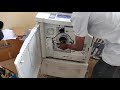 How to fix riso rz,ez image quality
 Made a ZINE in 24 hours on RISO printing ~ Frannerd
 RISO ComColor GD Instruction of Loading Paper in the Standard Tray <RISO>
 #Printing #Press #Riso SF5330 #Digital #Duplicator #Unboxing #Demo in Hindi #offset Machine
 Risographie Tutorial
 How to operate Risograph Machine for Printing Modules | Step by Step TUTORIAL | COPYLANDIA Corp.
 Getting Started in Screen Printing. How it Works and What You Need!
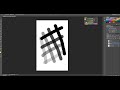 Risograph Tutorial - Photoshop separations
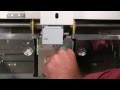 RISO Printer How To Adjust The Standard Feed Tray Separator