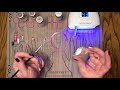
Nail Art Stamping Kit from GelMoment
Learn how to use the Nail Art Stamping Kit from GelMoment. Purchase this Kit on your Distributor’s website while supplies last.
Video provided by Independent GelMoment Distributor, Naomi Denu.
Stamping Instructions:
1. Start with your nails already polished and cured using GelMoment products.
2. Remove the blue protective film on the Stamping Plate before using.
3. Select a design that you would like to transfer from a Stamping Plate to your nail.
4. Select the Stamping Gel colour you would like to use for your design.
5. Apply a thin strip/line of Stamping Gel along the short edge of the chosen design.
6. Use the Scraper at a 45-degree angle to pull the Stamping Gel across the
design. Repeat this step to remove any excess Stamping Gel, until the design
can be clearly seen on the Stamping Plate.
7. To capture the design, roll the soft end of the stamper over the chosen design
on the plate. Start from one side of the plate and roll the stamper over it to the
other side. The stamping gel design should be clearly visible on the silicone
Stamper head.
8. To transfer the design, roll the stamper over your painted nail in the desired
location. Move the Stamper from one side of the nail to the other pressing firm
enough to transfer the design, but not too firmly to smudge it. Lift the Stamper
away from the nail and ensure the design is positioned on the nail as desired.
Use GelMoment Cleansers to wipe off any corrections before curing.
9. Cure your completed design under a GelMoment LED Lamp. For an extra
layer of protection, apply one coat of Clearly Frisky Gel Polish over the design
and cure again.
Cleaning Instructions:
• To clean the Stamping Plates, use a GelMoment Remover Pad.
• To clean the Stamper, simply use a generic sticky tape to remove any Stamping
Gel from the silicone heads.
• Using remover pads, cleansers or any other products on the Stamper may
damage the integrity of the silicone.
Видео Nail Art Stamping Kit from GelMoment канала gelmoment
Показать
Комментарии отсутствуют
Информация о видео
Другие видео канала
 Create a Waterfall Nail art Accent Nail with GelMoment
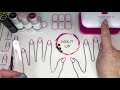 Love Wins! Valentine's Day Tic Tac Toe Nail Art Design Tutorial Using GelMoment Gel Polish
 April 2022 Mid Month Recap
 GelMoment Testimonial
 Gelmoment poudre perlée vidéo d'application
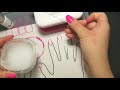 DIY Foam Bubble Effect Nail Art Tutorial with GelMoment DIY Gel Polish System
 March 2022 Mid Month Recap
 GelMoment Incentive Trip: Amalia's Retreat
 Robin's Egg DIY Nail Art Tutorial with Gel Polish from GelMoment
 Frolic In Fiji
 Optimum Foot File& Buffer From GelMoment
 GelMoment Color of the Month: "Beauty Queen" DIY Gel Nail Polish
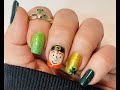 Leprechaun Nail Art by Jamie Leigh
 Introducing GelMoment BodySpa Coffee Scrubs
 Create Your Own Flower Bouquet Nail art Design with GelMoment
 Daydreamer
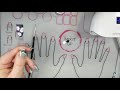 Peony Nail Art Tutorial with GelMoment DIY Gel Polish System
 Spring Bunny Nail Art Design with GelMoment Gel Polish
 Create Your Own Puzzle Pieces Nail Art with GelMoment DIY Gel
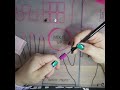 Create "Pop Art" Style Nail art with GelMoment Gel Polish