Quick Tip: Convert Flattened Artwork into Layers in Procreate
At some point in Procreate, most of us have experienced the frustration when we realize we painted more than we should have on the same layer. This is especially painful when you’d like to put an element behind one and in front of the other. If this is final artwork, then redrawing would be required to maintain line quality, but if you’re trying out some ideas, there’s a quick way to convert that flattened artwork into layers that I wanted to share.
This tip works best for solid colored artwork (vs. gradients/shading) and it’s a process you can easily adapt for replicating elements, too!
Looking for more Procreate tutorials + freebies?!
👉 Head to my site: https://every-tuesday.com
👉 Free Procreate brushes + swatches: https://every-tuesday.com/resource-library
🎓 New to Procreate? Take my free course, Procreate 5X for Beginners here: https://learn.every-tuesday.com/procreate-for-beginners/
🎨More Procreate projects like this one: https://www.youtube.com/playlist?list=PLOaLExfvXZWLjxrfEIDoZQoVMlO_9ZOFV
---------------------------------------------------------------
CREATE THIS PROJECT WITH:
✅ Signature Brush (free when you become an email subscriber): https://every-tuesday.com/resource-library
✅ Color Palette (free): https://every-tuesday.com/flattened-color
---------------------------------------------------------------
TECH STUFF + ACCESSORIES I USE
✨ This artwork was created on a 5th gen iPad Pro (12.9”, 256GB) with a 2nd gen Apple Pencil using the Procreate app (v.5.2.6)
✨ I use the Paperlike screen protector on my iPad Pro, as well as their pencil grips. More info here: https://every-tuesday.com/paperlike
✨ When not in use, I keep my Apple Pencil in the NimbleStand: https://every-tuesday.com/stand
✨I recommend any iPad listed here for working in Procreate: https://every-tuesday.com/ipads as they all allow for pressure sensitivity. I only recommend an Apple Pencil because of its reliability compared to other 3rd party styluses
---------------------------------------------------------------
CHAPTERS:
00:00 Intro + Palette
00:25 Foliage and Details
01:55 Automatic Selection Tool
03:30 Copy and Paste
06:15 Organize Multiple Layers
---------------------------------------------------------------
LET’S CONNECT!
👉 Website: https://every-tuesday.com
👉 Instagram: https://instagram.com/everytuesday
(Use #procreateit to tag your work!)
---------------------------------------------------------------
Видео Quick Tip: Convert Flattened Artwork into Layers in Procreate канала Every Tuesday
Показать
Комментарии отсутствуют
Информация о видео
Другие видео канала
 10 Easy Script Lettering Styles for Beginners + FREE Cheat Sheet!
 How to Make a Watercolor Logo in Procreate
 Easy Painted Flowers in Procreate
 Simple Flower Doodles with Messy Watercolor in Procreate
 Testing Patterns in Procreate: Make Seamless Patterns in HALF THE TIME 😱
 EYE CATCHING Radiant Leaf in Procreate | PROCREATE FOR BEGINNERS
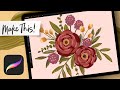 Messy Gouache Flowers in Procreate | PROCREATE FOR BEGINNERS
 Paint Flat Style Florals for Birthday Stationery in Procreate | ADVANCED PROCREATE TUTORIAL
 Loose and Messy Watercolor Florals in Procreate | ADVANCED PROCREATE TUTORIAL
 Draw a Flat Floral Frame in Procreate | INTERMEDIATE PROCREATE TUTORIAL
 Easy iPad Wallpaper with Calendar in Procreate | PROCREATE FOR BEGINNERS
 New Year's Firework Animation in Procreate ✨
 Paint a Winter Gouache Bouquet in Procreate | ADVANCE PROCREATE TUTORIAL
 Seamless Holiday Lights Pattern in Procreate | INTERMEDIATE PROCREATE TUTORIAL
![Flat Florals in Procreate [Course Trailer]](https://i.ytimg.com/vi/kisR4E2RF0M/default.jpg) Flat Florals in Procreate [Course Trailer]
Flat Florals in Procreate [Course Trailer] Spooky Skull Animation in Procreate | INTERMEDIATE PROCREATE TUTORIAL
 Paint a REUSABLE Sketchy Fall Bouquet in Procreate | INTERMEDIATE PROCREATE TUTORIAL
 Easy Peeling Paper Effect in Procreate
 3 Easy Floral Envelope Designs Anyone Can Make in Procreate
 Procreate Animation for Beginners - How to Create a Birthday Sparkler