Welding in the Quarter Panel - Mazda MX5 Miata Rust Repair Pt. 5 - Underdog Garage
Today we are installing and welding in the quarter panel on our 2003 Mazda MX-5 Miata. We are getting closer and closer to the end of this rocker panel repair. This quarter panel came out really well. I made some mistakes and definitely struggled, but I hope you enjoy the repair footage and find it useful.
First I placed the replacement quarter panel on the car and marked up where I wanted to cut it exactly. I cut and trimmed the quarter panel to fit right where it needed to go. Then I started prepping the MX5 body for welding by sanding back the paint on the quarter panel. This would give me clean metal to weld to. I also drilled spot weld holes all along the bottom of the panel and inside the wheel arch. Once the panel was completely ready for install, I prepped my welder and set it for welding 20 gauge metal. I clamped the quarter panel in position, and I started placing tack welds working from the top down. the tack welds allow me to weld on the thin metal without risking heat warpage.
between 3 and 4 tacks I would cool the panel with an air gun and keep filling in the gaps. This is also know as stitch welding. Once the top edge of the quarter panel was tacked in, I started focusing on the door jam and the wheel arch. I'd fill in the plug welds and work my way down to the underside of the rocker panel. After I had completed welded in every section of the quarter panel, I ground down the beads smooth. Betty, our MX5 Miata, was now ready for the body filler stage and almost ready for primer.
I found the biggest thing I had to focus on with the quarter panel install was the fitment. I needed to really make sure the replacement panel lined up perfectly with the door jam. I get the panel fitted as best as possible. That way the body work is easier and I can really get the panel looking super clean.
The welding was pretty tricky. I had a lot of trouble welding the plug welds on the underside. Overall I think it came out pretty great. All I have to do now is grind the material back and the quarter panel will be ready for body work.
Hang out with us on social!
Instagram:
https://www.instagram.com/underdoggarage/
Facebook:
https://www.facebook.com/UnderdogGarage/
Disclaimer: All videos are intended for basic information. Underdog Garage is not liable or responsible for any damage caused as a result of information in the video above
Видео Welding in the Quarter Panel - Mazda MX5 Miata Rust Repair Pt. 5 - Underdog Garage канала Underdog Garage
Показать
Комментарии отсутствуют
Информация о видео
Другие видео канала
 Quarter Panel Body Repair - Mazda MX5 Miata Rust Repair Pt. 6 - Underdog Garage
 Project MX-5: Saving My Rusted Miata From Certain Death
 Honda Civic EG Rear Quarter + Rocker Panel Rust Repair - Slideshow
 MX5 Sill and arch repair - How to guide - Miata - Part 1
 Replacing The Side Skirt On The NA Miata
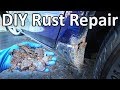 How to Repair Rust on Your Car Without Welding (No Special Tools Needed)
 Butt Welding Automotive Patch Panels - Start to Finish
 MX5 Sill drains and Meister R Suspension - Whats going on in the workshop 38
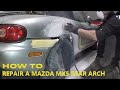 How to repair a Mazda MX5 Rear Arch and Sill Section
 Mazda MX5 Miata Chassis Rail Repair Pt. 1 - Rail Removal - Underdog Garage
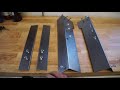 Mazda MX5 Front Chassis rail rust - Buyers guide and how to repair
 Spot Weld Removal - Mazda MX5 Miata Rust Repair Pt.1
 whats going on in the workshop 34 - Serious Mk1 MX5 Sill repairs
 MX5 Sill and arch repair - How to guide - Miata - Part 2
 DIY Miata MX-5 Rust & Dent Restoration + Complete Car Respray!
 Mazda MX-5 Fender Wing Removal
 How To Fix and Prevent MX5 Miata Fender Rust | The ULTIMATE Guide
 How to Remove a Mazda MX5 Rear Wheel Arch and Sill - Lots of Hidden Rust
 Miata Panel Replacement Pt. 1
 How Body Shops Fix Rust Holes: MIG Welder, Lap Welds, Bondo