How to Install Handrail and Stair Spindles (Staircase Renovation Ep 4)
I didn't understand how to install handrails and stair spindles, so I hired a professional to coach me through it. Doug Watson from Country Lane Woodshop (http://www.countrylanewoodshop.ca) has a lot of experience with this and you will see how we installed the handrail. After some coaching from Doug, I continued with the work to install the stair spindles.
The installation of the old handrails was done by the builder of our house about 15 years ago. The installer fastened the top end of the angled handrails by drilling a hole in from the top surface and countersinking a screw, before inserting a wooden plug to hide the hole as best as possible. I didn't want to install my newly finished handrail the same way as the wooden plug would always be visible, and I wouldn't be happy with that quality of work.
Before Doug arrived, he asked me to have all the parts ready and to order some hardware. I made and installed a shoe rail, which is the bottom board that has a groove for the spindles to sit in. I also made fillet strips that would fit snugly in the groove and flush with the surface. I also the underside of the railing so the groove would allow the stair spindles to fit in snugly and I made matching fillet strips for the handrail too.
The hardware I ordered was for the angled railing to be secured to the newel post. I used Zip Bolts:
Amazon link - https://amzn.to/2EAqlQu
🇨🇦 Canadian Amazon link - https://amzn.to/2IPwdKQ
note: purchases made with this link help fund our video production
Zip Bolts are designed specifically for this. I was impressed with how well they pull in the handrail to the newel post. When finishing the last few cranks on the bolt, the railing actually lifted up at the bottom end from the tension.
The stair spindle installation would have been difficult for me to figure out without Doug's coaching. The most challenging part was determining the length of the spindles on the angled sections when they were plumb. I ended up making an extendable spindle jig that I could put in place, make sure it was plumb, and then lock it to length. I then transferred this jig to a spindle to draw my cut lines. The jig needs to be centered on the spindle, so by adding measurements on each end, it became easy to center the spindle.
Once I had the stair spindles cut, I could put them in place with a fillet strip in between each one. This let me see how the start and end of the run looked so I could get equal spacing between the spindles and the newel posts. Once I cut my starter fillet strip, I was ready to install the run for stair spindles. I glued them in place with carpenter’s glue and if the spindle wasn't a snug fit, I also drove a finishing nail through the spindle into the handrail.
This was a project where I learned a few new things. I enjoyed working with Doug and learning from his experience. This would have taken a lot more time (and likely more material) if I had to figure out how to do this on my own.
Our woodworking plans - https://woodenitbenice.ca/collections/woodworking-plans
Our 1-on-1 woodworking advice sessions - https://woodenitbenice.ca/collections/woodworking-advice-sessions
See the tools we use in our workshop and the tools we recommend: https://www.amazon.com/shop/homeimprovementwoodworking
🇨🇦 Canadian link - https://www.amazon.ca/shop/homeimprovementwoodworking
For more woodworking knowledge or to contact us directly, visit our website https://WoodenItBeNice.ca Hosted by Scott Bennett, owner of Wooden It Be Nice in Brooklin, Ontario, Canada
#stair #spindle #handrail
Видео How to Install Handrail and Stair Spindles (Staircase Renovation Ep 4) канала Home Improvement Woodworking
Показать
Комментарии отсутствуют
Информация о видео
8 ноября 2017 г. 5:23:36
00:14:13
Другие видео канала
 Fitting Staircase Spindles ~ Extension Build #17
 Installing Newel post and stair railing | Finishing my Basement | Episode 28
 How To Install Prefinished RetroFit Stair Treads from Stair-Treads.com
 These were Stronger than I Expected! - Finally Making Progress!!
 DIY Staircase Railing - Horizontal Metal and Wood for Modern Farmhouse Style
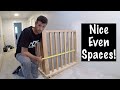 How to get EVENLY SPACED Spindles!
 Setting out stair spindle spacing's. This example is only for a 1m base rail. SEE DESCRIPTION FIRST
 How to Install a Newel Post using the ThreadLock Newel Post Fastener
 How to build a Railing for a Staircase
 DIY Stairs Makeover for Under $200 with Full Cost Breakdown!!
 Installing Stair Rails - Menards
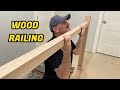 How To Install Stairwell Handrail & Soleplate
 DIY Staircase Makeover
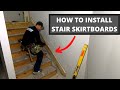 How to Install Stair Skirt Boards: Tricks, Finding Angles, Cutting, Transitions
 Easiest Method Possible To Measure Height Of Stairway Guardrail - Building Codes
 Staircase fitting basics
 How To Connect Handrail at an Angle to a Newel Post Using the ZIPBOLT Angled Railbolt
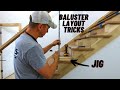 How to Layout Iron Baluster Spacing on Staircase - Wood Tread & Handrail Spindle Layout
 DIY Replacing Wooden Balusters with Iron Balusters
 DIY STAIRCASE MAKEOVER UNDER $100 | Updating Oak Banister