Smart Home using Tasmota ESP8266 NodeMCU Alexa controlled relay | IoT Project 2021
In this IoT project, I have explained how to make the smart home using Tasmota ESP8266 NodeMCU Alexa controlled relay to control appliances with Amazon Alexa and manual switches. You can monitor the real-time feedback and also control the relays manually from switches without the internet. And the most amazing part is I have used all FREE tools and you don't need any coding knowledge to make this voice control smart home system.
$2 for 1-4 Layer PCBs, Get SMT Coupons: https://jlcpcb.com/RHS
Download PCB Gerber file for this NodeMCU IoT based home automation project
https://drive.google.com/uc?export=download&id=1Jx4D_DSV_ei1y0a82AbtxbsNhy8sjCmY
During the IoT tutorial video, I have covered the following topics:
00:36 Control appliances with Tasmota Alexa using ESP8266
01:21 Control ESP8266 NodeMCU without internet.
02:01 Required Components for this ESP8266 IoT project.
02:23 Circuit diagram of ESP8266 Alexa home automation project.
03:56 Download the Tasmotizer & Tasmota release from Github.
04:32 Flash ESP8266 NodeMCU with Tasmota firmware.
05:39 How to set up Tasmota for ESP8266.
08:44 Tasmota Alexa integration.
09:33 Setup Amazon Alexa App to add Tasmota devices.
10:17 How to resolve Tasmota Alexa not working
10:32 Control relays with voice using Amazon Alexa App and buttons.
Required Components for each room for this NodeMCU home automation
1. ESP8266 NodeMCU 1.0
2. 4-channel 5V SPDT Relay Module
3. Push Buttons or Switches
4. Amazon Echo Dot
Amazon India Affiliate links:
NodeMCU : https://amzn.to/3fJA4EG
4-channel 5V Relay Module : https://amzn.to/2BQ5Y3o
Echo Dot Alexa(4th Gen) : https://amzn.to/3srCiPA
Amazon United States Affiliate links:
NodeMCU : https://amzn.to/2WoR2A2
4-channel 5V Relay Module : https://amzn.to/3r2HuJ4
Required Components for the NodeMCU control Relay Module PCB:
1. Relays 5v (SPDT) (4 no)
2. BC547 Transistors (4 no)
3. PC817 Optocuplors (4 no)
4. 510-ohm 0.25-watt Resistor (4 no) (R1 -- R4)
5. 1k 0.25-watt Resistors (5 no) (R5 -- R9)
6. LED 5-mm (5 no)
7. 1N4007 Diodes (5 no) (D1 -- D5)
8. Push Buttons (4 no)
9. Terminal Connectors
10. 5V DC supply
Important Points:
1. You need an Alexa device like Echo Dot for this project.
2. For no device found error, restart the Echo Dot and try again.
3. The NodeMCU and Echo Dot must be connected with the same Wi-Fi.
4. The Boot will fail if the D3 (GPIO-0) (switch-2) and SD3 (switch-1) pins are connected with the ground during booting.
5. If you use Switch (latched), make sure the switch-1 and switch-2 should be OFF during the ESP8266 Boot.
6. Please take proper safety precautions while working with High Voltage.
7. All the tools used are open source and FREE.
Important Links:
Tasmota Firmware Download:
http://ota.tasmota.com/tasmota/release/
Tasmotizer Download:
https://github.com/tasmota/tasmotizer/releases
__________________________________________________________
We need your support 🙏🏻 to make Tech StudyCell sustainable.
Help my projects on Patreon: https://www.patreon.com/techstudycell
Feel free to donate any amount: https://paypal.me/sdaspay
__________________________________________________________
During the Tasmota tutorial video, I have explained all the steps to make this NodeMCU ESP8266 smart home system with Tasmota to control the home appliances with and without the internet. I have also shown how to connect Amazon Alexa with Tasmota to control the relays with voice commands.
So with this smart house project, without writing a single line code, you can convert any appliance to IoT devices and control them through the internet.
Now you can just say "Alexa, turn on Light" to control the home appliances.
#internetofthings #tasmota #alexa
-------------------------------------------------------
Thanks For Watching...
✅ SUBSCRIBE ✅LIKE ✅SHARE ✅ COMMENTS
Find out more such projects: https://iotcircuithub.com/
Facebook: https://www.facebook.com/techstudycell/
Instagram: https://www.instagram.com/techstudycell/
Telegram: https://t.me/techstudycell/
Twitter: https://twitter.com/techstudycell
-------------------------------------------------------
Other useful Internet of things projects:
Latest NodeMCU projects playlist:
https://www.youtube.com/playlist?list=PLlBmS9EKFydcv9ffXm72-cU9_EusicIjO
Latest ESP32 projects playlist:
https://www.youtube.com/playlist?list=PLlBmS9EKFydee7YsvVP_5TiPDeH38PwlK
ESP32 Smart Home System with Amazon Alexa app & Manual Switches
https://youtu.be/b5yr-H6jJAc
Smart Home with Google Assistant & Alexa using NodeMCU ESP8266
https://youtu.be/gpB4600keWA
Видео Smart Home using Tasmota ESP8266 NodeMCU Alexa controlled relay | IoT Project 2021 канала Tech StudyCell
Показать
Комментарии отсутствуют
Информация о видео
Другие видео канала
 Tasmota and Tasmotizer - Easy Flashing Guide for ESP8266 devices in 2020
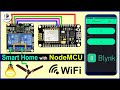 Home automation using NodeMCU and Blynk App - IOT based Project
 Arduino IoT Cloud ESP8266 NodeMCU Alexa Home Automation system | Internet of Things projects 2021
 Home Automation with Tasmota using ESP32 Alexa voice control relay & DHT11 sensor | IoT Project 2021
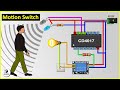 How To Make Motion Sensor Light Switch using CD4017 & IR sensor at Home
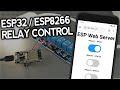 ESP32/ESP8266 Relay Module - Control AC Appliances (Web Server)
 Internet & Manual Controlled 4ch Relay using ESP8266 01 | IoT Projects | LCSC | Ubidots | JLCPCB
 Senko Hanabi: The Most Enchanting Firework You’ve Never Seen
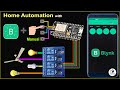 Wifi Smart Home Automation system with Manual Switches using NodeMCU ESP8266 & Blynk | IoT Projects
 TOP 5 ESP8266 (NodeMCU) PROJECTS - Maker Tutor
 Smart Home with Amazon Alexa using ESP32 control Relay (Voice + IR Remote) | IoT Projects 2021
 Home Automation System using ESP32 with Blynk IR remote & Manual control Relay | IoT Projects 2021
 My biggest Home Automation project using ESP32 | IoT Projects | ESP32 Projects | Ubidots | LCSC
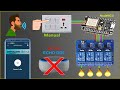 NodeMCU ESP8266 Alexa App Voice Control Home Automation System | IoT Projects 2021
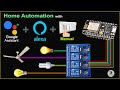 Smart Home with Google Assistant & Alexa using NodeMCU ESP8266 (Manual + Voice) | IoT Projects 2021
 WiFi Door Lock using ESP32 CAM & Blynk - IoT Projects for Smart House
 Top 5 Arduino projects 2021 never seen before
 How to make Water Pump Automatic Switch ON-OFF Circuit | Water Level Controller with 555
 First KiCad board from an EasyEDA user
 What Is A NodeMCU Anyway? We're About To Find Out!