Building the ChopBot, an inexpensive Plasma cutter linear drive part 1
Youtube video series, “Building the ChopBot, an inexpensive Plasma cutter linear drive”
I decided to make the ChopBot to help me do high quality, uniformly straight plasma cuts in steel plate. I have a very nice little Hobart 250ci plasma cutter which has an integrated compressor and runs off of 110v. This makes it self contained and very portable, but it requires a very slow speed of around 3”/minute when cutting to its max rated capacity of 1/4” steel. I just don’t have a very steady hand, and even when using a guide to draw the torch along, my cuts are still pretty ragged. Because I am a hobbyist and not a production shop, slow cutting speed is not a problem for me. I can afford to wait 2 minutes for the Hobart to cut a piece of plate, as opposed to doing it in 15 seconds with a much larger, more expensive, and less portable unit. I have several projects coming up that require lots of clean cuts of 1/4” plate, so this is the perfect time to make this tool.
I am certainly not the first one to to do this, and there are very sophisticated commercially available units available costing several thousand dollars. I wanted to make something that was mechanically very simple, and constructed with readily available standard parts, to make duplication and future service easy. I also wanted it to be as compact as possible so it would not take up much storage space. My garage is small, and my workshop is already quite crowded. Finally, I wanted it to be very easy to attach to an existing portable work table that I use for cutting and light fabricating, along with having a quick interconnect to my existing plasma cutter to allow the ChopBot to turn the plasma on at the start of the cut, and off at the end of the cut.
The backbone of this unit consists of a 4’ long, 40mm square aluminum extrusion, and a neat little linear bearing with Teflon sliders that I already had on hand from a different project from years ago. Utilizing what I already had lying around, plus about $130 in new parts will result in a nice simple, solid unit.
The ChopBot is modular, so if I ever need to do much longer cuts in the future, all I have to do is connect another piece of extrusion to the existing one, and purchase a longer piece of threaded rod.
My travel speed calculations are as follows: I needed max rapid speeds of about 15” per minute. The Hobart speed chart states 10” per minute for 1/8” steel, slowing to 3” per minute for 1/4” steel plate. My lead screw has 13 threads per inch, so the motor speed calculation is pretty simple: Threads per inch x Max speed required equals motor RPM. So for my application, 13 x 15 = 195. This means I need a motor of 195 RPM’s. The closest small 24v DC motor to this number is 200RPM’s. This lets me use a very small, inexpensive motor with lots of gear reduction so I have adequate torque to move the plasma along the track.
================================================
Disclaimer: This video series is not intended to be an exhaustive “How to do it” tutorial on how to build a plasma cutter drive. Rather, it is meant to be a “How I did it” journal of one of many projects that I undertake in my home workshop, using hobbyist equipment and methods. If you attempt to duplicate any of these methods, you do so at your own risk. Therefore, I will not be held liable for any incidental or consequential damages as a result of trying to duplicate these methods.
Видео Building the ChopBot, an inexpensive Plasma cutter linear drive part 1 канала MakerCave
Показать
Комментарии отсутствуют
Информация о видео
Другие видео канала
 Building the ChopBot, an inexpensive Plasma cutter linear drive part 2
 Making the Plasma Cutter Track
 plasma tracer I built
 Making Rotary Welding Table
 PM727MXL Linear Rail Concept
 Making MOTORIZED Plasma Cutting Track
 Crossbow Portable CNC Plasma Cutting Machine (English)
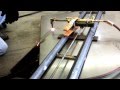 Cutting a perfectly straight edge with an OA torch
 671 supercharger rebuild part 7
 DIY Plasma torch cutting track
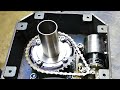 Welding & Cutting rotary table - BUILD
 DIY CNC Plasma Table - Part 2 Linear Rails
 This marker will change the way you work with sheet metal
 Homemade Plasma Cutter Track 11ft long!
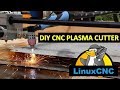 DIY CNC Plasma Cutter (CHEAP)
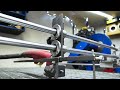 Making plasma cutting tracker table
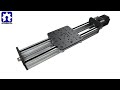 OpenBuilds C-Beam Linear Actuator 1500mm Lead Screw (Tension System)
 Adding Fold down ramps to car trailer to replace slide in ramps
 Introduction to Plasma Cutting
 Homemade Electric Workshop Crane