Wrought Iron Fence DIY Installation
Today I wanted to go over installing our Stronghold Iron fence panels to show you how everything goes together.
Depending on the size of your project, installing our iron fence can usually be done in a single weekend. One day for setting the posts and one day for hanging the fence panels and gates.
Before you jump into installing the fence, let’s make sure you’ve got the basic tools required for installing the fence panels. Here’s a list of what you’ll need:
• Measuring Tape
• Level
• Quality Drill or Power Driver
• Cutting Tool for Metal (hacksaw, sawzall, cut-off wheel, etc)
• Ratchet and Socket Set
• Masking Tape or a felt tip marker that will show up on black fence
• Metal file
• Center punch
• Hammer and Rubber Mallet
There are really only 5 components to our iron fence. Using our sample pieces here, they are:
• The fence post and cap
• The fence panel
• The fence bracket
• The self-tapping screw
• The iron install kit we send you
First thing is to grab your fence panel brackets and slide them onto the fence panel rails in preparation for mounting it to the post.
There are two types of iron fence brackets:
• A standard bracket
• An angle bracket
With your brackets slid on, the next step is to determine where you want to mount the fence panel on the post height-wise. The norm is typically 2-3 inches off the ground.
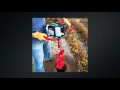
Next, slide your top bracket against the post. With the self-tapping screw in the driver, place it through the mounting hole in your bracket. Run the drill until you feel the screw punch through the wall of the post. When you feel that, slow down the drill and leave it slightly loose. You don’t want to fully tighten the screw just yet. Do this for your two top rail brackets on each end of the fence panel.
With the fence panel being suspended by the top brackets, grab your level. You need to set the panel plumb before drilling your lower brackets. Place your level against one of the pickets and position the fence so that it reads plumb. Once you have the panel plumb, slide your lower brackets out and drill the self-tapping screws the same as we did on the top ones.
Most installations call for an iron fence panel at a corner, end of a run or near a gate that will need to be cut shorter than 8ft wide. We first want to measure out the fence panel to determine where we will need to make the cut. Ideally, you want to try and make your cut as close to the picket on the side you are removing to preserve the air gap spacing between pieces.
Mark all of the horizontal rails where the cut will be made with masking tape or a marker. Use your cutting tool of choice to make the cut through each rail. After cutting off the unneeded portion, take your metal file and clean up any burrs or rough edge left at the cut. Lastly, touch-up the cut with paint to prevent rusting.
That’s the basics of installing our Stronghold Iron fence panels to the posts. Don’t be discouraged if that first panel or two takes a bit longer than you thought. Once you get the rhythm down pat, you’ll find that each fence panel goes in a little quicker than the one before it.
Jason Kauffman
Iron Fence Shop®
800-261-2729 Toll Free
sales@ironfenceshop.com
www.ironfenceshop.com
Видео Wrought Iron Fence DIY Installation канала Iron Fence Shop®
Depending on the size of your project, installing our iron fence can usually be done in a single weekend. One day for setting the posts and one day for hanging the fence panels and gates.
Before you jump into installing the fence, let’s make sure you’ve got the basic tools required for installing the fence panels. Here’s a list of what you’ll need:
• Measuring Tape
• Level
• Quality Drill or Power Driver
• Cutting Tool for Metal (hacksaw, sawzall, cut-off wheel, etc)
• Ratchet and Socket Set
• Masking Tape or a felt tip marker that will show up on black fence
• Metal file
• Center punch
• Hammer and Rubber Mallet
There are really only 5 components to our iron fence. Using our sample pieces here, they are:
• The fence post and cap
• The fence panel
• The fence bracket
• The self-tapping screw
• The iron install kit we send you
First thing is to grab your fence panel brackets and slide them onto the fence panel rails in preparation for mounting it to the post.
There are two types of iron fence brackets:
• A standard bracket
• An angle bracket
With your brackets slid on, the next step is to determine where you want to mount the fence panel on the post height-wise. The norm is typically 2-3 inches off the ground.
Next, slide your top bracket against the post. With the self-tapping screw in the driver, place it through the mounting hole in your bracket. Run the drill until you feel the screw punch through the wall of the post. When you feel that, slow down the drill and leave it slightly loose. You don’t want to fully tighten the screw just yet. Do this for your two top rail brackets on each end of the fence panel.
With the fence panel being suspended by the top brackets, grab your level. You need to set the panel plumb before drilling your lower brackets. Place your level against one of the pickets and position the fence so that it reads plumb. Once you have the panel plumb, slide your lower brackets out and drill the self-tapping screws the same as we did on the top ones.
Most installations call for an iron fence panel at a corner, end of a run or near a gate that will need to be cut shorter than 8ft wide. We first want to measure out the fence panel to determine where we will need to make the cut. Ideally, you want to try and make your cut as close to the picket on the side you are removing to preserve the air gap spacing between pieces.
Mark all of the horizontal rails where the cut will be made with masking tape or a marker. Use your cutting tool of choice to make the cut through each rail. After cutting off the unneeded portion, take your metal file and clean up any burrs or rough edge left at the cut. Lastly, touch-up the cut with paint to prevent rusting.
That’s the basics of installing our Stronghold Iron fence panels to the posts. Don’t be discouraged if that first panel or two takes a bit longer than you thought. Once you get the rhythm down pat, you’ll find that each fence panel goes in a little quicker than the one before it.
Jason Kauffman
Iron Fence Shop®
800-261-2729 Toll Free
sales@ironfenceshop.com
www.ironfenceshop.com
Видео Wrought Iron Fence DIY Installation канала Iron Fence Shop®
Показать
Комментарии отсутствуют
Информация о видео
Другие видео канала
 Marking the Fence Layout and Setting Your Posts
 Aluminum Fence - How to install it!
 Simple Metal Gate Build | JIMBO'S GARAGE
 Upgrade Your Home With IronCraft Residential Fences
 Iron Fence vs Aluminum Fence - Which is Better?
 ASPEN 3-Rail Ornamental Fence Installation - Available at your local Sams Club Stores
 Wrought Iron Fence Installation Video
 Watch us build an IRON FENCE in 2 minutes!
 5 Things to Look for When Buying a Wrought Iron, Steel or Aluminum Driveway Gate
 Welding Fence & Gate - Jimbos Garage
 How to Add Strength and Stability to Posts or Pillars
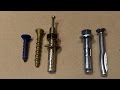 A Beginner's Guide to Attaching Things to Concrete and Brick
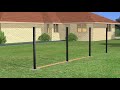 Slipfence Horizontal Installation Video
 How to weld measure and setup steel fence gate build jig
 How To Install Metal Fence Panels Part 1 - DIY
 How To Install Aluminum Fence | DIY Aluminum Fence Installation | Complete Guide
 120326 METAL FENCE QT LAN for Web
 Montage Fence Installation by Ameristar Fence Products
 How to measure and install your new Wrought Iron Gate
 MUST WATCH! 30+ Modern Metal / Iron Fence Gates Ideas