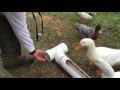
Continuous Watering Design for Ducks
Provides an overview of a simple cheap design that allows for a continuous water supply and easy clean out.
Material List:
13 gallon HDPE drum (eBay for $25)
Kerick Valve MA052 PVC Mini Float Valve (Amazon $10)
Gilmour 1/2-Inch Brass Double Female Swivel Hose Connector 5FPS7FH (Amazon $5)
1.5" PVC fittings (Home Depot $6)
8' 2' x 4' weathershield (Home Depot $6)
4x L brackets (Home Depot; $6)
3' 1/2" galvanized pole (Home Depot; $8)
10oz of loctite PL advanced adhesive (Home Depot; $7)
10' of 1/4" black rubber trim (Amazon; Seal Rubber; $15)
Procedure:
A. Creating watering drum
1. Cut watering holes' make sure all holes are in line with each other (I made mine with a 4" hole saw bit)
2. Cut spigot hole; hole should be at the height you want your water level to be (using 1/2" spade bit)
3. Cut clean out hole; hole placement should 3/4 of the way around the drum from where the watering holes are (using 1.5" hole saw bit)
4. Cut pole holes; make sure holes are both the same height for each side of drum (I made mine 3" down from top of drum side when watering holes are facing directly at you; used 3/4" spade bit)
5. Screw float valve into the inside of the spigot hole
6. Screw swivel hose connector onto float vale from the outside of drum
7. Remove lid clamp; remove lid, add thin bead of adhesive around the lid grove
8. Replace lid making sure pole hole is in the right placement; place lid clamp back on; add thin bead of adhesive around where lid rim meets drum
9. Allow to cure for 24 hours
B. Make stand
Make stand for what ever height you'd like. I buried my stand in the sand so I made it extra high. Burying stand in the ground ensures ducks won't tip it over.
1. Cut sides with saw (I made mine 30" high)
2. Cut base piece (I made mine 30" wide)
3. Cut pole holes with 3/4" bit (I made mine 3" from top of side pieces)
4. Attach sides and base with L brackets and weatherproof 2" screws
5. Add footings on base if you want to stabilize it (I used 2x 10" 2" x 6" scrap I had sitting around)
C. Finish
1. Add pole to support
2. Thread pole through drum and hang on support
3. Note where spigot lines up against side piece; cut a 3" notch into side piece
4. Wrap garden hose with teflon tape and then screw garden hose to spigot adaptor; make sure garden hose and spigot are tight
5. Turn on water
6. Adjust float valve using the wing nut on the valve so you have the float turn off the water at the desired height
7. Make sure drum is leakproof and then turn off water and empty drum
8. Cut edge rubber material to appropriate length and attach to the rim of the drinking holes
9. Bury stand; ensure that it is level; turn water on
10. Done
If interested; I talk more about the design at the following poultry forum:
http://www.backyardchickens.com/t/906368/any-ideas-for-automatic-watering-system-for-ducks/10#post_17316064
Please let me know if you have any questions.
Видео Continuous Watering Design for Ducks канала smithmal
Показать
Комментарии отсутствуют
Информация о видео
Другие видео канала
 DIY - Build A Better Backyard Duck Feeder
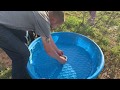 DIY Easy Drain Duck Pool
 Swapping Water Stations Winter to Spring
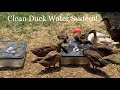 Duck Water System
 Bucket List: DIY a cheap and clean duck waterer
 "No Messy Ducks!" - How to Raise CLEAN Ducks
 Automatic Pet Waterer
 Best Chicken/Duck Feeder Ever
 THE BEST CHICKEN WATERING SYSTEM EVER! Never frozen, never empty, never dirty and no waste.
 🦆 DIY DUCK WATER STATION
 Insulated Drinking/Dunking Pails
 Cleaning Sand in a Duck Yard
 Automatic Watering System For My Ducks (Chickens and Guineas Too!)
 How To Make An Automated Chicken Water Trough
 Best Chicken Feeder – NO FEED WASTE (NOW available on Amazon)
 How to Make a DIY Duck Feeder
 🔨 Building a Duck House w/Deck & Pool On The Farm (coop, pen, run)
 Duck Keeping Tips & Tricks
 Keeping Water From Freezing (Solved) Testing our new Winter Waterers
 Keeping Ducklings Watered and Dry - A Simple Duck Waterer