Basics for making a Junk Journal cover for beginners - Part 1
If you're looking for Part 2, follow this link:
https://www.youtube.com/watch?v=6fcww3Yd9F4&t=26s
Material needed:
* Cardboard OR Cardstock OR recycled cereal box
* Glue: Mod podge AND Fabric Tac glue
* Thin sheet of paper OR Print paper OR gift wrapping paper OR Magazine paper OR Newspaper for the base
* Muslin OR Cotton paper OR other patterned fabric
* Printed cardstock of your choice to decorate the outside and inside of your cover.
Cardboard dimensions:
-- Two pieces 5" by 7"1/2
-- One 1 piece: the spine 1"1/2 by 7"1/2
Hello all, this is Gemma with Handy colors.
Today I'll walk you through the whole process of making this vintage junk Journal. it might seem a bit intimidating but you'll see it's pretty simple.
You only have to follow the steps and of course add your own touch.
In this part one of our project, I'll give you the basics for making the cover of any kind of Journal you would like to create.
To start, you will need three pieces of cardboard, you can choose a recycled cereal box or some cardstock but I usually prefer to have a kind of sturdy, hard cover.
Here, my both large pieces measure 5” by 7”1/2. the spine or the narrow piece in the middle measures 1” 1/2 by 7”½. I’ll put all dimensions in the description box.
You will glue these three pieces in the middle of a large sheet of thin paper that I will call our base.
Make sure to leave no less than 1”1/2 between the edges of your cardboard pieces and the base. in my case my base is made of thin scribble sheets. You can choose simple print paper, tissue paper for gift wrapping, magazine paper, newspaper, it doesn't matter. Our goal here is to assemble the three cardboard pieces to form our journal cover.
You notice that I left some space ⅛” between the large cardboard pieces and the middle one, the spine.
Once glued using mod podge, cut a triangle out of our paper Base by leaving ⅛” between the four cardboard corners and the edge of your cut.
Next, you will glue the sides of your base to the cardboard pieces
And voila you have a journal cover.
Next, cut a large piece of muslin or cotton fabric by leaving no less than 1”½ of extra fabric on each side. Glue, using mod podge, your cover to the Muslin fabric. Here, I chose to glue the side showing the cardboard but you can choose to glue any side to the fabric, everything will be covered afterwards. But, I prefer this way of doing things.
Same process here, cut the fabric corners by leaving again 1/8” between the corner and the fabric cut. And glue the sides of your fabric to the cover.
Finally, cut a piece of fabric measuring 3” by 7”½ and glue it on the spine. Here, I have a larger piece but you'll see that I managed to get the right size afterwards.
Here, I added some fabric tac glue on the edges to make sure nothing comes apart.
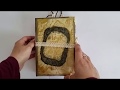
Once all is well glued and dry, I Inked the edges of my cover with black ink to give it a vintage touch. You can use brown ink or any other color, it's your Journal so do what inspires you the most.
Now, you can leave the cover as it is if you used a patterned fabric or maybe you like to have a monochromatic cover. as I said it's totally up to you.
In my case, I cut two pieces of gold embossed floral cardstock to decorate my cover. each piece measures 4”7/8 by 7”⅜. I inked the edges with black ink as well for a vintage touch. Use the same color of ink you used for your main cover.
I used mod podge to glue my pieces and added a line of fabric tac glue on the edges of my pieces to be safe and avoid any surprises!
I did the same with the inside of my cover but now I got three pieces of cardstock two pieces measuring 4” 7/8 by 7”3/8 and one piece, the middle one, measuring 1”3/8 by 7” ⅜.
Okay, those numbers gave me a headache! To make it simple, what I do is I always leave an 1/16” on each side so I can see a tiny portion of my fabric :)
See, we made it to the end and we have a journal cover.
I hope that you found this video easy-to-follow, remember if you make mistakes it's alright. You will get better with time and practice.
Well, this is the end of the first part of our junk Journal project.
part two will proceed with the sewing, adding charm and the final touches to our journal.
Thank you for watching to the end. don't forget to like, subscribe and leave your questions, comments and suggestions for future videos.
I'll see you next time in part 2.
Bye
Follow me on social media:
Facebook page HandyColorsShop
https://www.facebook.com/HandyColorsshop/
Instagram gemma_handycolors
https://www.instagram.com/gemma_handycolors/
Etsy shop: HandyColorStationery
https://www.etsy.com/shop/HandyColorStationery
Видео Basics for making a Junk Journal cover for beginners - Part 1 канала Gemma HandyColors
https://www.youtube.com/watch?v=6fcww3Yd9F4&t=26s
Material needed:
* Cardboard OR Cardstock OR recycled cereal box
* Glue: Mod podge AND Fabric Tac glue
* Thin sheet of paper OR Print paper OR gift wrapping paper OR Magazine paper OR Newspaper for the base
* Muslin OR Cotton paper OR other patterned fabric
* Printed cardstock of your choice to decorate the outside and inside of your cover.
Cardboard dimensions:
-- Two pieces 5" by 7"1/2
-- One 1 piece: the spine 1"1/2 by 7"1/2
Hello all, this is Gemma with Handy colors.
Today I'll walk you through the whole process of making this vintage junk Journal. it might seem a bit intimidating but you'll see it's pretty simple.
You only have to follow the steps and of course add your own touch.
In this part one of our project, I'll give you the basics for making the cover of any kind of Journal you would like to create.
To start, you will need three pieces of cardboard, you can choose a recycled cereal box or some cardstock but I usually prefer to have a kind of sturdy, hard cover.
Here, my both large pieces measure 5” by 7”1/2. the spine or the narrow piece in the middle measures 1” 1/2 by 7”½. I’ll put all dimensions in the description box.
You will glue these three pieces in the middle of a large sheet of thin paper that I will call our base.
Make sure to leave no less than 1”1/2 between the edges of your cardboard pieces and the base. in my case my base is made of thin scribble sheets. You can choose simple print paper, tissue paper for gift wrapping, magazine paper, newspaper, it doesn't matter. Our goal here is to assemble the three cardboard pieces to form our journal cover.
You notice that I left some space ⅛” between the large cardboard pieces and the middle one, the spine.
Once glued using mod podge, cut a triangle out of our paper Base by leaving ⅛” between the four cardboard corners and the edge of your cut.
Next, you will glue the sides of your base to the cardboard pieces
And voila you have a journal cover.
Next, cut a large piece of muslin or cotton fabric by leaving no less than 1”½ of extra fabric on each side. Glue, using mod podge, your cover to the Muslin fabric. Here, I chose to glue the side showing the cardboard but you can choose to glue any side to the fabric, everything will be covered afterwards. But, I prefer this way of doing things.
Same process here, cut the fabric corners by leaving again 1/8” between the corner and the fabric cut. And glue the sides of your fabric to the cover.
Finally, cut a piece of fabric measuring 3” by 7”½ and glue it on the spine. Here, I have a larger piece but you'll see that I managed to get the right size afterwards.
Here, I added some fabric tac glue on the edges to make sure nothing comes apart.
Once all is well glued and dry, I Inked the edges of my cover with black ink to give it a vintage touch. You can use brown ink or any other color, it's your Journal so do what inspires you the most.
Now, you can leave the cover as it is if you used a patterned fabric or maybe you like to have a monochromatic cover. as I said it's totally up to you.
In my case, I cut two pieces of gold embossed floral cardstock to decorate my cover. each piece measures 4”7/8 by 7”⅜. I inked the edges with black ink as well for a vintage touch. Use the same color of ink you used for your main cover.
I used mod podge to glue my pieces and added a line of fabric tac glue on the edges of my pieces to be safe and avoid any surprises!
I did the same with the inside of my cover but now I got three pieces of cardstock two pieces measuring 4” 7/8 by 7”3/8 and one piece, the middle one, measuring 1”3/8 by 7” ⅜.
Okay, those numbers gave me a headache! To make it simple, what I do is I always leave an 1/16” on each side so I can see a tiny portion of my fabric :)
See, we made it to the end and we have a journal cover.
I hope that you found this video easy-to-follow, remember if you make mistakes it's alright. You will get better with time and practice.
Well, this is the end of the first part of our junk Journal project.
part two will proceed with the sewing, adding charm and the final touches to our journal.
Thank you for watching to the end. don't forget to like, subscribe and leave your questions, comments and suggestions for future videos.
I'll see you next time in part 2.
Bye
Follow me on social media:
Facebook page HandyColorsShop
https://www.facebook.com/HandyColorsshop/
Instagram gemma_handycolors
https://www.instagram.com/gemma_handycolors/
Etsy shop: HandyColorStationery
https://www.etsy.com/shop/HandyColorStationery
Видео Basics for making a Junk Journal cover for beginners - Part 1 канала Gemma HandyColors
Показать
Комментарии отсутствуют
Информация о видео
Другие видео канала
 How to make a Junk Journal - A step by step tutorial for beginners - Part 2
 Tutorial How I make my hard covers for Journals
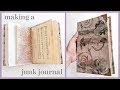 How To Make A Fabric Hard Cover Junk Journal | Tutorial For Beginners
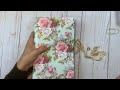 Starting a Junk Journal for beginners. So easy! | Part 1
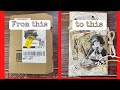 Amazon Packaging Recycling into a Junk Journal/Digital Collage Club Design Team Project
 Tutorial: Hidden Spine, Attaching Your Signature
 Junk Journal - Cardboard Journal - Easy to Make
 How to Make a Fabric Book Cover in 3 Mins -Furoshiki Book Cover Guide - No Sew Book Cover in Minutes
 12 ways to make a journal cover
 Junk journal cover from cracker box
 Beginners Junk Journal Tutorial MPP
 A Beginner's Guide to making Journals - part 1 - recycled book covers
 How to Make a Big Book How to Make a Junk Journal Tome Part1 Step by Step DIY Tutorial for Beginners
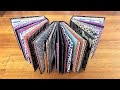 Tutorial - Envelope Journal Ephemera Storage Book
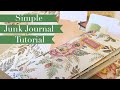 Simple Junk Journal TUTORIAL *plus a bonus idea* | “Use Your Paper” Series Idea #4
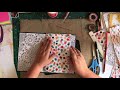 Putting together a Junk Journal
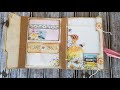 Crafting with File Folders: All in One Journal Folio
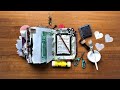 What To Put in a Junk Journal / Let's Play
 Turning a Paperback Book into a Hardcover // Book Binding Tutorial
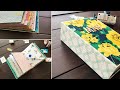 How to Make a Journal from a Cereal Box | Step by Step Tutorial for Beginners | Junk Journal DIY