Creating 3D Printable Models from Medical Scans in 30 Minutes Using Free Software
Link to full tutorial: http://goo.gl/e3BSjD
Link to FREE DICOM image set download: http://goo.gl/Z37cZ7
UPDATED TUTORIAL: An easier and faster method of making bone STLs https://youtu.be/c3LgY0W5QSo
Link to prior tutorial on selecting a good scan for 3D printing: http://goo.gl/SDkShX
In this video tutorial, you will learn how to convert a medical scan, such as CT or MRI, and convert it into a 3D printable model using free and open source software Osirix, Blender, and MeshMixer. This tutorial is part of a series. You can learn more about 3D printing of medical scans here: http://www.embodi3d.com/tutorials.html
Dr. Mike returns with an in-depth tutorial on how to get the most out of medical 3D printing software. The free 3D printing programs Osirix, Blender, and Meshmixer are used and explained. Packed into this video and tutorial viewers will find detailed steps of how to turn a traditional DICOM-based medical image into an STL file ready to become an incredibly useful 3D printable skull medical model.
This guide on converting a DICOM medical image into an STL file uses Osirix, which is a program exclusive to Macintosh operating systems. Those using Windows or Linux may still find useful information in this tutorial, but system-specific guides for these systems are on their way. Be sure to keep an eye out for them! In addition to Osirix, files will also make stops in the programs Blender and Meshmixer on their journeys to becoming 3D printable medical models.
Before getting started, Dr. Mike directs viewers’ attention to the file pack provided. This contains the skull image that is used in the demonstration, making it a must-download for those who want to follow along exactly with Dr. Mike to produce a high-quality skull model for 3D printing. Definitions of DICOM, STL, and Osirix are provided, as well as an explanation of why DICOM files must be STL files to be printed as 3D medical models.
Dr. Mike starts by having users open their DICOM files in Osirix. From this point, there are some technical instructions to which viewers will want to give close attention. The specific directions accompanying each step should leave viewers without any points of confusion and feeling comfortable using features such as the Region of Interest (ROI) tool to measure Hounsfield density as they segment the skull image to create a new series. After walking viewers through creating a bitmapped series using a skull CT scan, Dr. Mike shows users how to complete 3D surface rendering of the image to generate an STL file from it using Osirix.
When Osirix finishes converting the file to STL format, the next destination is Blender, a free open-source 3D software program. In Blender, Dr. Mike walks users through essential tasks such as centering the 3D object in space, cleaning up the mesh, and smoothing the surface while providing helpful details, such as what a “Blender unit” is. As with Osirix, several of the steps in Blender can be a bit complex, so viewers not comfortable with this program will want to tune in closely!
The final step makes use of Meshmixer, another free software package that is a must-have for these types of projects. Dr. Mike shows users how to inspect their 3D printable medical image for defects using Meshmixer as they complete the last steps required to convert a DICOM-based medical scan to an STL file needed to make a 3D medical model ready for printing!
Before closing, Dr. Mike directs viewers to other indispensable resources he provides, such as additional must-see tutorials and 3D medical models already in STL format ready to be printed!
Видео Creating 3D Printable Models from Medical Scans in 30 Minutes Using Free Software канала Embodi3D
Показать
Комментарии отсутствуют
Информация о видео
Другие видео канала
 Creating 3D Printable Medical Models for Free: Embodi3D.com, 3D Slicer, and Meshmixer
![PICTURE TO 3D - FREE, FAST & AWESOME! -🤩 [RE-UPLOADED]](https://i.ytimg.com/vi/QANxO69y6r4/default.jpg) PICTURE TO 3D - FREE, FAST & AWESOME! -🤩 [RE-UPLOADED]
PICTURE TO 3D - FREE, FAST & AWESOME! -🤩 [RE-UPLOADED] Conversão Rápida e Gratuita de DICOM em STL pelo Blue Sky Plan
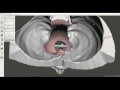 How to Create a Hollow Shell from a Medical STL File Using MeshMixer
![Patient CT Mandible Segmentation for 3D Print Tutorial [ITK-SNAP, Meshmixer, Makerbot]](https://i.ytimg.com/vi/P44m3MZuv5A/default.jpg) Patient CT Mandible Segmentation for 3D Print Tutorial [ITK-SNAP, Meshmixer, Makerbot]
Patient CT Mandible Segmentation for 3D Print Tutorial [ITK-SNAP, Meshmixer, Makerbot]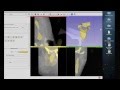 Tutorial: Preparing Data for 3D Printing Using 3D Slicer
 How to 3D Photoscan Easy and Free!
 A ridiculously easy and free way to make 3D printable bones from CT scans
 Osirix for neurosurgeons: 3D segmentation and visualisation
 Which LAYER HEIGHT gives you the STRONGEST 3D prints?
 How To Get Your First 3D Job
 How to 3D print CT scans using democratiz3D in 4 Easy Steps
 How to Turn any Image into Mesh Quick and Easy Blender 2.8 New 2019 Tutorial with the Knife Tool
 Using Free Software and Services to Make 3D Printable Medical Models: from the 2017 RSNA Meeting
 New easier way to install Bio Blender in Windows !!!
 Open Source 3D Modeling Software
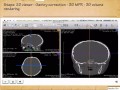 OsiriX for Neurosurgeons and Craniofacial surgeons
 3D Printing of Bones from CT Scans: A Tutorial on Correcting Mesh Errors using Blender and Meshmixer
 Creating Lifelike Muscle and Skin 3D Printable STL Files from Medical CT Scans Using a Free Service
 Learn to turn your CAT (CT) or MRI scan into a 3D model.