How to Make Self-Stick Photo Frame Blocks, Detailed Instructions
✆ (866)537-2244
✉ info@binding101.com
Buy Photo Blocks ► https://www.binding101.com/silver-linings-photo-mounting-frames
Buy Assembly Kit ► https://www.binding101.com/silver-liningstm-mounting-frame-accessories
Subscribe for more ► https://www.youtube.com/c/binding101
These detailed instructions walk you through just how easy it is to make DIY modern photo frames using SilverLinings Self Stick Photo Mounting Blocks and the SilverLinings accessory kits.
To follow along with these instructions, you will need:
• SilverLinings Block in your choice of size
• Self-healing cutting mat
• Handheld rotary cutter
• Brayer hand roller
• Frame alignment guide
• Photo gloves
• Photo to match size of your photo block
Start by placing your alignment guide (referred to as the “jig” in this video) against your photo block. Starting at the corner opposite the guide, peel the adhesive liner back a couple of inches and crease it to it stays up. Put on your photo gloves to avoid finger prints on the photo. Now take your photo and place it so that the top and left sides extend over the block and onto the guide; you will see there is a groove to allow for this. Now press the photo onto the exposed corner of adhesive. Hold the rest of your print up as you peel the remainder of the liner off the photo block. Gently roll the photo down, consecutively as you lightly use the brayer/hand roller to roll the photo from the stuck corner, outward to the opposite corner. Now roll over the print in all directions, more firmly to fully adhere. Be careful of your pressure on the edges of the frame to avoid damaging them. Next, lift the photo block up and flip it so it is face-down. Position your cutter on one edge, using the arrow guides to align it. Press down firmly and roll the cutter along the edge. Repeat that step for each edge, making sure to match up those arrow guides on each end. And you’re done!
The SilverLinings self-stick photo blocks are great for photographers with wedding, engagement, pet, and other specialties, as well as for vacation, travel and timeshare businesses, and even fine art galleries. They are also perfect for other displays, such as notices and marketing tools within medical offices – use them as a check in notice, or other important long-term signage throughout your office. Or use them for any modern display or sign for your business, organization, restaurant, etc. These photo blocks are sold in small packs of just 10, and are incredibly affordable, so are accessible for all businesses and individuals.
Call (866)537-2244 for bulk pricing or for more information. Or you can buy online at www.binding101.com.
- - -
Buddha by Kontekst https://soundcloud.com/kontekstmusic Creative Commons — Attribution 3.0 Unported— CC BY 3.0 http://creativecommons.org/licenses/b... Music promoted by Audio Library https://youtu.be/b6jK2t3lcRs
Видео How to Make Self-Stick Photo Frame Blocks, Detailed Instructions канала Binding101
Показать
Комментарии отсутствуют
Информация о видео
Другие видео канала
 MegaBind-1 Plastic Comb Binding Machine - Product Overview
 Make Index Tab Dividers with the Onglématic O5P Tab Cutter
 Lassco Wizer FMM-3 Paper Drill - Product Overview
 3-Ring Letter Size Clearview Binders with Bulk Discount Pricing
 Rhin-O-Tuff ONYX HD7700 Ultima Punch - Feature Overview
 Akiles WBM-532 Manual Wire Closer - Product Overview
 Akiles BookletMac Booklet Maker - Product Overview
 DIY Valentine's Day Foil Cards
 How To Use Glue Dots® Adhesives The NEW Way to Glue™
 MBM Triumph™ 5255 Automatic Programmable Paper Cutter
 Spiral-O Wire FAQs | Q&A for Twin Loop Spiral Wire Combs
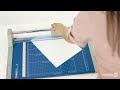 Dahle 550 Professional Rolling Trimmer
 Rhin-O-Tuff Quietized Die Demo
 EBM-2.1 EZ Glide 1-Spindle Paper Drill - Product Overview
 Simple Foiled Christmas Cards with a Laminator
 Lassco Wizer Score II - Product Overview
 Dahle 508 Personal Rolling Trimmer, 18'' Cutting Length
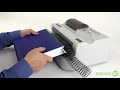 Akiles Finish-@-Coil M Electric Coil Inserter | Spiral Inserting Machine | Binding101
 Akiles Coilmac EX Pro All-in-One Spiral Coil Binding Machine
 How to Change the Blade & Cut Sticks on Cut-True 15M, 16M, & 22S Cutters