Let's Sew A Rice Trivet Gift | Easy Gift Project | Zazu's Stitch Art
Finally! This is a fast and easy trivet using pre-washed cotton quilting fabric and about a pound of white rice to makes a great gift that will brighten any kitchen or table. The secret to the fast is a good guide on your sewing machine foot. The secret to a tightly-filled trivet with a neat closure is your edger foot and how you position the rice bag as you stitch it closed. Loved ones will think of you fondly each time they use this well-constructed item to protect their table or counter top. With a little planning, you can adapt this to any size. With no protein content, white rice is very stable and will last for years, although these types of items will attract mice etc., so not the best for use in a camper or at a cabin....Yes, in Montana a lot of people have cabins with microwaves!
Visit my blog for additional ideas on making, using and selling rice trivets: http://www.zazusstitchart.com/2017/09/09/well-it-is-about-time-rice-trivets-whats-ahead/
0:15 Intro - Similar to my rice pack, with one little trade secret to filling the trivet very full.
0:47 I am making two to demonstrate how "chaining" helps speed up mass production. my chains would be 6 or 10 long, even if I were making a batch of dozens.
MATERIALS/SUPPLY LIST for one rice trivet:
* 2 rectangles, 9.5 x 8 inches - prewashed fabrics - right sides together. The trivet ends up square.
* Approx. 1 pound white rice, or about 2 cups.
* A seam guide on your machine foot makes this extra quick.
* An edger foot is very helpful to close this item precisely.
1:29 Test sew for small, tight stitches. (Approx. 2 mm or 12 stitches per inch.) Use the same tight stitch for the whole project. With right sides together, stitch the first side of the trivet, using a 5/8-inch seam allowance and only backstitch if you must. We will not clip our corners either.
2:02 Clip the trivets apart and press the seam open. Also press in 5/8-inch down one long side of the piece, where we will eventually hem the trivet closed.
2:44 Starting at the seamed edge, stitch two more sides of the trivet, pivoting at the corner and opening the pressed ends where the hem will be. Backstitch if you must. If you are making more than one, leave the work in the machine.
3:48 Snip the trivets apart and finger-press the seam open where it crosses the pre-pressed hem edge. Then finger-press the hem so that is continuous around the cute little pouch that you have created.
4:36 Do not clip the corners. But do clip all your threads, so that they can't get sewn into one of the channels and spoil your piece. Turn the piece right side out, handling the two corners as shown.
5:43 Press the pouch flat.
5:50 Prepare to sew the channels by setting the edge guide on your presser foot at about 2 Inches, but use your piece to check for accuracy. Without a good seam guide, you should mark at least the center line and use a tape guide. More later...
6:28 Sew the FIRST LINE, with guide against the edge of the work, BACKSTITCHING at both ends. Stay about 5/8 or 1/2 inch away from the edges.
7:00 Without clipping threads, hop over and stitch the SECOND LINE by following the first line. BACKSTITCH at both ends.
7:16 Pivot work 180 degrees. Hop over and stitch the THIRD LINE, by following the edge of the work with your guide. BACKSTITCH both ends.
7:36 Do the next trivet and then clip all threads carefullys.
7:49 Starting with one of the middle channels, fill them pretty full with your handy rice funnel. Watch that video here: https://www.youtube.com/watch?v=ngzLfi8lggE Don't rest the trivet in the rice too much, or it will get covered with rice dust.
8:12 Pin carefully, working each pin in and out of the fabric twice. Keep all the rice away from the hem and your needle.
9:26 Using my edger foot (#5 for a Bernina) and my needle kicked over, I carefully stitch the edge by tilting the whole piece into the machine. Doing so creates a kink, retaining the rice back from the hem edge and your needle. Stitch closed, still using your tiny stitch, pulling pins as you go, and BACKSTITCHING well at both ends. Tilt the work way up to do this.
11:44 Clip threads and shake the rice into the empty edge.
Like. Subscribe. Comment. Ask Questions.
Related videos:
My rice pack video: https://www.youtube.com/watch?v=N1nBQm1RzsQ
Handy rice funnel video: https://www.youtube.com/watch?v=ngzLfi8lggE
Visit my new online course, QUILT A NIGHT TIME LANDSCAPE (USE 20% OFF PROMO CODE: 3NIGHT3V Exp. 12/31/2020) https://coursecraft.net/courses/z925d/splash
Web home page: https://www.zazusstitchart.com/
Curated sewing shop: https://www.zazusstitchart.com/curated-sewing-shop/
Mailing list sign up: https://www.zazusstitchart.com/mc4wp-form-preview/
My Esty Shop: https://www.etsy.com/shop/ZazusStitchArt
Facebook: https://www.facebook.com/ZazusStitchArt/
Pinterest: https://www.pinterest.com/zazusstitchart/boards/
Support the tutorials through Paypal: https://www.paypal.com/cgi-bin/webscr?cmd=_s-xclick&hosted_button_id=WGEUHFN73ERPA&source=url
Видео Let's Sew A Rice Trivet Gift | Easy Gift Project | Zazu's Stitch Art канала Zazu's Stitch Art
Показать
Комментарии отсутствуют
Информация о видео
Другие видео канала
 Hem Fabric Napkins Like a Pro with pinless mitered corners | Zazu's Stitch Art Tutorials
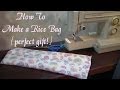 perfect handmade gift rice bag
 Key Fob Card Pouch - Quick Sewing for Craft Shows
 Stitching for the Kitchen
 Microwave Bowl Extras
 Let's Sew A Heat Pack Gift | Easy Fleece Project | Handy Rice Funnel | Zazu's Stitch Art
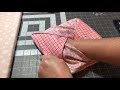 Craft Fair Series 2019-Hot Pads! Idea # 69
 DIY Reusable Rice Heatpack (or Trivet) Tutorial
 Free-motion Potholder w/ raw-edge binding | Moderate Gift | Zazu's Stitch Art Tutorials
 Let's Sew Washable Leaf Placemats | Zazu's Stitch Art Tutorials
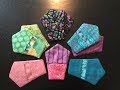 HOW TO - MAKE A FINGER THUMB POT HOLDER - USING FABRIC SCRAPS
 HOW TO MAKE A SIMPLE WHEAT BAG - HEAT PACK - DIY SEWING PROJECT/ EASY SEWING TUTORIAL
 Sewing Projects to SURVIVE COVID-19
 Raw Edge Applique Coasters | Zazu's Stitch Art Tutorials
 How to Sew a Bowl Cozy with Crafty Gemini
 Quick, Easy, Cute Hot Pads
 15 Sewing Room Tips & Hacks {Streamline Work} Find Organizational Bliss Zazu's Stitch Art Tutorials
 The Little Black Bra! | FREE Pattern Tutorial
 Tension: Art Quilting and Troubleshooting Basics | Zazu's Stitch Art Tutorials