Rocket stove hot tub - How I made it
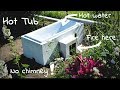
This is my version of a rocket stove hot tub ! Easy and cheap to make and very efficient. Perfect for winter evenings and mornings, good for the mind and soul ! Using rocket stove technology this hot tub uses very little wood and produces little smoke as well as producing great heat.
Cost to run: 0 euros (I use rain water and salvaged wood)
What I used:
- Bath tub: pressed metal enameled bath tub, very light to carry and I hope resistant over time. I found this tub at a second hand store for 20 euros. Plumbers could also be a good source as when they do renovations they usually through them out !
- Tub metal support: about 10 meters. I used square piping that I had left over from another project. I would recommend something strong as it has to support the structure plus the water plus the person. This was all welded together, it could also be bolted. You could also use wood as the structure is not in contact with the heat.
- Flexible chimney pipe: 9 euros. This is useful for the curve needed at the end of the tube. I added another piece of pipe I had at the end of that and secured it with a metal fencing rod so it can stand on its own. It is a good thing to make the chimney go up a few meters so you don't get any smoke and it also creates a good draft for the stove.
- insulating refractory bricks: I had these from another project. These are ultra light, heat resistant, insulating and perfect for the inner wall of the combustion chamber. They will allow higher temperatures in the combustion chamber and thus a more efficient burn. If you cannot find these you can always use normal refractory bricks or simple bricks.
- cement bricks: again I already had these, These are used to add an extra layer around the combustion chamber, to create the first part of the chimney under the tub and to create thermal mass so that once hot they will give back heat and thus the water stays hot for longer. You could use any type of material that creates a thermal mass for this part.
- wood feed: this is a old tin can, it is simply to give a form, around it I added cobb and bricks, so it is not a problem if the end near burn chamber burns though.
How it works / wood consumption:
- I use two empty fruit and veg boxes (these are thrown out in France after a single use!) and two thirds of one of these boxes filled with palette wood.
- I chose to make a rather large wood feed, combustion chamber and chimney under the tub as to heat that amount of water you need fairly powerful fire.As you can see in the video there is a metal grill at the bottom of the wood feed, this allows more air to arrive in the combustion chamber.
- The fire needs to be intense and constant. It takes about 15 to 20 minutes to heat the tub containing 110 to 120 liters of water.
- I get the water up to temperature and then no longer add wood to the stove. Thanks to the thermal mass the water stays hot for around one and a half hours ! But no longer adding wood to the fire there is no risk of over heating.
Skin protection from the heat given off by the base of the hot tub:
- Hard to see in the video but an essential part of the bath, are a few wooden planks to sit on when you are in the water as the base of the tub gets very hot and stays hot for some time !
Water:
- I use rain water, the next day I water the garden with the bath water !
Bath tub wood structure:
- This was made from palette wood
Cob:
- My "cement" was made from "cob", everything was done with this, it is absolutely amazing. I have a clayish soil in my garden, I used this mixed with straw and water. When cob dries it is extremely strong, good insulation and heat resistant. Though it needs to be protected from rain.
#rocketstovehottub #rocketstove #diy
Видео Rocket stove hot tub - How I made it канала gaetanproductions
Показать
Комментарии отсутствуют
Информация о видео
Другие видео канала
 DIY Hot tub - wood fired, off-grid (+20 points for relax in the garden)
 Hot Water Rocket Stove K Type Part 2
 Must See BEFORE Building a Rocket Mass Heater --- step by step and Why we TOOK it DOWN again!
 DIY Outdoor Sauna
 $100 Wood Fired Hot Tub (that can be used anywhere!) #9
 Firewood Heated Hot Tub | How We Built Ours
 Rocket Stove Water Heater Outdoor Shower | Part 3
 🛀Incredible Off-Grid Wood Fired Bath Tub COMPLETE! Portuguese Homestead Series
 Cedar Hot Tub
 TIMELAPSE: WOOD FIRED HOT TUB Built By Couple In 13 Min
 Wood Burning Pool Heater - Upgrade and Update
 DIY ROCKET STOVE HOT TUB FOR $100 + 5 HOURS | OFF GRID NZ
 We built a DIY in-ground Hot Tub/Spa! (4 foot deep, 1000 gallons, fits 10)
 Building A BETTER Beach Hot Tub!!
 Brilliant DIY Off-Grid Water Heater Using a Rocket Stove – No Propane!
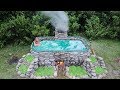 Building Hot Tub Spa Without Using Modern Technology
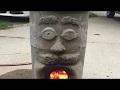 DIY Wood Fired Rocket Stove Outdoor Bath
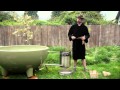 Dutchtub Tutorial
 Rocket Stove Water Heater (First Attempt)