How to Stop and Repair a Tank Live Leak
#Liveleaks and through-wall defects present major safety concerns to asset owners. This video demonstrates how live leaks on tanks operating at low pressures can be stemmed effectively by using Belzona 9611 (ES Metal). This rapid-curing epoxy is packaged as a stick and has been designed specifically to seal live leaks. The solution is then completed by bonding of a plate over the stemmed leak to achieve a permanent repair. This video mainly focuses on #howtobondmetaltometalwithoutwelding.
http://www.belzona.com/en/focus/composite_repairs.aspx
Leakage of potentially harmful solutions into the environment can prove problematic to both personnel and equipment in the immediate vicinity.
Eliminating the health and safety risks associated with conventional cut and weld hot work, #Belzona cold-applied metal repair composites are simple to apply in situ without the need for specialist equipment meaning they can be easily applied by your maintenance team.
Materials Used:
To stop the leak, we used Belzona 9611 (ES-Metal) then to bond on a plate we used Belzona 1161 (Super UW-Metal)
Read more about Belzona materials on our website:
http://www.belzona.com/en/products/1000/1161.aspx
How-to Guide:
Step 1: Prepare the surface using a simple grinding file.
Step 2: Clean the area to remove any dirt, grease and other contaminants.
Step 3: Cut off the required amount of Belzona 9611 and knead until a uniform color is achieved.
Step 4: Force the mixed material into the hole and apply pressure with a ratchet strap until the material hardened.
Step 5: After approximately an hour or once the material has fully cured, remove the ratchet strap.
Step 6: Roughen the entire area of the tank where a plate will be bonded using a grinder.
Step 7: Again, clean the area to remove any dirt, grease and other contaminants.
Step 8: Mix Belzona 1161 as per the IFU until a uniform material was achieved.
http://www.belzona.com/ViewFile.aspx?id=61011
Step 9: A Firmly apply the mixed Belzona material to the prepared area of the tank with a stiff bristled brush. Additionally, the material should be applied to the plate, pressing well into the surface and creating a sufficient build up in the center.
Step 10: Position the plate and firmly press it onto the repair area.
Step 11: Remove the excess material from each of the ladder’s feet and remove the masking tape to finish the application.
To find your local Belzona products and services supplier please visit: http://www.belzona.com/en/about/disfinder.aspx
Subscribe to our YouTube channel to explore our collection of How-To videos including:
How to Bond Brackets (Welding vs. Cold Bonding) https://youtu.be/ncTYiKJveEM
How to Bond Ladder Mounts to a Tank https://youtu.be/sFFWsdjD6ys
Cold Bonding by Injection
https://youtu.be/ZjTHLEhoB_Y
Видео How to Stop and Repair a Tank Live Leak канала Belzona
Показать
Комментарии отсутствуют
Информация о видео
Другие видео канала
 How to repair cracks in water tank|crack repair technique easy
 How to Repair a Weld Seam Without Welding
 Belzona Composite Patch
![FLEX TAPE vs. Gorilla Tape: which one is better? [9]](https://i.ytimg.com/vi/Ro-7sAkVB3s/default.jpg) FLEX TAPE vs. Gorilla Tape: which one is better? [9]
FLEX TAPE vs. Gorilla Tape: which one is better? [9] Is Flex Seal the Best? Let's find out!
 stop water leak with screw a cheap fix
 വാട്ടർ ടാങ്ക് പൊട്ടിയാൽ കാര്യം നിസ്സാരം Water Tank Leakage Repair
 Pipe leak repair with Belzona epoxy composites
 Water tank repair.wmv
 Metal Tank Repair - Fix Bad Water Leak in Water Holding Tank from Well
 "വാട്ടർ ടാങ്ക് പൊട്ടിയത് ഒട്ടിച്ചു പരജയപ്പെട്ടൊ"? | "Water Tank Leakage Repair" in Malayalam
 How to repair a hole in a metal tank - no welding | Tech-Bond
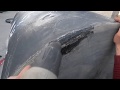 Learn Plastic Welding » Weld and repair water tank with a heat gun and plastic clip
 Flex Ed 101: How to Use Flex Paste
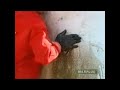 How to Stop Leaks in Concrete Walls Concrete Tanks and Pipes instantly
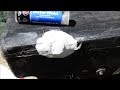 Fresh Water Tank Repair JB Weld WaterWeld
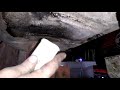 temporary fix to a leak in the fuel tank
 Product Introduction: Belzona 9621 - 3D Leak Seal Mesh Kit
 How to Apply WaterStop Wet and Dry Sealant
 How To EASILY Repair Holes In Aluminum