DISASSEMBLY - WE M4A1 UPPER | AIRSOFT
DISASSEMBLY - WE M4A1 UPPER | AIRSOFT
I am done caressing the bottom, let´s fiddle with the upper.
Today I will continue my disassembly of the Wei-Tech M4A1.
Share this video: https://youtu.be/ibGSx_YUEV8
Support us on Patreon and get access to 3d-printing files:
http://patreon.com/specialweaponsandplastic
Follow us on facebook for Deals and more:
https://www.facebook.com/SpecialWeaponsAndPlastic/
Visit our website:
www.SpecialWeaponsAndPlastic.com
STEP 1:
First off I remove the magazine and check the chamber to make sure the gun is safe before proceeding.
The only parts I won't disassemble down to the bare bones are the delta ring, carry handle and forward assist, since it is better to just buy the entire assembly if you want or need new ones.
And the bolt will be covered in a separate video since it is an intricate and complex part, in and of itself.
Two pushed pins later and the lower and upper are separated.
STEP 2:
Time for the barrel.
I unscrew the flash hider and remove the washer, plus the o-ring behind it.
Then I unscrew the barrel extension. If I’m feeling lazy, I can just remove the extension with the flash hider still attached.
STEP 3:
To remove the handguard, I pull back the delta ring, and separate the two halves. My gun is brand new, so the leaf spring is putting up a fair fight.
STEP 4:
The carry handle, on the other hand, is easily removed by undoing the nuts on the side, and pulling off the handle.
STEP 5:
To remove the bolt I pull the charging handle back about 5cm.
The bolt can then be pulled out.
Next I remove the charging handle by pulling it back until the tabs on the handle matches the cut-outs inside the upper, then push the handle down, and out.
STEP 6:
On to the front sight / gas block.
All these pins must be punched out from left to right, since they are knurled on one end.
I start with the pin holding the front sling mount.
Then I punch out the two pins securing the gas block to the barrel.
The final pin is the small one securing the gas tube to the gas block.
Before I can remove everything I need to unscrew this small grub screw, which allows me to pull off the gas block, handguard cap and gas tube, all in one.
STEP 7:
Over to the delta ring. Apparently it is held in place with copious amounts of threadlock. So after applying some heat, I use the disassembly tool Wei-Tech supplied to loosen the delta ring.
Then I unscrew it by hand
and remove it.
STEP 8:
Then I pull off the outer barrel.
Followed by the inner barrel and hop-up assembly.
I will get back to the hop-up unit at the end of the video.
STEP 9:
I open the ejection port cover.
This is done by depressing this detent from the inside.
then placing my thumb over the coil spring, and pulling the rod out to the front.
The rod is held in place with this small c-clip,
so if your rod is moving backwards, this part is probably missing.
When the rod is out, I can remove the port cover and spring.
STEP 10:
Time for the forward assist. Punching out the pin, from the bottom, towards the top, allows the forward assist and spring to get airborne.
After recovery, I present them to the camera, for your viewing pleasure.
STEP 11:
Lastly, I will attack the hop-up unit.
The amount of hop-up can be adjusted with this screw, through the ejection port.
But I will leave that screw be.
Instead I remove the screw holding the unit together, revealing the hop-up rubber and hop-up nub. These items are consumables, and need to be replaced from time to time.
When replacing the rubber, make sure the nub is on the right side of the barrel so it fits into the notch in the housing.
The cut-away portion of the inner barrel is up, since that is where the nub will interact with the hop-up rubber.
By the way, keep in mind that the tiny nub is a flightrisk.
That’s it!
Let’s end it with an overview of all the parts.
Note that I’m performing these modifications at my own risk. These alterations can go very wrong if you lack the skills, tools and knowledge required, and can damage your equipment and parts as well as cause injury on your person if you attempt them yourself.
Видео DISASSEMBLY - WE M4A1 UPPER | AIRSOFT канала Special Weapons And Plastic
Показать
Комментарии отсутствуют
Информация о видео
27 июля 2018 г. 10:44:59
00:05:03
Другие видео канала
 M4 Carbine: full disassembly & assembly
 DISASSEMBLY - WE M4/M16/416/XM177/M733 BOLT | AIRSOFT
 Airsoft Tech Talk: JG M4 Disassembly
 UNBOXING - WE M4A1 | Airsoft
 The Airgun Show – Hectic daytime rat shoot, PLUS top night hunting shots with Nite Site…
 TIPS & TRICKS - REAL FURNITURE ON WE M16A1 | AIRSOFT
 Maintain Your GHK M4 Gas Blowback Rifle
 DISASSEMBLY - WE M16A1 UPPER | AIRSOFT
 airsoft M4 barrel removal
 Changing the Hop-Up Rubber in a WE M4
 RAIL SWAP! - Building Your Build Ep. 2 | Airsoft GI
 UNBOXING - DOMINATOR DM870 | AIRSOFT
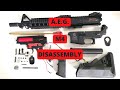 how to m4 AEG disassembly guide
 UNBOXING - WE M16A1 | AIRSOFT
 Airsoft CAA M4 Carbine Gas BlowBack 450 Fps 6mm
 Tech-tip: WE M4 series GBBR Bolt Carrier Group (BCG) dis-assembly and reassembly
 Facts about GBBR Myths Revealed
 SFA: How To: Removing the Front triangle sight post on a m4/m16
 WE vs GHK vs VFC - Which One?
 Airsoft V2 gearbox disassembly and re-assembly tutorial