Beginners Guide to Facetune – Edit Your Instagram Selfies Like a Pro!
Want to make your selfies look amazing like your favorite Instagram influencers? Watch this video to learn the ins and outs of the Facetune app. We'll show you how to use Facetune to edit your selfies.
To edit a selfie from your camera roll, tap the Photo icon at the top right corner. Tap to select the photo you want to edit. Tap the Photo icon again to hide the camera roll window.
Tap Retouch to open another menu. To whiten your teeth, tap Whiten. Then pinch to zoom in closer to your face, and drag your finger over your teeth in the image to basically paint on the whitening effect. Change the intensity of the effect with the slider at the bottom. Using the Smooth tool is similar to the Whiten tool. Zoom in on your face, then paint the smoothing effect on your skin to smooth out uneven skin texture or wrinkles. Scroll horizontally over the bottom menu to see more tools. The Details tool is great for making certain features stand out. The Glow tool also adds brightness.The Conceal tool is great to paint under your eyes to reduce the appearance of dark circles. The Matte tool can be used to mattify any shiny areas of your face. Last in this section, the Black & White tool is nice to use on the background of your image to make you stand out more.
The Face tool has 3 functions: Smile, Jaw, and Width. To make your smile bigger, tap Smile, then slide the intensity bar to your liking. To make your jaw look sharper, tap Jaw, then slide the intensity bar to the right. If you wanted to make your face look fuller, slide it to the left. Finally the width tool just changes the width of your face overall. Slide the intensity bar to the right to make your face thinner, or the left to make it wider.
Using the Reshape tool, you can tap and drag part of your photo to accentuate or minimize something. The Refine tool is more detailed. You might use this to make your eyebrows look more arched. The Resize tool can also be used to make parts of your face larger or smaller by pinching with two fingers. If you make a mistake with any of these 3 Reshape tools, you can paint on the “Restore” effect to bring it back to normal.
Just like the filters you’ve likely seen on Instagram, Facetune's filters will add a different look to your photo, changing the colors, brightness, contrast, and more.Tap a filter to add it to your photo.
Next is Paint. The skin tool allows you to paint on your skin tone, which is nice if you want to make yourself look more tanned. Tap a color on the right side. See more colors by dragging your finger upwards over the colors shown. Tap a color to select it, then paint it on the areas where you want it. Adjust the intensity to your liking. The Tone tool is a great way to add a blushed look to your cheeks. Once you’ve selected a tone, paint it on your face where you want it and adjust the intensity how you’d like it. Similarly, the Paint tool can be used to add a wash of colour to your lips, or create the look of eyeshadow around your eyes.
In the Crop section, there is a Crop tool to adjust the size of your photo. Drag the corners of the blue box to indicate the potion of the image you’d like to keep. Tap Flip to mirror your image. Tap Rotate to rotate the image 90 degrees clockwise. To tilt your image, use Straighten. Tap Fixed Ratio to crop your image to a specific size ratio. Tap the sizing you’d like to use, then move the cropped box to the portion of the image you want to keep.
In the Adjust section, you can make changes to your photo’s brightness, contrast, color, sharpness, and more. Tap a tool to use it, then use the slider to adjust it to your liking.
In the Light FX category, you’ll find lots of cool effects to apply to your photos. Tap an effect to try it out. Adjust the intensity to your liking with the slider at the bottom. Tap Flip to flip the light effect vertically.
The Vignette tool is sort of like a spotlight for your face. Drag the blue oval with your finger to adjust what part of the image you want the focus to be on. You can make this larger or smaller by pinching with 2 fingers. With the softness tool, you can adjust how soft the edges of the vignette are. Change how light or dark the vignette is with the Brightness tool. Give your vignette outline more of a rectangular shape with the corners tool. Use the Blur tool to make the outside of your vignette more blurry.
The Defocus tool allows you to paint a blur over the background of your photo to keep the focus on you. You can paint the blur on yourself as you do with other effects, or tap Auto at the bottom to have FaceTune automatically detect the background and blur it out.
To save your photo tap the Share icon in the top right corner. Then tap Save to Camera Roll.
Visit http://www.techboomers.com for over 100 free courses on all of today's most popular websites & apps!
Видео Beginners Guide to Facetune – Edit Your Instagram Selfies Like a Pro! канала Techboomers
Показать
Комментарии отсутствуют
Информация о видео
Другие видео канала
 How To Facetune Instagram Pictures
 How To Get QUALITY Photos With Your iPhone!
 I USED FACETUNE TO DO MY FULL FACE OF MAKEUP.. HERE ARE THE RESULTS 😅
 How to Edit Photos on Facetune 2! (Easy Tutorial)
 Facetune: Reshape Basics
 FACETUNING MY FOLLOWERS SELFIES
 HOW TO TAKE YOUR SELFIES FROM DRAB TO FAB! FACETUNE TUTORIAL
 Top 5 Best Photo Editing Apps For Android ⚡⚡⚡ April 2020
 JAMES CHARLES FACETUNE TUTORIAL ( not CLICKBAIT)
![QUICK GUIDE for Very Beginners [IPAD] Affinity Designer | #Live 32](https://i.ytimg.com/vi/GXBuyrErtmI/default.jpg) QUICK GUIDE for Very Beginners [IPAD] Affinity Designer | #Live 32
QUICK GUIDE for Very Beginners [IPAD] Affinity Designer | #Live 32 TOP 5 APPS TO EDIT LIKE A BEAUTY GURU! HOW TO FACETUNE INSTAGRAM PHOTOS
 How to Edit Pictures Like an INSTAGRAM MODEL (2 Apps You NEED)
 HOW I TAKE AND EDIT MY INSTAGRAM PICS *BY MYSELF* | My Camera Equipment, Apps, + Tips!
 HOW I TAKE AND EDIT MY MAKEUP PHOTOS.. how to facetune like a pro
 How to Use Facetune Video FREE - Beginners Guide
 HOW TO EDIT/FACETUNE INSTAGRAM PHOTOS 2019 (best editing apps)
 HOW TO EDIT YOUR INSTAGRAM PICTURES LIKE A PRO (HIGHLY REQUESTED)
 HOW I EDIT MY MAKEUP PICTURES FOR INSTAGRAM | SPILLING ALL THE TEA..
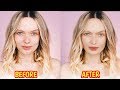 Facetune 2 Full Tutorial - Best Android Photo Editing Application
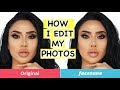 HOW TO EDIT PICTURES USING FACETUNE | BrittanyBearMakeup