How to Glitter an Outlined Checkered Pattern Tumbler & Apply HTV Decal
In this video I go over how to glitter an Outlined Checkered Pattern Tumbler and also apply an HTV Holographic and Reflective Decal
The steps in creating this cup are below:
1. Prep cup by sanding and painting a base color or use Dixie Belle Slick Stick.
2. Tape using the automotive thin tape the checkered pattern.
3. Apply a thin (less than 5ml total) epoxy layer.
4. Apply your glitters however you like.
5. Remove tape and let it cure completely.
6. Mix a small amount of epoxy (10ml) and add in the mica or glitter of your choice.
7. Using a silicone makeup brush, apply the epoxy mixture into the lines in a thin layer.
8. Let cure.
9. Brush off excess glitter and seal if needed (I did not).
10. Apply epoxy and spin until cured.
11. Sand if necessary to create a smooth surface for decal.
12. Apply decal (I show applying an HTV decal in this video).
13. Apply final coat of epoxy and spin until cured.
Glitters were Featherbear Bling - Picture in video
https://featherbeardesigns.com/cart?kb_ref=5e7af0e
I use Counter Culture DIY's Artist Resin (Epoxy)
https://counterculturediy.com/product-category/artist-resin/
1/4 inch masking tape:
https://www.amazon.com/STIKK-Painters-Removal-Finishing-Masking/dp/B07SMFHXG2/ref=sr_1_7?dchild=1&keywords=1%2F4+inch+automotive+tape&qid=1594736437&sr=8-7
MINDERELLA CREATIONS Information:
www.facebook.com/MinderellaCreations
My group for behind the scene sneaks and ordering information:
https://www.facebook.com/groups/402553970257171/
Instagram: https://www.instagram.com/Minderella1225/
I go over my typical supplies in these videos:
*New* https://youtu.be/3Nw7v7GB-j8
*Original* https://youtu.be/WksL6r6O098
I use HOGGS - https://hoggoutfitters.com/
I use Stickermule for my cup labels and branding.
Here is my referral link which gives you $10 credit and gives me $10 if you purchase:
https://www.stickermule.com/unlock?ref_id=5214680701&utm_medium=link&utm_source=invite
I created the wording in Silhouette Studio and cut a Stardust Co Vinyl.
https://www.amazon.com/Stardust-Holographic-Reflective-Transfer-Certified/dp/B07NKZFQC1
Tumbler Tutorials and MORE! Facebook group I help admin:
https://www.facebook.com/groups/tumblertutorials/
Chapters:
0:00 Intro
0:20 Taping the cup
4:53 Glitters Used
5:20 Apply Epoxy as an adhesive
8:30 Applying Glitter
14:00 Removing tape
16:40 Fixing Paint that pulled up
19:56 Mixing Mica in Epoxy and Applying in the lines
30:00 First layer of Epoxy
30:16 Applying HTV Decal with Embossing Gun
34:09 Final layer of Epoxy
34:31 Showing off the end result
35:50 SURPRISE BOTTOM!
36:00 Outro -- Like and Subscribe!! Drop a comment if you have questions!
I do not own the rights to the included songs:
Together by for KING & COUNTRY
Burn The Ships by for KING & COUNTRY
God Only Knows by for KING & COUNTRY
Hold Her by for KING & COUNTRY
Church (Take Me Back) by Cochren & Co.
Who You Say I Am (Studio Version) by Hillsong Worship
Not Today by Hillsong United
Oceans (Where Feet May Fail) by Hillsong United
Видео How to Glitter an Outlined Checkered Pattern Tumbler & Apply HTV Decal канала Minderella Creations
Показать
Комментарии отсутствуют
Информация о видео
Другие видео канала
 DIY: How to glitter a Northern Lights Tumbler
 How to Use Counter Culture DIY Quick Coat to Seal Glitter
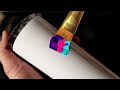 Easiest Most Beautiful Alcohol Ink Tumbler EVER!!!
 Clear Waterslide on Dark Cup HACK !!
 DIY: How to apply Glitter Mixed into Epoxy on a Tumbler - Great for Chunky!
 How To Apply Dry Mica Powders to a Tumbler that I Pre-applied resin
 DIY: How to do a Peek-A-Boo or Stenciled Glitter Tumbler
 How to Apply Waterslide Decals to Tumblers
 Pastel Glitter Beach Tumbler Tutorial
 Christmas light tumbler tutorial with NO showing wires or battery pack
 Epoxy Glitter Tumbler | Mod Podge Method
 How to Crackle a Tumbler
 How to make an Alcohol Ink Geode Tumbler
 Alcohol Ink Drips on Tumbler | 595
 DIY: How to Apply Ombre Glitter with the Epoxy Method
 How to make layered resin earrings
 How to Glitter a Pencil Tumbler: Start to Finish
 DIY DOLLAR TREE GLAM CHANEL INSPIRED PERFUME BOTTLE | GIANT DIY NAIL POLISH
 Glitter Leopard Print Tumbler Tutorial: Gypsy Leopard PART 1