Simple Leather Wrap Bracelet: Easy Jewelry Tutorial
Click SHOW MORE for more details on this project!
Thanks for watching! If you like our videos, please click the subscribe link so you won't miss our new videos. We post new ones all the time!
Our blog is www.RunningWithSisters.com. It is loaded with DIY crafts, jewelry tutorials, and all kinds of gift crafts to make.
Let’s stay in touch!
Twitter: https://twitter.com/ONeilSisters
Facebook: https://www.facebook.com/TheONeilSisters
Instagram: https://www.instagram.com/oneilsisters/
Pinterest: https://www.pinterest.com/oneilsisters/
How To Make A Simple Leather Wrap Bracelet
by Jennifer and Kitty O'Neil
The O'Neil Sisters
Running With Sisters
Click to get the written how-to with step by step instructions on our blog: http://runningwithsisters.com/boho-leather-wrap-bracelet
Transcript (Edited For Length)
To make this leather wrap bracelet, we've got two pieces of leather. And this is a nice soft leather cord. We have two pieces of that. One piece we've already cut is 25 inches and then we have a longer piece and this one's 42 inches.
Then we have some beads. We have nine of these nice large round beads and eight of the smaller silver beads. The key to picking out these beads--you need to be able to fit two pieces of the leather into the bead at the same time, so you need a bead with a large enough hole that you can fit two pieces of leather in. So test that out. For this size bead you need to be able to fit one piece of the leather in. So that can be a little bit smaller. Then we also have a little hook. This is going to be our clasp.
To get started, we're going to take the end of our leather cord --that's the short piece-- lay it down and then we're going to fold the long piece over. This is our long piece folded over like this. We're going to start by tying a knot at this end. I'm going to tie an overhand knot in the cord and then I'm going to pull it tight to make a little knot. This is the loop that our hook is going to grab onto, so it doesn't need to be too big. I'm going to slide it up a little bit and tighten it up a bit.
Now we've got three strands and the whole design of this wrap bracelet is based on these three strands. We're going to alternate putting two strands into a big bead and putting one strand into a small bead.
I'm going to start by grabbing two strands. And I'm gonna start with a big bead. I'm going to feed both ends. Now with my other piece I'm gonna slide this through the single cylinder bead. We've got one bead on two strands and one bead on one strand. I'm going to move this strand over. I'm gonna take these two strands and feed them through a large bead. I'm gonna alternate which cords go through the big bead and which go through the small bead.
Now I'm going to slide this bead up here, pull the cords taut. I put the single cylinder bead on the single cord. My next move is to take one of these two cords. I'm gonna move it over to that side and I'm going to put these two ends through the big bead.
I slide up that big bead. I put a single on this single cord that's left over. I'm just going to continue like this putting two cords--one from before and one from the single--into a big bead. And then that single cord that's left over is going to go through the small bead. Let me do that all the way down to the end.
I'm putting on our last big bead. And you can see now, if you look at the bracelet, you can see it it alternates. Two go in the big bead here, these two, those two, these two. And then alternating these cylinders on one, every other. This one will slide up and up and back between these beads.
We have a hook already for the clasp to go into, but we need to put the clasp on. I've got the two short strands from the folded over one and this extra long one. Now I'm going to feed the longest piece of cord that I have into the opening of my S-hook or clasp here. And that's a little bit of a tight fit, but I can just squeeze it through there. And then I'm gonna bend that back on itself. This is gonna be our clasp.
And then just to secure that, I'm going to tie a knot with our ends. And I've got the two ends that were running alongside this third piece. This is the long piece coiled back on itself. I'm gonna tie a knot right here. And then all we need to do or trim these ends. And then I can spread my beads out a little bit throughout the bracelet.
And then the fun thing about this Boho Wrap Bracelet is that it wraps around--so you'll coil around your wrist and then clasp it and you have this fun little Boho Wrap Bracelet.
Cheers,
Jennifer & Kitty
We have all kinds of jewelry making videos and lessons. If you enjoy this one, you might also like these jewelry making lessons:
How To Make A Pandora Ribbon Choker
https://youtu.be/KOLY0cP8PoU
How To Make A Beaded Wire Mesh Necklace
https://youtu.be/sL5s06YnRJc
How To Make Jewelry: How To Make A Beaded Lariat Necklace
https://youtu.be/z7Ywk2DHUH4
Видео Simple Leather Wrap Bracelet: Easy Jewelry Tutorial канала The O'Neil Sisters
Показать
Комментарии отсутствуют
Информация о видео
Другие видео канала
 How to make a box knot leather bracelet - DIY Tutorial
 Leather Knotted Wrap Bracelet Tutorial! Simple and Easy! 💕 (It Doubles as a Necklace!)
 Leather Mystery Braid Cuff
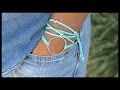 Boho Infinity Circle Charm Triple Wrap Bracelet - Step by Step DIY Tutorial How to Size - # 332
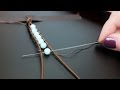 Beaded Wrap Bracelet // Becky Stern
 Gemstone Leather Friendship Bracelet
 Runa vikinga en pulsera paracord cierre corredizo
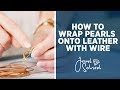 Wrapping Pearls onto Leather with Wire | Jewelry 101
 4 Strand Beaded Wrap Bracelet
 How to Make a Boho Leather Tube Bangle Wrap Bracelet - Step by Step DIY Tutorial - # 769
 DIY 3 Styles of Leather Bracelets for Guys | Curly Made
 Sliding Knots Made Easy! Step by Step Tutorial
 How to Make a Boho Triple Wrap Bracelet - Step by Step DIY Tutorial Bohemian Faux Suede Wrap
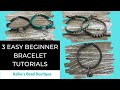 3 Easy Beginner Bracelet Tutorials - 3 of my favorite bracelets!
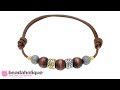 How to Make a Bracelet with Slide Knots
 Better Beader Episode 26 - How to Finish Leather Cord
 Wrap Bracelet Tutorial - Chain Lash Bracelet
 How To Make a Beautiful and Easy Faux Suede and Czech Glass Bracelet
 DIY Fashion ♥ Adjustable Braided Leather Bracelets
 Learn how to make a barrel knot leather bracelet - DIY TUTORIAL