Permanent waving with Curlformers on long, FINE hair - Step by Step
Add an exciting new technical service to your in-salon menu and perm with Curlformers to create long-lasting beach-waves or to add body and texture to limp, lifeless hair. The options are endless and you can perm with Curlformers on short and long hair but remember the final result will depend on hair condition, texture and the type of permanent wave solution applied!
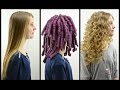
This step-by-step video shows you how to perm with the Extra Long and Wide Curlformers on long, fine hair to create a mane of longer-lasting beach-waves and curls. Because our model has fine hair but a lot of it, perming produces a slightly tighter curl than it would on thicker/coarse-textured hair.
Hair condition is vital to the success of your perm. We recommend that a stretch or strand test is carried out in advance to give an indication as to how well the hair will curl. The wide Curlformer, which comes in short, long and extra long lengths, gives a soft beach wave and is currently the most popular option.
Good results have been achieved on normal hair using a variety of perm solutions but it's important to read and follow the manufacturer's instructions as they vary.
1 Correctly gown your client and then wash hair once with a clarifying shampoo to remove any build-up, followed by a regular shampoo. Rinse and towel dry.
2 At this stage, you may want to mist hair with a leave-in treatment to even out porosity and ensure the perm lotion is evenly absorbed to produce a more even curl.
3 Prepare your station in advance (as you would with foils for colouring) by applying your choice of Curlformer to some Styling Hooks. Thereafter you can involve your clients by asking them to thread Curlformers on to the Styling Hooks and passing them to you, one at a time.
4 When choosing which width of Curlformer you want to use, remember that each size comes in two different colours; one colour curls the hair clockwise and the other curls anti-clockwise. This means you can create curls that fall forwards and onto the face, or backwards and away from the face. Alternating them throughout gives a more natural-looking curl.
5 Divide the hair into sections and apply Curlformers to 1 inch by 1 inch sections, as you would if you were curling rather than perming the hair.
One of the great things about perming with Curlformers is that the tension is automatic: you don't need to worry about winding or using end papers.
6 Comb hair smooth; twist once at the root for ease of application and thread through eye of the hook and then pull hair through the Curlformer.
7 Start at the nape of the neck. Place the Curlformers from 1 - 1 and 1/2 inches off base. This creates a more natural look and avoids bumps at the root and tell-tale perm parting lines. Hair should be kept wet throughout winding (to prevent fish hooks).
8 Once you have all the Curlformers in place apply dampened cotton wool around the hairline, including the nape area, or apply a barrier cream to protect the skin and avoid causing irritation.
9 Next apply the perm solution, which is a lot easier than you might think! Just apply it to each Curlformer one by one, gently stretching each out as you go along. Apply the solution along one side (the top) and it will seep through. It's very easy to see exactly where you have applied the solution and where you haven't. It's a good idea to apply at the backwash or with a shoulder drip tray. With a drip try you don't waste as much product!
10 Once the hair is evenly saturated with the perm solution, process according to the manufacturer's instructions. You may wish to test after 5 minutes for ribbing.
11 After processing, rinse the hair for up to 20 minutes in warm water (or according to the manufacturer's instructions), until the smell has gone and the hair is thoroughly rinsed.
12 Then towel blot each Curlformer individually and gently dry with a hair dryer to get rid of excess water. This helps to ensure the neutralizer isn't diluted.
13 Then apply neutralizer to each Curlformer, which again is a simple process because you can see exactly where you have applied the solution and where you haven't. It's a good idea to use a sponge to press the neutralizer in to the Curlformers. The neutralizer should be left on for 5 minutes (or according to the manufacturer's instructions).
14 After the 5 minutes, remove the Curlformers. Once removed and if required, apply additional neutralizer for 3 minutes. Rinse & apply a conditioning treatment.
15 Rinse again and apply mousse or a curl texturizer. Then scrunch and diffuse-dry or leave to dry naturally.
The whole process should take about 2 hours and 30 minutes from start-to-finish depending on length and texture of hair. Your Curlformers can be rinsed through, ready for the next client.
Curlformers will give you a consistent curl/wave pattern every time
SHOP THE LOOK: https://www.hairflair.com
Видео Permanent waving with Curlformers on long, FINE hair - Step by Step канала HairFlairCom
Показать
Комментарии отсутствуют
Информация о видео
Другие видео канала
 Curlformers- No Heat Curls: How to Use Them | BabesInHairland.com
 Permanent Beach Waves Tutorial
 Локоны без вреда для волос - на бигуди Magic Leverag
 Как Сделать Кудри без Плойки. Новый Способ Кудри на Ободок.Тестирую Лайфхак
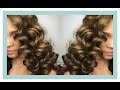 Natural Hair | {Semi-Wet Perm Rod Set}
 LOCKEN ohne HITZE! - Heatless Curls Methode mit LOCKENWICKLER | Sanny Kaur
 HOW TO PERM HAIR (REAL HAIR DEMO) detailed tutorial step by step
 I Tried WAVE FORMERS On My Natural Hair & I'M SHOOK!!
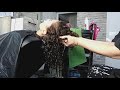 PERMANENT CURLS
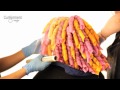 Permanent waving with Curlformers on long THICK hair - Step By Step
 EASY CURLFORMERS ON NATURAL HAIR l SPIRAL CURLFORMERS VS BARREL CURLFORMERS
 The Guide To Creating The Most Popular Perm For 2020 ( Step by Step Demo )
 Hair Curlers Tutorial by Glitter
 The Guide To Getting The Perfect Perm
 Beachy Waves Perm - How to get Permanent Waves using Curlformers (Super easy technique!)
 Best Heatless Hair Curlers? CurlFormers Dupe Review, Tutorial & Demo
 The BEST HEATLESS CURLS?! | Milabu
 ONE OF THE BEST SPIRAL PERMS EVER #hair2020 DAUERWELLE BY JOERG MENGEL FRISEURE
 WE ARE USING CURLFORMERS WRONG!? Roll Up Method On Natural Hair | Perfect Heatless Curls
 Permanete con Anven Permanens- Paso a Paso para realizar una Permanente con Bigudies