How to Wrap Posts in Cedar Wood | Tutorial
For the Cedar Stain - Click HERE 👉https://amzn.to/2y32f09
For the New Ryobi Nail Gun - Click HERE 👉 https://amzn.to/2YLjCKK
If you're looking to improve the curb appeal on your house, then you've come to the right video because this will show you how to wrap two cedar posts for less than $100.
This was by far the biggest improvement to the front of the house and it really makes this stand out from the rest of the houses in the neighborhood, just by adding cedar wood.
It's really as easy as cutting the wood planks to the same height as the posts you currently have, then applying those boards to 2 sides. Then cut a 4x4 piece of wood into 4 even pieces of 1" thick to apply to the other 2 sides of the posts. Now when you go to nail in the other cedar boards, they'll rest flush with the other boards.
Easy!
You can use any cedar wood sealer you'd like, they come in many different colors.
Thank you for watching another Kelly Concepts video!
-------------------------------------------------------------------------------
Tools Used:
⚒️⚙️🗜️🔦📐🔧🔨
Cedar Stain: https://amzn.to/2y32f09
Ryobi Nail Gun: https://amzn.to/2YLjCKK
#CedarPostDIY #WrapPost #FrontYardLandscaping
-------------------------------------------------------------------------------
Kelly Concepts is a participant in the Amazon Services LLC Associates Program, an affiliate advertising program designed to provide a means for sites to earn advertising fees by advertising and linking to Amazon.com
Видео How to Wrap Posts in Cedar Wood | Tutorial канала Kelly Concepts
Показать
Комментарии отсутствуют
Информация о видео
Другие видео канала
 TRANSFORMING OLD PORCH POSTS | CLEAN AND MODERN
 DIY Stone WRAPPED COLUMNS
 Ply Gem Stone Durata EZ Column Wrap
 Easy method to cover up basement beams
 Porch Post Remodel
 Building Our Own DIY Natural Wood Shutters!
 HOW-TO: Wrap a Support Post - Easy DIY Project
 Build a Rustic Faux Beam Mantel or Shelf
 How To Build A Porch Column Wrap | This Old House
 How To Replace Columns
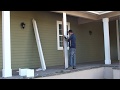 DIY l How to install patio PVC column wraps - FYPON
 Cedar Wrapping Posts!
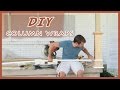 EASY, DIY FRONT PORCH COLUMN/POST WRAPS TUTORIAL!
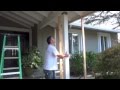 Termite Post/Beam Replacement-DIY
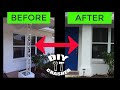 House Column Makeover Improve Curb Appeal |Covering Wrought Iron Column
 DIY Cedar Wrapped Porch Posts
 How to DIY- Farmhouse Faux Log Beam
 How to Install Porch Columns | This Old House
 Add $5,000 to your properties value with just $20! Part 2 (low cost front exterior remodel)
 Building Simple Box Columns - DIY Front Porch Home Improvement!