Cable Drum Bottle Top Table in Epoxy Resin
I made a couple of bottle top tables using some old cable drums I salvaged. This video takes you through the step by step guide of how I made them.
1. Preparing the Table (00:05)
- Sand it down
- Fix underlay board
- Bottle top dry run
- Straighten the bottle tops
2. Fixing the Bottle Tops (00:51)
- Mix Adhesive Ratio 5:1
- Apply Tile Adhesive
- Fix Bottle Tops
*Allow to dry for at least 24hrs
3. Grouting (03:19)
- Mix Grout Ratio 3:1
- Apply the Grout
*Allow to dry for at least 24hrs
4. Applying the Resin (05:07)
- Ensure the table is level
- Mix the resin thoroughly as per the manufacturers reccomendation
- Apply the Resin evenly
- Use a blowtorch to eradicate any bubbles in the resin
*Allow to dry for at least 24hrs
5. Finishing Touches (10:08)
- Sand the base again if required
- Apply varnish (I used 3 coats of Yacht Varnish)
Wood Effect Trim: The wood effect trim is a UPVC Rosewood which I found to be easily shaped around the edging.
This was the most problematic to fix which isn't covered in this video.
After many failed attempts I settled on having to use 2 screws to secure it, and on the second table found it easier if this was fitted before applying the resin.
Here is a list of materials:
- Cable Drum
- Wood Fibre Underlay Boards
@fibre-underlay-boards-7m-15-pack/7824r
- No Nonsense No Mould Grout Black
@nsense-no-mould-grout-black-5kg/200hp
- Tack Pins
- Bottle Tops
- Tile Adhesive
- Sanding Disks
- Yacht Varnish
- UPVC Wood Effect Trim
- 1.5Kg Epoxy Resin
Thanks for watching, and please ask any questions you may have. I have made many mistakes, some costly so happy to help you avoid the same ones I made.
Видео Cable Drum Bottle Top Table in Epoxy Resin канала Lee Austin
Показать
Комментарии отсутствуют
Информация о видео
Другие видео канала
 Table with epoxy resin inlay and matching lamp
 DIY Bottle Cap Table With Epoxy Resin
![[아빠의 취미]공드럼 화로 캠핑테이블 만들기(Build Outdoor cooking Table From Wooden Cable Coil Discarded)](https://i.ytimg.com/vi/LrqSQhWk4dU/default.jpg) [아빠의 취미]공드럼 화로 캠핑테이블 만들기(Build Outdoor cooking Table From Wooden Cable Coil Discarded)
[아빠의 취미]공드럼 화로 캠핑테이블 만들기(Build Outdoor cooking Table From Wooden Cable Coil Discarded) HOW TO MAKE BEER BOTTLE CAP COASTERS. EPOXY RESIN. DIY COASTERS.
 2 YeaRs iN tHe maKing...
 Build Outdoor Coffee Table From Wooden Cable Coil Discarded // Amazing Ideas Woodworking Project!
![Epoxy Cable Spool Table (INCREDIBLE RESULT) [subtitles included]](https://i.ytimg.com/vi/_EFvYXrnuQc/default.jpg) Epoxy Cable Spool Table (INCREDIBLE RESULT) [subtitles included]
Epoxy Cable Spool Table (INCREDIBLE RESULT) [subtitles included] Amazing Idea . Make Coffee Table And Chairs From Glass Bottle , Old Tire And Cement .Very Easy .
 Building a beer bottle cap cable reel table using bottle tops and epoxy resin
 MINI BAR PART 2
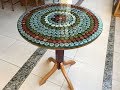 MESA DE TAMPINHAS E RESINA EPOXY - MOSAICO - MESA TAPA - BOTTLE LID TABLE AND EPOXY RESIN - MOSAIC
 A Burning CANDLE in Epoxy Resin. DIY a Simple Way / RESIN ART
 Building a Bottle Cap Table - Every Step
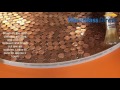 Making a Penny Table Top with Resin
 5 EPOXY Tips I Wish I Knew As A Beginner!
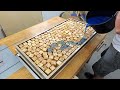 Coffee table with epoxy resin Homemade
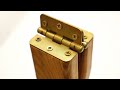 Cool idea! Don't throw away pieces of wood!
 Epoxy Resin Table
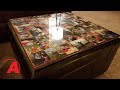 DIY Epoxy Clear Coated Game Board | Alumilite
 Beer Bottle Cap Table Tutorial Using Bottle Caps and Epoxy Resin