Let’s Make Some Fun and Easy Wreath Attachments |Crafting with Hard Working Mom |How to DIY
Join this channel to get access to perks:
https://www.youtube.com/channel/UCQ2zn4_-swLCIXIDQ8MLdxA/join
Learn How to Make Fun and Easy Wreath Attachments
00:00 Video Start
07:05 Glitter Ball Ornament
26:06 Wrapped Candy
49:30 Curly Q's
59:11 Yarn Ball Ornament
01:16:44 Glitter Ball Pick
#hardworkingmom, #decomeshwreath #wreathdesign
Shop- https://hardworkingmomstore.com/
Business Group- https://hardworkingmom.com/success-path/
Wreath Design Group- https://hardworkingmom.com/product/design-with-hard-working-mom-wreath-therapy-on-steroids/
HOW TO CONTACT ME: hardworkingmomtv@gmail.com
PURCHASE MY SIGNS HERE: https://rclsignsandmore.com/
Tools & Supplies Store- https://www.amazon.com/shop/influencer-5ef69f14
PLACES I RECOMMEND FOR WREATH SUPPLIES-
Nicks Seasonal Decor- https://nicksseasonaldecor.com/?ref=W5Y8eDMzVKE2oM
DecoExchange- https://goo.gl/QPsTPY
Festive Creations by Stephanie- https://festivecreationsbystephanie.com/
Susie’s Wreaths and Things- https://www.simplify-organize.com/shop/?ref=14
Tools & Supplies Store- https://www.amazon.com/shop/influencer-5ef69f14
INSTRUCTIONS:
Glitter Ball Ornaments- Get your Styrofoam Ball and stick barbecue skewer to the bottom to easily handle ball. Apply a layer of Acrylic Paint that's similar to color of Glitter. Let dry. Apply layer of Modge Podge to ball and sprinkle Fine Glitter all over ball. Once completely dry, get your mixture of Modge Podge and water and using a sponge, dab it on entire ball to prevent Glitter fall out.
Wrapped Candy Attachment- Using a Fat Quarter of Fabric, lay on flat surface. Make a seam on 3 sides using a hot glue gun. Lay your 6.5" Styrofoam Ball in the middle and glue down the side with no seam first over the ball. Then glue down the other side of Fabric. When covering ball with each side of fabric, glue about half way down the ball. Next place clear Rubber Bands on each side of the ball to make it into the shape of a wrapped candy. Lastly make two mini bows and tie middle with clear Rubber Bands and then place on each side of wrapped candy.
Curly Q's- Take your piece of printed Stationary Paper and cut into 1" strips. Fold strip in half length wise. Your strip of paper should be at least 12" long. Take your 18 guage Floral Wire Stem and place inside seam of paper. Then get your hot glue gun and glue the paper in half making sure to go out to edges. Make sure to use low temp glue gun. Cover strip of paper with Modge Podge because it will prevent paper from fraying later on. Once completely dry, get a wooden dowel and curl your piece of paper. You can also add Glitter to your piece of paper after applying Modge Podge.
Yarn Ball Ornament- Get a Styrofoam Ball in any size you choose. I used a 4" Styrofoam Ball. You'll need yarn that's a little chunky in different colors. Glue Yarn starting at the top with hot glue and you can use 1-3 different colors. Make sure you're using a low temp glue gun. Now just go around the entire ball using hot glue and make sure to take your time. Once you get to the bottom, cut yarn and finish.
Glitter Ball Pick- This one is very easy. Take an 18 guage Floral Wire Stem. Take your mini Glitter Vase Fillers and push them through the Wire Stem. You can either cover entire stem or you can leave a space between the Glitter Balls. When you get to the top, place a small amount of hot glue and place your last Glitter Ball but don't go through the entire ball so that way you won't see any wire sticking out from top.
SUPPLIES:
Glitter Ball Ornaments:
4in Styrofoam Ball- https://amzn.to/3WChCWQ
Modge Podge
Fine Glitter- https://www.etsy.com/listing/1605074273/tumbler-glitter-nail-art-glitter-craft
Acrylic Paint
Paint Brush
Sponge Applicator
Wrapped Candy Attachment:
Fat Quarter of Fabric
Styrofoam Ball
Clear Rubber Bands
Wired Ribbon
Curly Q's:
12x12" Stationary Paper
Modge Podge
18 Guage Floral Wire Stems
Wooden Dowel to Curl
Yarn Ball Ornament:
Medium to Chunky Yarn- https://amzn.to/3UD67f6
4in Styrofoam Ball- https://amzn.to/3WChCWQ
Glitter Ball Pick:
Glitter Vase Fillers
18 Guage Floral Wire Stem
Thank you, to all my HWM YouTube Community for all your support and I will see you all soon. Thank you, HWM by, Lori.
Find me when I will be live- https://bit.ly/33x7Oyf
Affiliate links for tools used. If you purchase I will get a few pennies for the purchase. About enough to buy a stick of gum :)
E-Z BOWS STOW AND GO- https://e-zcraft.com/products/e-z-bowz-stow-go-with-matching-tote-bag
Wire Cutters- https://nicksseasonaldecor.com/products/8-25l-straight-head-cutter
Mesh Roller- https://www.simplify-organize.com/product/ultimate-collapsible-mesh-roller/
Cable Tie Gun- https://www.amazon.com/dp/B08FR1ZHVQ
Purple Cutting Mat- https://www.amazon.com/dp/B07RG9L4C3
Fiskars Rotary Cutter and Mat- http://amzn.to/2hyAUHL
Ryobi Glue Gun- http://amzn.to/2hBoizL
Bowdabra Bow Maker- http://amzn.to/2zdPxeE
Metal Hole Punch- https://rclsignsandmore.com/products/metal-hole-punch
Видео Let’s Make Some Fun and Easy Wreath Attachments |Crafting with Hard Working Mom |How to DIY канала Crafting with Hard Working Mom
Показать
Комментарии отсутствуют
Информация о видео
2 мая 2024 г. 15:36:12
01:24:44
Другие видео канала
 Flip Flop Stained Glass Deco Mesh Wreath |Hard Working Mom |How to
 Bee Stained Glass Deco Mesh Wreath |Hard Working Mom |How to
 Save the Wild Mustang Door Hanger Kit | Part Two
 Hello Winter Truck Door Hanger Kit
 Let’s Play With Ribbon |Hard Working Mom |How to
 How to make an easy bow| Hard Working Mom |EZ Bow Maker|
 Beach Deco Mesh Wreath using Single Roll of Mesh| Hard Working Mom |How to
 Window Scene Bird and Butterflies Stained Glass Deco Mesh Wreath |Hard Working Mom |How to
 Love of a Pet Deco Mesh Wreath| Hard Working Mom |How to
 Owl Deco Mesh Wreath| Hard Working Mom |How to
 How to make an easy hand bow with no twisting
 Love how this turned out from with one of my new signs #wreathdesign #hardworkingmom #butterfly
 Lemon Spring/Summer Deco Mesh Wreath |Hard Working Mom |How to
 Halloween Skull Rail Door Hanger |Hard Working Mom |How to
 Horse Head Door Hanger | Hard Working Mom |How to
 How to Winter Deco Mesh Wreath |Hard Working Mom |How to
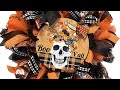 Halloween Skull Deco Mesh Wreath| Hard Working Mom |How to
 Highland Cow Wood Door Hanger| Hard Working Mom| How to Paint
 Fall, Family &Football
 How to make a Black and red plaid Merry Christmas gnome wreath
 90 today and still working!