New RV Roof Vent Replacement + Installing with Butyl Tape
In today’s video, we show you how we replaced all three of our roof vents! The original vents for our RV were not universal, making it very hard to locate new vent covers. Because of this, we decided to remove and replace them all. Great decision!!!
The best process for this is to make sure that when you tear out the old vents, scrape up ALL of the old tar/butyl tape and sealant! You need to have a clean surface for everything to stick to. Though we didn’t show it, we wiped everything down with alcohol before each new step... It’s just a good habit to get into.
Here are the 8 easy steps:
1) Remove the old vent and clean every inch of the roof’s surface
2) Check to make sure the new vent will fit in the hole
3) Apply butyl tape over the pre drilled holes around the edges of the vent
4) Place the vent where it needs to go… make sure it vent opens towards the back of the RV!
5) Drill new holes (if necessary)
6) Secure the vent on the roof with screws (preferably rust resistant)
7) Clean up all of the excess butyl tape from the edges of the vent
8) Seal everything with Dicor self leveling lap sealant.
Like always, we’d love to hear what you think. If you have any questions, comments, or suggestions/tips you;d like to share, comment below.
If you’d like to support this channel for FREE by doing your normal, everyday shopping, just click on this Amazon link and shop away! :) http://www.amazon.com/?tag=duetju20-20
We need your help! This is crucial to the success of our channel. Please SUBSCRIBE, LIKE, COMMENT, and SHARE our videos!
Here are three reasons why your subscription matters...
You get up to date notifications for every new video we release!
It helps others like you find our content more quickly and easily!
You support us as we continue providing consistent, quality content to the world :)
Thanks for the love and support!
- Michael and Jenny Justus
Have you ever wondered what it takes to live full-time in an RV? Follow our journey on social media as we search for what it really means to live…
➞ Facebook https://www.facebook.com/duetjustus
➞ Instagram https://www.instagram.com/duetjustus/
➞ Twitter https://twitter.com/duetjustus
➞ Pinterest https://www.pinterest.com/duetjustus/
----------------------------------------------------------------------------------------------------------------
----------------------------------------------------------------------------------------------------------------
CAMERA GEAR:
Canon 70d (body only) → http://amzn.to/2ae3gkQ
Canon 18-135 STM lens → http://amzn.to/2eMf6Gs
Canon 10-18 wide angle STM lens → http://amzn.to/2eMcF6C
iPhone 6/6s wide angle/telephoto lenses → http://amzn.to/2eMfvIM
Shotgun mic → http://amzn.to/2ae3pVB
Windscreen → http://amzn.to/2ae4VGW
Tripod → http://amzn.to/2ae3Zmg
Monopod → http://amzn.to/2ae3sAN
Lighting kit → http://amzn.to/2dZW0fz
3-axis motorized gimbal → http://amzn.to/2dEIFs3
----------------------------------------------------------------------------------------------------------------
----------------------------------------------------------------------------------------------------------------
RV INFO:
NAME: HaRVey Dent
STYLE: Class C motorhome
YEAR: 1989
MODEL: Yellowstone Camino Classic
LENGTH: 28ft + Hitch and scooter
WEIGHT: 10,000 lb (approx.)
CHASSIS: Ford Econoline Club Wagon (e350)
ENGINE: Ford 460 7.5L V8 engine
ODOMETER: 47,000
MPG: 6.5 (on average)
----------------------------------------------------------------------------------------------------------------
----------------------------------------------------------------------------------------------------------------
MUSICAL CREDITS:
Track 1: Blank [NCS Release] by Disfigure
https://www.youtube.com/watch?v=p7ZsBPK656s
Follow Disfigure:
https://www.youtube.com/user/DisfigureMusic
https://soundcloud.com/disfigureofficial
https://www.youtube.com/user/DisfigureMusic
Видео New RV Roof Vent Replacement + Installing with Butyl Tape канала Understanding Solar Power
Показать
Комментарии отсутствуют
Информация о видео
Другие видео канала
 Replacing And Resealing RV Roof Vents
 Installing a New Girard Tankless Instant RV Hot Water Heater
 37 RV MODS & UPGRADES we have done in 2 years of Full Time RV Living
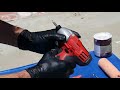 Rv Roof Magic your only choice for Rv Roof Leaks
 Mercedes Sprinter Campervan - Water Tanks
 New RV Window Seal Replacement + Repair
 Replace an RV Roof Vent Cover
 Building your own urine diverting composting toilet for a fraction of the cost!
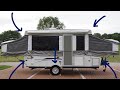 You NEED to do THIS to Your Pop Up Camper! | The FREE Pop Up Camper Renovation | Part Six
 DIY RV Renovations: Make a beautiful table with epoxy and CDs
 Camping Disaster/Our Three Month Old RV Was Destroyed by a Tree While Camping #HighlandRidge
 RV 101® - How to Replace & Seal an RV Roof Vent
 Adding a Urine Diverter + Improving Our DIY Composting RV Toilet
 CAMPER RV VENT LID REPLACEMENT RV ROOF VENT REMOVAL REPLACEMENT
 RV Awning Repair + Resealing the Roof with Dicor
 How To Mount Large Solar Panels on RV with NO DRILLING | Winnebago Class A | RVwithTito DIY
 RV Upgrade | Maxx Air vent cover EASY install! (MADE IN USA) | RV Life
 FORD TRANSIT - How to Install a Roof Vent Easily?