DIY: How to Test Fuses
Video tutorial on how to test a vehicle's fuses to determine if they are need of a replacement using various methods. This tutorial does include four different methods which are using a test light/lamp, testing voltage with a multimeter, doing a visual inspection, and testing for continuity with a multimeter. Fuse boxes are found on various locations throughout your vehicle depending on your make or model. Some of these locations can consist of under the dashboard, on the side of the dashboard, under the hood, in the trunk, in the glove box, under the seat, etc. You will have to consult with your vehicles owner's manual to determine where it is located. When replacing a fuse, it is mandatory to replace it with the appropriate rated fuse so you do not risk damaging your vehicle's electrical system. This particular tutorial was done on a 2003 Dodge Dakota.
Website: http://4diyers.com
Facebook: https://www.facebook.com/4diyers
Google Plus: https://plus.google.com/+4DIYers
Twitter: https://twitter.com/4DIYers
Instagram: https://www.instagram.com/4diyers/
Tumblr: http://4diyers.tumblr.com
Pintrest: https://www.pinterest.com/4diyers/
Tools/Supplies Needed:
-test light/lamp
-multimeter
Procedure:
-locate your fuse panel and remove the access cover
-determine what fuse is required to be tested
-some circuits will need to be power up, for example the ignition either needs to be on or on accessories to power up the radio
-find a sufficient ground source if you are too far away from the battery
-if using a test light/lamp, put the ground clamp on a sufficient ground located or negative battery terminal, touch the test probe on the two test points on the fuse
-if the test light/lamp does not light up on either test terminal, the circuit may not be powered up or there is an issue with the circuit
-if the test light/lamp only lights up on one test terminal and not the other, the fuse will need to be replaced
-if the test light/lamp lights up on both test terminals, the fuse is good
-if using a multimeter, set it to the DC voltage on the two place reading
-clamp the ground probe on a sufficient ground source or negative battery terminal
-using the positive probe, test the test terminals on the fuse
-if no voltage is shown, the circuit may not be powered up or there is an issue with the circuit
-if voltage is shown on one test terminal and not the other, the fuse will need to be replaced
-if voltage is shown on both test terminals, the fuse is good
-we can also do a visual inspection on the fuse, depending on the type it may or may not need to be removed
-inspect the fusible link inside the fuse to see if it's broken or there is a burnt spot on the housing
-using a multimeter we can also check for continuity
-set the multimeter to the lowest ohms setting, this can ONLY be done when the fuse is out of the vehicle otherwise you do risk the chance of damaging electronics in your vehicle
-touch the probes together to ensure the multimeter is functioning correctly
-touch each test probe on each terminal on the fuse and ensure there is continuity
-if there is no continuity, the fuse will need to be replaced
Thank you to all those who watch my videos and support my content. Don't forget to subscribe to my channel for future tutorial videos and like my video if you found it helpful. New videos are always being uploaded every week!
© 4DIYers 2013
All Rights Reserved
No part of this video or any of its contents may be reproduced, copied, modified or adapted, without the prior written consent of the author.
Видео DIY: How to Test Fuses канала 4DIYers
Показать
Комментарии отсутствуют
Информация о видео
Другие видео канала
 How To Test a Relay The Easy Way
 How to Use an Automotive Test Light - Quick and Easy
 How to check car fuses without pulling them out - Testing fuses with a Multimeter
 How to Diagnose a Failed Relay In Your Car, Truck or SUV
 How to Fix Electrical Problems in Your Car (Ground Fault)
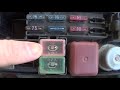 How to check large clear fuses
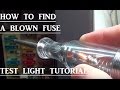 How to find a Blown fuse in your vehicle (Test Light Basics Tutorial)
 How to use a Circuit Tester to Check Car Fuse (Test Light)
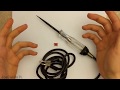 How to Check and Replace a Blown Fuse in a Car
 MUST WATCH - Can a Test Light Damage Your Cars PCM ?
 The BEST Way TO Perform a Parasitic Draw Test
 Electrical Troubleshooting Basics - EricTheCarGuy
 Your Car's Fuse Box Explained: Everything You Need to Know About The Stuff In Fuse Boxes!
 How to Test Car Fuses Using a Test Light
 Crank No-Start Diagnosed only with Test Light
 How To Use a Fuse Tester Made by EATON
 How to Check For Bad Fuses With A Multimeter
 How To Test Relays- EricTheCarGuy
 How to Use a Multimeter for Beginners - How to Measure Voltage, Resistance, Continuity and Amps