- Популярные видео
- Авто
- Видео-блоги
- ДТП, аварии
- Для маленьких
- Еда, напитки
- Животные
- Закон и право
- Знаменитости
- Игры
- Искусство
- Комедии
- Красота, мода
- Кулинария, рецепты
- Люди
- Мото
- Музыка
- Мультфильмы
- Наука, технологии
- Новости
- Образование
- Политика
- Праздники
- Приколы
- Природа
- Происшествия
- Путешествия
- Развлечения
- Ржач
- Семья
- Сериалы
- Спорт
- Стиль жизни
- ТВ передачи
- Танцы
- Технологии
- Товары
- Ужасы
- Фильмы
- Шоу-бизнес
- Юмор
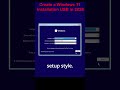
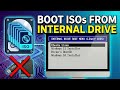
How to Boot WinPE from Windows Recovery Partition (Step-by-Step)
Welcome back to Meink WinLab! In this step-by-step tutorial, I will show you how to replace the default Windows Recovery Environment (WinRE) with a custom WinPE (like Hiren's BootCD). By doing this, you can boot directly into a powerful rescue toolkit straight from your hard drive—no USB required!
While I use Hiren's BootCD as an example in this video, this method works with almost any custom WinPE .iso file.
⚠️ CRITICAL DISCLAIMER (READ BEFORE PROCEEDING) ⚠️
This video is for educational purposes only. The steps shown involve modifying core system partitions using the diskpart utility. ONE WRONG COMMAND CAN WIPE YOUR ENTIRE HARD DRIVE AND DESTROY ALL YOUR DATA. Always back up your important files before messing with disk partitions. Do not blindly copy the disk/partition numbers shown in the video (e.g., Disk 0, Partition 4); your system WILL be different. I am not responsible for any data loss, corrupted systems, or hardware issues that may occur by following this guide. Proceed at your own risk!
📌 STEP-BY-STEP TEXT GUIDE:
Step 1: Allocate Space for the New Recovery Partition
Open Disk Management.
Shrink your C: drive by about 1500MB. We will combine this unallocated space with the existing Recovery Partition (~700MB) to make room for the larger custom WinPE file.
Step 2: Delete the Old Recovery Partition
Open Command Prompt as Administrator.
Type diskpart and press Enter.
Use list disk, select disk X (your OS disk), and list partition to find your current Recovery partition.
Select it (select partition X) and delete it forcefully using the command: delete partition override. (Make absolutely sure you selected the correct partition!)
Step 3: Create & Configure the New Partition
Create a new primary partition using the combined unallocated space.
Format it as NTFS.
Run the following two specific diskpart commands to set the proper GPT attributes so Windows recognizes it as a Recovery Partition:
set id="de94bba4-06d1-4d40-a16a-bfd50179d6ac"
gpt attributes=0x8000000000000001
Step 4: Disable Current WinRE
Exit diskpart.
To be safe and clear the current configuration, type: reagentc /disable and press Enter.
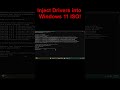
Step 5: Extract and Rename the WinPE File
Mount your custom WinPE ISO (e.g., Hiren's BootCD).
Navigate to the sources folder inside the mounted ISO.
Copy the boot.wim file to your desktop (or any temporary folder).
Rename that boot.wim file to winre.wim.
Step 6: Replace the System Recovery File
Copy your newly renamed winre.wim file.
Navigate to C:\Windows\System32\Recovery (Note: This is a hidden system folder, you may need to enable "Show hidden files" and uncheck "Hide protected operating system files" in Folder Options).
Paste and replace the existing file.
Step 7: Enable WinRE and Test!
Go back to your Command Prompt (Admin) and type: reagentc /enable
Once successful, hold the SHIFT key on your keyboard and click Restart in the Windows Start Menu.
Your PC will now boot directly into your custom WinPE environment!
💡 Don't forget to Like, Share, and Subscribe to Meink WinLab for more advanced Windows tips, PC troubleshooting, and technical deep-dives!
⏱️ Timestamps
00:00 Introduction & What You Need
00:38 Create Recovery Partition
02:01 Create WinPE Boot
03:14 Test in UEFI mode
03:46 End
#WinPE #WindowsRecovery #HirensBootCD #CustomWinRE #Diskpart #BootWIM #Windows10 #Windows11 #TechTutorial #PCTroubleshooting #MeinkWinLab #ComputerRescue #WindowsMods #TechHacks #SystemRecovery #ITSupport
Видео How to Boot WinPE from Windows Recovery Partition (Step-by-Step) канала Meink WinLab
While I use Hiren's BootCD as an example in this video, this method works with almost any custom WinPE .iso file.
⚠️ CRITICAL DISCLAIMER (READ BEFORE PROCEEDING) ⚠️
This video is for educational purposes only. The steps shown involve modifying core system partitions using the diskpart utility. ONE WRONG COMMAND CAN WIPE YOUR ENTIRE HARD DRIVE AND DESTROY ALL YOUR DATA. Always back up your important files before messing with disk partitions. Do not blindly copy the disk/partition numbers shown in the video (e.g., Disk 0, Partition 4); your system WILL be different. I am not responsible for any data loss, corrupted systems, or hardware issues that may occur by following this guide. Proceed at your own risk!
📌 STEP-BY-STEP TEXT GUIDE:
Step 1: Allocate Space for the New Recovery Partition
Open Disk Management.
Shrink your C: drive by about 1500MB. We will combine this unallocated space with the existing Recovery Partition (~700MB) to make room for the larger custom WinPE file.
Step 2: Delete the Old Recovery Partition
Open Command Prompt as Administrator.
Type diskpart and press Enter.
Use list disk, select disk X (your OS disk), and list partition to find your current Recovery partition.
Select it (select partition X) and delete it forcefully using the command: delete partition override. (Make absolutely sure you selected the correct partition!)
Step 3: Create & Configure the New Partition
Create a new primary partition using the combined unallocated space.
Format it as NTFS.
Run the following two specific diskpart commands to set the proper GPT attributes so Windows recognizes it as a Recovery Partition:
set id="de94bba4-06d1-4d40-a16a-bfd50179d6ac"
gpt attributes=0x8000000000000001
Step 4: Disable Current WinRE
Exit diskpart.
To be safe and clear the current configuration, type: reagentc /disable and press Enter.
Step 5: Extract and Rename the WinPE File
Mount your custom WinPE ISO (e.g., Hiren's BootCD).
Navigate to the sources folder inside the mounted ISO.
Copy the boot.wim file to your desktop (or any temporary folder).
Rename that boot.wim file to winre.wim.
Step 6: Replace the System Recovery File
Copy your newly renamed winre.wim file.
Navigate to C:\Windows\System32\Recovery (Note: This is a hidden system folder, you may need to enable "Show hidden files" and uncheck "Hide protected operating system files" in Folder Options).
Paste and replace the existing file.
Step 7: Enable WinRE and Test!
Go back to your Command Prompt (Admin) and type: reagentc /enable
Once successful, hold the SHIFT key on your keyboard and click Restart in the Windows Start Menu.
Your PC will now boot directly into your custom WinPE environment!
💡 Don't forget to Like, Share, and Subscribe to Meink WinLab for more advanced Windows tips, PC troubleshooting, and technical deep-dives!
⏱️ Timestamps
00:00 Introduction & What You Need
00:38 Create Recovery Partition
02:01 Create WinPE Boot
03:14 Test in UEFI mode
03:46 End
#WinPE #WindowsRecovery #HirensBootCD #CustomWinRE #Diskpart #BootWIM #Windows10 #Windows11 #TechTutorial #PCTroubleshooting #MeinkWinLab #ComputerRescue #WindowsMods #TechHacks #SystemRecovery #ITSupport
Видео How to Boot WinPE from Windows Recovery Partition (Step-by-Step) канала Meink WinLab
WinPE Windows Recovery Partition Custom WinRE Hiren's BootCD boot.wim winre.wim diskpart tutorial replace winre with winpe boot winpe from hard drive Windows 10 recovery Windows 11 recovery PC rescue disk Meink WinLab reagentc system recovery custom boot partition IT troubleshooting Windows mods create recovery partition Windows deployment DISM commands modify Windows PC repair tool boot without USB recovery partition GPT system rescue emergency boot
Комментарии отсутствуют
Информация о видео
27 мая 2026 г. 19:29:41
00:04:09
Другие видео канала