- Популярные видео
- Авто
- Видео-блоги
- ДТП, аварии
- Для маленьких
- Еда, напитки
- Животные
- Закон и право
- Знаменитости
- Игры
- Искусство
- Комедии
- Красота, мода
- Кулинария, рецепты
- Люди
- Мото
- Музыка
- Мультфильмы
- Наука, технологии
- Новости
- Образование
- Политика
- Праздники
- Приколы
- Природа
- Происшествия
- Путешествия
- Развлечения
- Ржач
- Семья
- Сериалы
- Спорт
- Стиль жизни
- ТВ передачи
- Танцы
- Технологии
- Товары
- Ужасы
- Фильмы
- Шоу-бизнес
- Юмор
Mashy Teaches BANanoVuetifyAD3 - The V-Label (Transcript Included)
Today we look at the V-Label to create H1-H6, paragraphs, divs etc.
TG Channel
https://t.me/bananovuematerial
Github
https://github.com/Mashiane/BANanoVuetifyAD3/tree/605
BANanoVuetifyAD3 Kitchen Sink
https://mashiane.github.io/BANanoVuetifyAD3/#/
Mashy Teaches Channel & Current Lesson
https://www.b4x.com/android/forum/threads/mashy-teaches-webapp-website-development-with-bananovuetifyad3-the-new-series.132305/post-857407
Music by Bensound
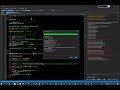
Video Transcript:
Good day, today we look at the V-Label and its various options. With the v-label you are able to create paragraphs, divs, headings etc.
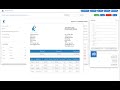
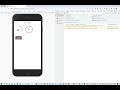
On this page, we have created a v-container, with some rows and each row 3 columns spanning 4 spaces.
In each v-column we have added a v-label and changed its tag to suit our needs, depending on the size.
The sum of the columns in each row equals 12, meeting the grid specifications.
In the first row, first column we have added a H1 v-label.
One can choose the tag to use from a list of provided tags, and then set other properties like color etc.
On the first row, we have also defined a H2 and a H3 html element.
On the second row, we continue defining the various headers using the tags we want. We do this until we reach h6.
We start with paragraphs, on the 3rd row. The first being a plain paragraph and the others with classes applied to them.
On the sub title 1, paragraph, we have added a class named sub title 1. This will apply the specified class to that element.
We do the same for sub title 2, and also the same with the caption based paragraph.
More details about these classes can be found on the vue-tify website styles guide.
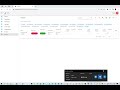
The next paragraph has red text, we do this by setting the text color of the paragraph. We later change this text color to green, when we click a button.
Using the same text color, we have another paragraph with blue text. We change the text of this paragraph via code using the update caption call. To update the text of the paragraph, we need to check the Use Caption property. This ensures that our v-label can be dynamically changed at runtime.
We have just changed the text color of the red paragraph to green, at runtime. This uses a binding to the class attribute of the element.
The next paragraph is bold. We are able to set it bold by checking a property.
We do the same with italic, we just check the italic property.
With the lorem ipsum, we demonstrate how we can truncate a paragraph, for that we check the truncate property.
As we wanted some dummy data for this paragraph, we checked the lorem ipsum property and also selected truncate, as a result there are 3 dots at the end of the paragraph.
In the next paragraph, we add some text decoration, by selecting line-through on the drop-down. There are also other options that you can choose.
With the text align property, we are able to right align text, center text or justify it.
The last paragraph is centered within the column.
We also created a gradient button, so that when clicked, one can update the text color of one of the paragraphs.
To activate gradients, check the gradient active property, the gradient alignment and then choose the 2 colors to apply.
The other button is just plain.
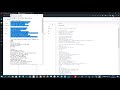
After we placed our components on the designer, we generated members,that is, define them as variables. Then on the button click events, we defined code to run to change the paragraph color and paragraph text.
When we navigate to our page, we want the original content to be shown, so we define an on create method.
When a button is clicked, we update the paragraph content. Remember this needs the Use Caption property to be checked. The other button click, changes the text color of the paragraph.
We have just navigated outside of the page and back, to reset the contents and then change it at runtime.
Видео Mashy Teaches BANanoVuetifyAD3 - The V-Label (Transcript Included) канала Anele Mbanga
TG Channel
https://t.me/bananovuematerial
Github
https://github.com/Mashiane/BANanoVuetifyAD3/tree/605
BANanoVuetifyAD3 Kitchen Sink
https://mashiane.github.io/BANanoVuetifyAD3/#/
Mashy Teaches Channel & Current Lesson
https://www.b4x.com/android/forum/threads/mashy-teaches-webapp-website-development-with-bananovuetifyad3-the-new-series.132305/post-857407
Music by Bensound
Video Transcript:
Good day, today we look at the V-Label and its various options. With the v-label you are able to create paragraphs, divs, headings etc.
On this page, we have created a v-container, with some rows and each row 3 columns spanning 4 spaces.
In each v-column we have added a v-label and changed its tag to suit our needs, depending on the size.
The sum of the columns in each row equals 12, meeting the grid specifications.
In the first row, first column we have added a H1 v-label.
One can choose the tag to use from a list of provided tags, and then set other properties like color etc.
On the first row, we have also defined a H2 and a H3 html element.
On the second row, we continue defining the various headers using the tags we want. We do this until we reach h6.
We start with paragraphs, on the 3rd row. The first being a plain paragraph and the others with classes applied to them.
On the sub title 1, paragraph, we have added a class named sub title 1. This will apply the specified class to that element.
We do the same for sub title 2, and also the same with the caption based paragraph.
More details about these classes can be found on the vue-tify website styles guide.
The next paragraph has red text, we do this by setting the text color of the paragraph. We later change this text color to green, when we click a button.
Using the same text color, we have another paragraph with blue text. We change the text of this paragraph via code using the update caption call. To update the text of the paragraph, we need to check the Use Caption property. This ensures that our v-label can be dynamically changed at runtime.
We have just changed the text color of the red paragraph to green, at runtime. This uses a binding to the class attribute of the element.
The next paragraph is bold. We are able to set it bold by checking a property.
We do the same with italic, we just check the italic property.
With the lorem ipsum, we demonstrate how we can truncate a paragraph, for that we check the truncate property.
As we wanted some dummy data for this paragraph, we checked the lorem ipsum property and also selected truncate, as a result there are 3 dots at the end of the paragraph.
In the next paragraph, we add some text decoration, by selecting line-through on the drop-down. There are also other options that you can choose.
With the text align property, we are able to right align text, center text or justify it.
The last paragraph is centered within the column.
We also created a gradient button, so that when clicked, one can update the text color of one of the paragraphs.
To activate gradients, check the gradient active property, the gradient alignment and then choose the 2 colors to apply.
The other button is just plain.
After we placed our components on the designer, we generated members,that is, define them as variables. Then on the button click events, we defined code to run to change the paragraph color and paragraph text.
When we navigate to our page, we want the original content to be shown, so we define an on create method.
When a button is clicked, we update the paragraph content. Remember this needs the Use Caption property to be checked. The other button click, changes the text color of the paragraph.
We have just navigated outside of the page and back, to reset the contents and then change it at runtime.
Видео Mashy Teaches BANanoVuetifyAD3 - The V-Label (Transcript Included) канала Anele Mbanga
Комментарии отсутствуют
Информация о видео
30 октября 2021 г. 21:17:40
00:06:34
Другие видео канала