Silhouette Studio v4 - Tracing and Offset Tools for Creating Cookie Cutters
Learn how to use the Trace and Offset tools in Silhouette Studio v4 to create your 2D design for making 3D printed cookie cutters. This video was originally created and shared in a FB group centered around making 3D printed cookie cutters.
NOTE - It is recommended to create your cut edge offsets in multiples of your nozzle size. For example, your nozzle is 0.4mm. Create the offsets in multiples of that size. Such as 0.8, 1.2 etc. If your cut edge is created with a 1.0mm offset you will most likely have a gap between the walls of the cutting edge and dough will get stuck in that space.
Topics covered include:
**Dragging a file onto your work space
**Using the Trace tool - where to find it and how to use
**Editing the traced design to clean up the edit points
**Changing Units of Measurement from inches to mm using Preferences
**Sizing your cutters proportionally using the Scale tool on the Quick Access Toolbar (QAT)
**Using the Offset tool to create your cut edge and handle of your 2D design
**Making the design a compound path
**Saving the design as an SVG to later import into a CAD program like Fusion360, 123D Design etc to make a 3D model
If you are interested in using Tinkercad to create your 3D model, watch this video for that process as the saving steps are slightly different. https://youtu.be/Q4AI8tkVYMU
Видео Silhouette Studio v4 - Tracing and Offset Tools for Creating Cookie Cutters канала Baked on Maple
Показать
Комментарии отсутствуют
Информация о видео
Другие видео канала
 Tracing in Silhouette Studio - A Complete Walkthrough
 How to make a PYO Cookie(Paint Your Own)
 Project Showcase: DIY 3D Printed Cookie Cutters
 DIY: Demon Slayer Waterproof Stickers with Cricut Explore
 How To Outline An Image In Gimp? - Thumbnail Outline Youtube - Outline Picture Tutorial, Guide
 Making Stamps on a Glowforge || How To
 Best Slicer Settings For Cookie Cutters
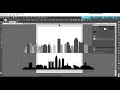 Silhouette Studio v4 - Select by Color
 Fusion 360 Adding Wall Labels on a Cookie Cutter Tutorial
 Illustrator - Photoshop Tutorial - 3D Printed Cookie Cutter | Design Tutorials
 Transparent PNG Auto Trace in Silhouette Studio v 4.4
 Fusion 360 Sketch + Bridged Cookie Cutter Tutorial with Add-In
 How To Make 3D Printed Cookie Cutters
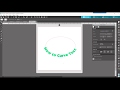 Curving Text in Silhouette Studio v4
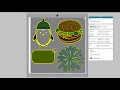 Tracing in Silhouette Studio®
 How to do a cookie cutter with inkscape / no music, sorry
 Paint your own trolls sugar cookies
 Designing a Cookie Cutter with Cookie Cad
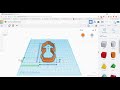 Create Your Own 3D Printed Cookie Cutters Using Silhouette Studio v4 and Tinkercad!!
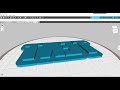 Silhouette Studio v4 & Silhouette3D - How to Create a Text Stamp for 3D Printing