DIY | Pebble mosaic stepping stone | Kieselstein - Mosaik - Trittplatte
(Instructions in English + Anleitung auf Deutsch)
Pebbles are a wonderful natural material to work with as they come in many different shades of brown, grey, white and even green and dark red. I show you the first steps of turning pebbles into a simple mosaic and using it to make stepping stones for the garden.
You need
• Pebbles (your choice of size and colour, I took white and black)
• sand
• a plastic container (like a plant saucer, rectangular, square or round depending on the shape you want)
• wire mesh in the size of your plastic container
• cement or concrete
Step by step guide
1. Pour sand in your container approximately 2 cm (0.7 inches) deep.
2. Draw the design directly into the sand using a pencil or a ruler.
3. Start with the main design (in my case the outlines of the flower petals)
4. Push the first pebble firmly into the sand.
5. Make sure you push it down until it rests on the bottom of your saucer.
6. The pebbles should be placed directly beside each other.
7. As your design slowly builds up always check if the pebbles touch the ground.
8. You don’t have to care if some pieces stick out more than others as long as the head of the pebbles is on the same level (and it will when the pebbles touch the ground).
9. For the concrete mix it in a container with enough water so you get a pastelike consistency.
10. Brush the sides of your saucer with oil so you can easily remove your setting stone after the concrete has cured.
11. Spread out the concrete evenly over your design and push it down with a spatula.
12. Cut the wire mesh into the size of your plant saucer.
13. Put the wire mesh over your first layer of concrete, it will act as an armament or reinforcement for your stepping stone.
14. Add another layer of concrete so that your mesh is wholly covered.
15. Let the concrete cure (this may take 2-3 days depending on your climate).
16. Don’t put it into the sun (it may crack) as it should drie slowly.
17. Remove the stepping stone from the container by carefully flipping it over.
18. Brush away the sand with a brush.
19. To remove the rest of the sand I advise you to use a garden hose.
20. Place your finished stepping stone in the desired spot
I hope you got inspired and try making one of your own. Thanks for watching!
(DE)
Kieselsteine sind ein wunderschönes natürliches Material, welches es in verschiedenen Variationen von braun, grau, weiß, grün oder sogar dunkelrot gibt. Ich zeige Euch die einzelnen Schritte um Kieselsteine in ein einfaches Mosaik zu verwandeln und Trittplatten für den Garten zu fertigen.
Du brauchst
• Kieselsteine (Farbe und Größe Deiner Wahl, meine waren weiß und schwarz und zwischen 3-4 cm groß)
• Sand
• Ein Plastikuntersetzer (z.B. ein Pflanzenuntersetzer, rechteckig, quadratisch oder rund abhängig von Deinem Motiv),
• Drahtgitter in der Größe Deines Plastikuntersetzers
• Trockenbeton
Schritt für Schritt Anleitung
1. Schütte Sand in Deinen Untersetzer (ungefähr 2 cm tief)
2. Zeichne Dein Muster direkt in den Sand. Ich habe einfach ein Lineal und die Hinterseite eines Bleistiftes dafür genommen.
3. Beginne mit Deinem Hauptmotiv (in meinem Fall die Außenlinie der Blumenblüten)
4. Drücke den ersten Kieselstein fest in den Sand.
5. Kontrolliere, dass Du ihn soweit hinuntergedrückt hast, dass er auf dem Untersetzer aufliegt.
6. Die Kieselsteine sollten direkt nebeneinander gesteckt werden.
7. Wenn Dein Motiv langsam Gestalt annimmt, schau immer darauf, dass die Kieselsteine auch den Boden Deines Untersetzers berühren.
8. Es ist egal, ob manche Stücke mehr oder weniger aus dem Sand herausragen, solange der Kopf des Kieselsteines den Boden berührt. Damit garantierst Du, dass Deine Trittplatte eben wird.
9. Für den Beton rühre Trockenbeton mit Wasser zu einer puddingartigen Konsistenz an.
10. Streiche die Seiten des Untersetzers mit Öl ein, damit Du Deinen Trittstein nach dem betonieren leichter aus der Form bekommst.
11. Verteile den Beton gleichmäßig über der gesamten Oberfläche.
12. Schneide das Drahtgitter in der Größe Deiner Form zu. Es dient als Unterstützung, damit Dein Trittstein gefestigt wird.
13. Lege das Drahtgitter auf die erste Schicht Beton und gib eine zweite darauf, so viel, dass das Gitter nicht mehr zu sehen ist.
14. Lass den Beton trocken, das dauert je nach Klima 2-3 Tage.
15. Gib den Stein auf keinen Fall in die Sonne (er könnte dann Risse bekommen), da er langsam trocknen soll.
16. Kippe den Stein aus Deinem Untersetzer, in dem Du ihn vorsichtig umdrehst.
17. Bürste den Sand weg.
18. Um den Rest des Sandes zu entfernen, empfehle ich den Gartenschlauch zu verwenden.
19. Platziere Deine Trittplatte auf dem gewünschten Platz.
Ich hoffe, Du hast hier ein paar Inspirationen gefunden und versuchst es selbst einmal. Vielen lieben Dank fürs Zuschauen!
Music from epidemicsound.com
Видео DIY | Pebble mosaic stepping stone | Kieselstein - Mosaik - Trittplatte канала HomeMade
Показать
Комментарии отсутствуют
Информация о видео
Другие видео канала
 Pebble Mosaic Artist Jeffrey Bale Uses Work to Connect With Nature
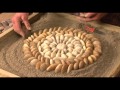 Initiation à la mosaïque de galets par Maggy Howarth - VF
 Alice-ART | Garten Rondell - Steinkreis selber machen | Stone circle selfmade
 How to get a Exposed Aggregate Finish on Concrete
 Mosaic Stepping Stones with Sarah McCann
 Making A Concrete Stepping Stone - Mosaic Tutorial
 Alice-ART Mosaik Pflastersteine Mosaic on Paving Stones
 DIY: Making Concrete Floating Stepping Stones
 The Art of Pebble Mosaics and the technique of the Aegean Ios Island Greece
 How to Make GLASS CONCRETE Stepping Stone Pavers
 Kevin Carman - Pebble Mosaic Artist
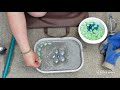 How to Make Cement Stepping Stones for Garden Path
 Les Crafts a Pebble Mosaic
 Sea Glass Stepping Stones; DIY Garden Projects; Mosaics
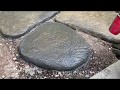 How to DIY large, irregular concrete stepping stones
 Mosaics For Beginners: Tutorial 1 - Essential Tools
 Traditional Greek pebblestone mosaic artist Stelios Grekos at work
 How to make MOSAIC CONCRETE PAVERS
 Easiest way to make stepping stones
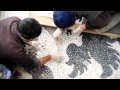 Rissêu, il mosaico ligure di ciottoli