How To Build A Pro Arcade Stick - Easy Way
I built a new arcade stick and this time I was aiming to make it as easy as possible.
I made a wood case and used authentic arcade parts (Myoungshin Fanta lever and Sanwa buttons).
I had no access to a workshop, I completed it on our balcony in couple of days work and the only power tool I used was an electric drill.
This tutorial video shows how I did it. Remember I am no woodworking expert at all and I am no electric expert, this can be done by anybody.
Tools include an electric drill, hole saws, hand saw, hand plane, wood rasps, sandpaper (hard and soft), clamps.
First plan the desired layout. I used the Namco Noir.
Plan how to cut the wood.
If you are no expert don't cut it yourself. Go to the store, give them the plan and let them cut it for you.
Tell them to be very accurate.
You might still need to adjust the panels a bit. Use the hand plane and sandpaper.
After the dimensions are right glue pieces of the frame together.
I used wood glue to join the elements. Wood glue these days make a bond that is stronger than the wood itself.
I used the top panel to position the support blocks.
Beware not to glue the top panel yet.
I marked the lines to round the edges. Round edges are not necessary BTW.
I cut the edges roughly with the hand plane.
It can be tricky without a fixed table but doable.
I used the rasp to round the edges further.
Finished with sandpaper.
For the USB cable I drilled a hole first.
I cut the rest with the hand saw.
And used a rasp and sandpaper to soften the edges.
I taped the layout on the top panel.
Marked the holes with a wood screw.
The pilot holes must be drilled very accurately.
Sanwa buttons require 30mm holes.
The Korean stick requires a 35mm hole.
While drilling the wood might burn a bit so take it slow and interrupt a few times.
I sanded the holes.
I tested the holes with the buttons and the stick.
Positioning the lever and the holes must be done very accurately.
Widen the holes in multiple steps.
I used threaded inserts for the M4 screws.
The hole depth must be very accurately drilled or the top panel will break through.
It was a bit messy but the threaded inserts are inserted and stable.
One hole went through the top panel and the others got humps too so I was not accurate enough.
I used wood glue and saw dust to cover the hole and sanded it.
I used acrylic for the bottom panel but it is not necessary. Actually plywood would be more stable.
Hole must be drilled in the acrylic before inserting the screws or it will break.
I glued the top panel and the case was ready for the varnish.
To sand the surfaces between layers I used a P240 grit sandpaper.
You can stop here and the case is finished but I wanted a darker and shinier surface and that needs multiple layers.
Sand, dust off, apply varnish, wait 24 hours and repeat a couple of times.
For the last finish I wet sanded with a P2000 and P2500 grit sandpaper.
Not really the result I expected so I added one last thin layer.
Professionals can get a beautiful mirror surface but I think this the best I can do.
The case was finished so I inserted the lever and the buttons.
These are 30mm Sanwa snap in buttons but they don't need to snap. Just push into the 30mm hole and they will stay.
I bought a cheap PCB (USB encoder) with prepared wires for the Korean levers (Crown or Myoungshin Fanta) and Sanwa buttons.
It does not require soldering.
If you have no access to a PCB like that you can always extract the PCB from a controller and solder wires to it.
Check my video about the PCB soldering.
Cable ties are useful to organize the cables.
I used small wood screws to fix the PCB and a hook screw to tie the cord.
It is important to fix the cord to something solid so you don't rip it off the PCB accidentally.
I secured the bottom panel with felt pads and the case is assembled.
Tested the stick and all the buttons and it is ready to use. :)
Music:
- Way Out West, Spaceman
- Belladonna, Meltin' Guitar
Check this link if you are interested how I built my old custom ardcade stick:
http://youtu.be/MVH2Q8oFzoY
Видео How To Build A Pro Arcade Stick - Easy Way канала aabyssx
Показать
Комментарии отсутствуют
Информация о видео
Другие видео канала
 The Ultimate Zangief Fight Stick
 DIY Arcade Stick
 BnB Fightstick V1 Assembly Tutorial
 The Stick I Use
 Make your own PS4 fighstick the easy way!!
 Ikea Arcade Stick V2: Overview
 I Turned a CHEAP Plastic Box into an EPIC Controller
 DIY Arcade Stick | Hitbox | Zero Delay
 Easiest DIY Arcade EVER - Part 1 - the Electronics
 DIY Arcade Stick | Zero Delay | Sanwa JLF
 DIY Arcade Stick: Easy, High Quality & Affordable
 Arcade Controller DIY from Recycled Pallet Wood
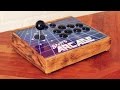 DIY Arcade from Pallet Wood
 DIY Arcade Stick for PC | Xbox | PS4 | Emulator Console
 DIY Arcade Controller for RetroPie
 DIY Arcade Stick - Walnut & Epoxy Resin
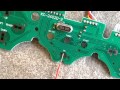 Arcade Stick PCB modding (soldering, wiring)
 The Shoe Box Arcade Stick | Building a DIY arcade stick out of a shoebox!
 Arcade Stick Custom Build DIY PC Raspberry Pi PS3
 DIY Arcade Stick Art Design Guide