- Популярные видео
- Авто
- Видео-блоги
- ДТП, аварии
- Для маленьких
- Еда, напитки
- Животные
- Закон и право
- Знаменитости
- Игры
- Искусство
- Комедии
- Красота, мода
- Кулинария, рецепты
- Люди
- Мото
- Музыка
- Мультфильмы
- Наука, технологии
- Новости
- Образование
- Политика
- Праздники
- Приколы
- Природа
- Происшествия
- Путешествия
- Развлечения
- Ржач
- Семья
- Сериалы
- Спорт
- Стиль жизни
- ТВ передачи
- Танцы
- Технологии
- Товары
- Ужасы
- Фильмы
- Шоу-бизнес
- Юмор
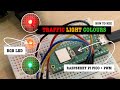
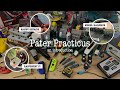
Automated Raspberry Pi back-lit 'mind your head' sign with ultrasonic sensor – Part 1
In this simple Raspberry Pi Pico project, I'm making an ultrasonically triggered warning panel which lights up whenever anyone gets too close – perfect for a ‘Mind Your Head’ sign for a low ceiling on a staircase.
In part 1, I demonstrate how to wire up the sensor and code the Pico to measure the distance from an object – and light up an LED if something gets too close. Finally, I upgrade my solitary LED to backlit panels to properly illuminate my sign, giving a taster of the finished project.
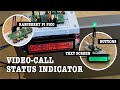
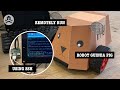
In the coming second part I will be going on to make the 3D printed casing and text screen, making refinements along the way to complete the project.
Beta versions of the 3D printed sign and case STLs used in part 2 are already available to download here: https://paterpracticus.com/rpi-pico-warning-sign. Very much work in progress at the moment, but the final versions will be up ready for when the video is finished.
Shopping List:
Raspberry Pi Pico - any will do, but I used a WH (£6.80) with Wi-Fi and headers for the initial breadboard experiments, and a standard Pico (£3.80) for the finished version as we don’t need the Wi-Fi capabilities.
Ultrasonic Distance Sensor - 3V or 5V - HC-SR04 compatible (RCWL-1601): £3.90 (ThePiHut).
White LED Backlight Module - Medium 23mm x 75mm: £2.40 each (ThePiHut).
Half size breadboard for the prototyping: c.£3 from various retailers.
386 Ohm resistor, yellow LED for testing and assorted jumper cables.
Timecodes:
0:00 Introduction
0:24 The Hardware
2:53 Programming
6:16 Back-lit sign
8:33 Final code refinements
9:43 Testing and summary
Видео Automated Raspberry Pi back-lit 'mind your head' sign with ultrasonic sensor – Part 1 канала Pater Practicus
In part 1, I demonstrate how to wire up the sensor and code the Pico to measure the distance from an object – and light up an LED if something gets too close. Finally, I upgrade my solitary LED to backlit panels to properly illuminate my sign, giving a taster of the finished project.
In the coming second part I will be going on to make the 3D printed casing and text screen, making refinements along the way to complete the project.
Beta versions of the 3D printed sign and case STLs used in part 2 are already available to download here: https://paterpracticus.com/rpi-pico-warning-sign. Very much work in progress at the moment, but the final versions will be up ready for when the video is finished.
Shopping List:
Raspberry Pi Pico - any will do, but I used a WH (£6.80) with Wi-Fi and headers for the initial breadboard experiments, and a standard Pico (£3.80) for the finished version as we don’t need the Wi-Fi capabilities.
Ultrasonic Distance Sensor - 3V or 5V - HC-SR04 compatible (RCWL-1601): £3.90 (ThePiHut).
White LED Backlight Module - Medium 23mm x 75mm: £2.40 each (ThePiHut).
Half size breadboard for the prototyping: c.£3 from various retailers.
386 Ohm resistor, yellow LED for testing and assorted jumper cables.
Timecodes:
0:00 Introduction
0:24 The Hardware
2:53 Programming
6:16 Back-lit sign
8:33 Final code refinements
9:43 Testing and summary
Видео Automated Raspberry Pi back-lit 'mind your head' sign with ultrasonic sensor – Part 1 канала Pater Practicus
Комментарии отсутствуют
Информация о видео
17 мая 2025 г. 19:30:06
00:10:16
Другие видео канала