How to set up Square Register
See the new Square Register at http://www.square.com/hardware/register.
Get to know your Square Register and customer display. Follow step-by-step instructions on setting up Square Register, connecting the customer display, turning on Square Register, and adding hardware accessories.
Watch our other videos to learn more about Square Register or go to http://www.square.com/register-setup.
TRANSCRIPT
How to set up Square Register
Let’s get your Square Register up and running.
Inside your box there’s a Square Register, customer display and cable, getting started guide, power adapter and cable, accessory hub, mounting plate, and mounting tools.
Start by removing the protective wrap from Square Register and the customer display.
Carefully lift the customer display out of Register and lay it down flat. Then, remove the protective foam pad.
Square Register has a touchscreen, power button, micro USB ports, cleat slot for the mounting plate, and release latch to undock the customer display.
Adjust the viewing position of Square Register by carefully tilting the screen.
The customer display has a touchscreen, EMV chip card slot, NFC antenna, magstripe reader, and micro USB ports for the customer display cable.
To get Square Register powered up, connect the accessory hub to Register by plugging the cable into either one of the micro USB ports located on the bottom of Register. Then, grab the power adapter and connect it to the accessory hub.
Plug one end of the power adapter cable into the power adapter and the other end into a power outlet. Square Register must be connected to a power source at all times.
How to set up the customer display
The customer display can be docked for more compact counters, or undocked for tiered or wider counters.
To dock the customer display, make sure no cables are connected to the display, then simply place it into its slot on Register. Press firmly on both edges until you hear a click to ensure it’s locked in place.
To undock the customer display, turn Register upside down and carefully place the screen onto a soft, clean surface. Hold in the release latch located on the base of Register, and remove the customer display at the same time.
To connect the customer display when it’s undocked, use the included cable. Plug one end into the customer display and the other end into the bottom of Register.
How to turn on Square Register
Once your customer display is set up, turn on Square Register by pressing the power button until the Square logo appears on the screens.
Set up your internet connection via Wi-Fi or Ethernet. We recommend connecting by Ethernet for the best performance. Simply plug one end of the Ethernet cable into your router, and the other end into the accessory hub.
Next, confirm your time zone.Sign in with your existing Square account, or set up a new account at http://www.square.com on a computer.
How to set up hardware accessories
You can connect a cash drawer, printer, or bar code scanner to Square Register via USB.
Simply plug them into the accessory hub. When the confirmation appears on screen or you hear the sound, you’re connected.
To test your accessory, go to Settings, tap your connected accessory, then tap the test button.
Now you’re ready to start selling with your accessories. Check out our other videos to learn more about setting up your Square Register or go to http://www.square.com/register-setup.
Видео How to set up Square Register канала Square
Показать
Комментарии отсутствуют
Информация о видео
Другие видео канала
 How to connect printers to Square Register
 Starting and Ending Your Day with Square Point of Sale
 Unboxing Square Terminal
 Setting Up LS2208 BARCODE SCANNER with Square POS
 How Square Makes Money
 Shopify VS Square: Which One For Your Small Business?
 Cash Drawer Setup
 Small Business Inventory Tracking with Square
 Best iPad POS System in 2021
 Coffee vendor out $14,000 after using Square
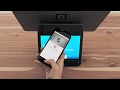 Taking Payments with Square Register
 How to mount Square Register to your counter
 Square Terminal Full Review
 Square Terminal Setup and Practical Uses
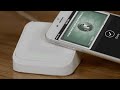 Getting Started with the Square Contactless and Chip Reader
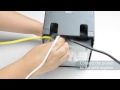 iPad POS Hardware Setup
 How Square Works
 Square Stand Training Part 1
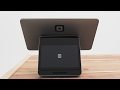 How to Use Square Register
 Setting up the new Square Register POS (key features)