How to remove tripod and fix nadir in 360 videos | Shooting tips with basic Photoshop edit | Gaba_VR
I show you how I remove tripod and fix nadir in my 360 videos. Working with long projects and multiply clips, I guess, this is the easiest way to do it. Check it out and learn some pro shooting tips, too, which ones can make editing much easier. And for further 360 contents and tutorials, subscribe to my YouTube channel: https://www.youtube.com/gabavr?sub_confirmation=1
Check out the next episode with some advanced tips in AfterEffects and PremierePro: https://youtu.be/pss5iRQ4Iug
=======================================
Created by Gaba VR (Gabor Szidor N.)
Subscribe: http://www.ngsstudio.hu/vr/
Follow me on Instagram: https://www.instagram.com/gaba_vr/
About my 360 photo exhibition: http://www.amongworlds.ngsstudio.hu/
Contact me: gabavr@ngsstudio.hu
=======================================
Are you new in 360?
Get the brand new Insta360 One R here: https://www.insta360.com/sal/one_r?insrc=INRNJ2T
Or check out the Insta360 One X with FREE accessories, like the invisible selfie-stick or an additional cold-weather battery: https://www.insta360.com/sal/one_x?insrc=INRNJ2T
=======================================
In my 360 videos I’m trying to do the highest quality, in terms of storytelling, shooting and editing, too. And one of the most common questions I’ve got is about my nadir editing, because in most of my 360 videos, I always clean nadirs on the bottom of the scenes, creating a floating 360 camera look with an invisible tripod.
But everything starts with the shooting process, and if we want to get rid of the tripod legs and shadows later, there are a couple of rules we have to keep in mind:
- the first one is that the main light source must be at the stitch line, hitting both camera sides equally,
- and the second one is making sure that there are no close objects at the stitch line or moving objects crossing stitch line.
These rules are leading to a better 360 video quality in most of the cases, but this time they have further roles. Following these rules nothing will cross the shadow of the tripod and no additional shadows will appear on the ground, around the legs of the tripod. So there will be a clear, static area to work with during post-production.
Then we can easily create masks in Photoshop to hide every disturbing details on the ground to make a floating camera look in our 360 videos.
In this episode I show you a basic method which works well even in older Photoshop versions, too, and in an upcoming video I will show you a more advanced workflow both in Photoshop and After Effects.
=======================================
If you're interested about littleplanet photography, follow me on Instagram: https://www.instagram.com/gaba_vr/
#removetripod #360editing #360camera #filmtrick #insta360onex #insta360oner #gabavr
Видео How to remove tripod and fix nadir in 360 videos | Shooting tips with basic Photoshop edit | Gaba_VR канала Gaba_VR
Показать
Комментарии отсутствуют
Информация о видео
Другие видео канала
 How To Remove A Tripod From 360 Photos In Photoshop
 How to remove tripod LIKE a PRO in 360 videos with After Effects and right in Premiere Pro | Gaba_VR
 360 virtual tour photography with DSLR cameras | Ep01: Shooting and retouching panoramas | Gaba_VR
 How To Fall Asleep In 2 Minutes
 Create dynamic FPV Shots with your Insta360 ONE X2 & ONE R | 10.000 Subscriber Special
 360 virtual tour photography with DSLR cameras | Ep02: Stitching and editing panoramas | Gaba_VR
 5 EASY Camera Effects for MORE CREATIVE VIDEOS
 360º Photos - Removing Stand, Monopod or Tripod Easily in Photoshop - Photoshop Action
 Which 360 Camera Should You Buy In 2022?
 Create & Manage Virtual Tour for Google My Business (GMB) on Google Maps, Street View 2021 Tutorial
 How to know your life purpose in 5 minutes | Adam Leipzig | TEDxMalibu
 Edit and Removing Tripods in 360 Images using Photoshop in just 3 steps !
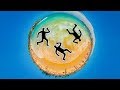 How To REMOVE PEOPLE from your 360 photos!
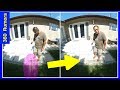 How to Remove a Tripod from 360 video or 360 photo: 4 ways to do it! (Adobe NOT required!)
 Make Your 360 Photos LOOK BETTER FAST! Photoshop Tutorial
 Stitch Panoramas in Photoshop Like a Professional
 Pano Head Knobs and 360 Virtual Tours
 How to edit PARALLEL PLANET videos on desktop in high quality | Insta360 Shot Lab Effect by Gaba_VR
 Low Light Photo Tips without a Full Sized Tripod: Take and Make Great Photography with Gavin Hoey
 How To Remove Tripod From 360 Video Nadir Without Photoshop For Free Tutorial