Mosfet spot welder build for dummies
Successful mosfet spot welder build, based on Daniel Creaney's YouTube channel @ https://youtu.be/Fe1uq2wq-ko and the DIY 18650 Facebook site @ https://www.facebook.com/groups/502079133941618
VIEWER ACCEPTS ALL RISKS
UPDATE:
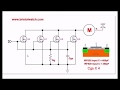
I just replaced the original 1K and 10K resistors with 95 Ohm and 220 Ohm. I did notice with 95 Ohm and 220 Ohm resistors that the mosfets did not get as warm as as previous. (Thermistor on a mosfet). Welds still look good, timing is the same as before. Will leave these resistors in place. Change of resistors based on a conversation with YT commenter below. Schema @ https://www.facebook.com/photo.php?fbid=10228679354554657&set=p.10228679354554657&type=3
Mosfets (IRF1405PBF). Spec sheet @ https://www.infineon.com/dgdl/irf1405pbf.pdf?fileId=5546d462533600a4015355db084a18bb
Total Gate Charge for mosfet 1405PBF Min 170 Max 260
So capacitance = charge / voltage
C = 260nC / 12V = 22nF per mosfet gate
So you need to charge 22nF to 12V in less than 1ms
To charge a 22nF capacitor to around 12V from 0V with source of 12V in around 100uS you will need 950 Ohm resistor to gate from 12V. In your case I would put 950 Ohm resistor per gate at 12V gate input voltage. If you have 10 mosfets in parallel then i would put 95 Ohm resistor.. 950 Ohm/num of mosfets in parallel to get one final gate resistor. So for 15 mosfets in parallel i would use 950/15= 63ohm resistor to charge all those gates in around 100uS at 12V.
I see that you used 10 mosfets so I would recommend you to use 95 or 100ohm resistor between gate and 12V signal source and 220ohm resistor between gate and source. That would be enough to turn on mosfets in around 100uS and turn it off in around 200-300uS. So the mosfet is acting as a resistor only for 300uS and not any longer. I would suggest you to try with 95 Ohm and 220 Ohm resistors instead of yours 1K and 10K and see if there is any difference in weld quality or thermal dissipation of mosfets. With 95 Ohm and 220 Ohm they should dissipate less heat than with 1K and 10K. Just be sure that your 12V signal can handle at least 150mA
Try it with 95 Ohm and 220 Ohm instead of 1K and 10K and check if there is difference in thermal performance and weld quality
UPDATE:
I have taken the source mosfet aluminum rail and now it connects to the negative side of the battery from it's other end. I ran a cable from the battery negative side to the other end of the mosfet rail. (See photo link ). Link to photos of rail connection change @ https://photos.app.goo.gl/1WobajxR2fAQ1diF7
Added protecton diode to circuit. Here is the link to protection diode https://www.amazon.com/gp/product/B01N11W49P/ref=ppx_yo_dt_b_asin_title_o05_s00?ie=UTF8&psc=1
Updated Flyback Diode using two diodes in parallel. Cheaper than the original one used in the video. https://www.amazon.com/gp/product/B008UG15QY/ref=ppx_yo_dt_b_asin_title_o06_s00?ie=UTF8&psc=1
Recently changed out the welding 4 gauge pens with smaller 8 gauge wire with stranded flexible silicon copper. This gives better control-placement of the welder tips on the cell with the smaller gauge, cables get warmer due to higher resistance.
Noted that the K-Weld uses 8 gauge cable.
Inserted copper ground wire (3.25mm dia) as welder tips from Home Depot about 1.5" into each of the 18" 8 gauge wire ends.
Shorter end tips allow for more control placement of the electrodes with this DIY mosfet welder. Does generate a bit more heat in comparison to the pens and wire gauge I was using before, due to the increase resistance but worth the advantage.
Better welds when you have more control using the 8 gauge with the silicon covered wire when your welding the positive ends of the 18650's because of the small footprint of that cells positive area.
Also tried used the spring pens, but that was again like holding a long pencil at the top and trying to write resulting with no control. UPDATE: have put these on a lever, better control now.
Did have to increase weld time by .01 tenths of a second due to the smaller cable as the resistance went up. Plenty of power to weld .03 nickel.
Used 10 mosfets in the build so far all working fine.
Parts used:
Mosfets: (MOSFET N-CH 55V 169A TO220AB) https://www.digikey.com/product-detail/en/infineon-technologies/IRF1405PBF/IRF1405PBF-ND/812209
Resistors: 95 Ohm and 220 Ohm (Updated after video)
Diodes for flyback UPDATED: Two in Parallel
https://www.amazon.com/gp/product/B008UG15QY/ref=ppx_yo_dt_b_asin_title_o06_s00?ie=UTF8&psc=1
Protection Diode:
https://www.amazon.com/gp/product/B01N11W49P/ref=ppx_yo_dt_b_asin_title_o05_s00?ie=UTF8&psc=1
Timer: https://www.amazon.com/gp/product/B07VLXR7Z1/ref=ppx_yo_dt_b_asin_title_o08_s00?ie=UTF8&psc=1
Spot Welder Pen:
https://www.amazon.com/gp/product/B07J41KG5X/ref=ppx_yo_dt_b_search_asin_title?ie=UTF8&psc=1
Battery 800 CCA
https://www.walmart.com/ip/EverStart-Maxx-Lead-Acid-Automotive-Battery-Group-Size-78N-12-Volt-800-CCA/16782712
Видео Mosfet spot welder build for dummies канала Steve Cahill
VIEWER ACCEPTS ALL RISKS
UPDATE:
I just replaced the original 1K and 10K resistors with 95 Ohm and 220 Ohm. I did notice with 95 Ohm and 220 Ohm resistors that the mosfets did not get as warm as as previous. (Thermistor on a mosfet). Welds still look good, timing is the same as before. Will leave these resistors in place. Change of resistors based on a conversation with YT commenter below. Schema @ https://www.facebook.com/photo.php?fbid=10228679354554657&set=p.10228679354554657&type=3
Mosfets (IRF1405PBF). Spec sheet @ https://www.infineon.com/dgdl/irf1405pbf.pdf?fileId=5546d462533600a4015355db084a18bb
Total Gate Charge for mosfet 1405PBF Min 170 Max 260
So capacitance = charge / voltage
C = 260nC / 12V = 22nF per mosfet gate
So you need to charge 22nF to 12V in less than 1ms
To charge a 22nF capacitor to around 12V from 0V with source of 12V in around 100uS you will need 950 Ohm resistor to gate from 12V. In your case I would put 950 Ohm resistor per gate at 12V gate input voltage. If you have 10 mosfets in parallel then i would put 95 Ohm resistor.. 950 Ohm/num of mosfets in parallel to get one final gate resistor. So for 15 mosfets in parallel i would use 950/15= 63ohm resistor to charge all those gates in around 100uS at 12V.
I see that you used 10 mosfets so I would recommend you to use 95 or 100ohm resistor between gate and 12V signal source and 220ohm resistor between gate and source. That would be enough to turn on mosfets in around 100uS and turn it off in around 200-300uS. So the mosfet is acting as a resistor only for 300uS and not any longer. I would suggest you to try with 95 Ohm and 220 Ohm resistors instead of yours 1K and 10K and see if there is any difference in weld quality or thermal dissipation of mosfets. With 95 Ohm and 220 Ohm they should dissipate less heat than with 1K and 10K. Just be sure that your 12V signal can handle at least 150mA
Try it with 95 Ohm and 220 Ohm instead of 1K and 10K and check if there is difference in thermal performance and weld quality
UPDATE:
I have taken the source mosfet aluminum rail and now it connects to the negative side of the battery from it's other end. I ran a cable from the battery negative side to the other end of the mosfet rail. (See photo link ). Link to photos of rail connection change @ https://photos.app.goo.gl/1WobajxR2fAQ1diF7
Added protecton diode to circuit. Here is the link to protection diode https://www.amazon.com/gp/product/B01N11W49P/ref=ppx_yo_dt_b_asin_title_o05_s00?ie=UTF8&psc=1
Updated Flyback Diode using two diodes in parallel. Cheaper than the original one used in the video. https://www.amazon.com/gp/product/B008UG15QY/ref=ppx_yo_dt_b_asin_title_o06_s00?ie=UTF8&psc=1
Recently changed out the welding 4 gauge pens with smaller 8 gauge wire with stranded flexible silicon copper. This gives better control-placement of the welder tips on the cell with the smaller gauge, cables get warmer due to higher resistance.
Noted that the K-Weld uses 8 gauge cable.
Inserted copper ground wire (3.25mm dia) as welder tips from Home Depot about 1.5" into each of the 18" 8 gauge wire ends.
Shorter end tips allow for more control placement of the electrodes with this DIY mosfet welder. Does generate a bit more heat in comparison to the pens and wire gauge I was using before, due to the increase resistance but worth the advantage.
Better welds when you have more control using the 8 gauge with the silicon covered wire when your welding the positive ends of the 18650's because of the small footprint of that cells positive area.
Also tried used the spring pens, but that was again like holding a long pencil at the top and trying to write resulting with no control. UPDATE: have put these on a lever, better control now.
Did have to increase weld time by .01 tenths of a second due to the smaller cable as the resistance went up. Plenty of power to weld .03 nickel.
Used 10 mosfets in the build so far all working fine.
Parts used:
Mosfets: (MOSFET N-CH 55V 169A TO220AB) https://www.digikey.com/product-detail/en/infineon-technologies/IRF1405PBF/IRF1405PBF-ND/812209
Resistors: 95 Ohm and 220 Ohm (Updated after video)
Diodes for flyback UPDATED: Two in Parallel
https://www.amazon.com/gp/product/B008UG15QY/ref=ppx_yo_dt_b_asin_title_o06_s00?ie=UTF8&psc=1
Protection Diode:
https://www.amazon.com/gp/product/B01N11W49P/ref=ppx_yo_dt_b_asin_title_o05_s00?ie=UTF8&psc=1
Timer: https://www.amazon.com/gp/product/B07VLXR7Z1/ref=ppx_yo_dt_b_asin_title_o08_s00?ie=UTF8&psc=1
Spot Welder Pen:
https://www.amazon.com/gp/product/B07J41KG5X/ref=ppx_yo_dt_b_search_asin_title?ie=UTF8&psc=1
Battery 800 CCA
https://www.walmart.com/ip/EverStart-Maxx-Lead-Acid-Automotive-Battery-Group-Size-78N-12-Volt-800-CCA/16782712
Видео Mosfet spot welder build for dummies канала Steve Cahill
Показать
Комментарии отсутствуют
Информация о видео
Другие видео канала
 Issues on Connecting MOSFETs in Parallel
 Make powerful spot welder 18650 battery
 Make your own Crude Battery Spot Welder with a Car Battery!
 I spent $100 to save 20 bucks... and it was TOTALLY worth it!
 Designing Power MOSFET Circuits - Circuit Tips and Tricks
 Cheap 18650 Spot Welder Reliability Mods and Test
 How to make a Giant Mosfet | Best DIY project for 2020
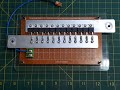 12 mosfet spot welder build video.
 Repair Attempt - Super Cheap Spot Welder
 Here is why MOSFET drivers are sometimes essential! || MOSFET Driver Part 1 (Driver, Bootstrapping)
 Spot Melting! 100A Timing Board / Spot kaynak yenileme / Spot welding machine renovation ...
 DIY SUPER Spot Welding Machine
 【電子工作DIY】バッテリー式スポット溶接機を作ってみた【リチウムイオン】| How to make a home use spot welder with a car battery.
 Spot Welder for battery homemade DIY part 1, Punktschweißgerät
 $20 PCB Spot Welder Showdown: Round 1
 New Spot Welder! Maletrics Build and Review
 Unboxing & testing the Sequre spot welder for DIY batteries
 kWeld - The best 18650 spotwelder?
 How to make a high current 200A spot welding machine using 3000F Capacitor
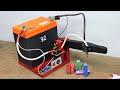 DIY Spot Welding Using 12V Battery