2002 Grand Caravan Rear Leaf Spring Lower Bushing Change
******** SAFETY READ SAFETY READ SAFETY READ WARNING READ SAFETY ********
This video is for entertainment purposes only. I was very nervous and very cautious doing this job.
OK IF YOU'RE CRAZY ENOUGH TO DO THIS, AT ONE PART IN THE VIDEO YOU HAVE TO USE A SCISSORS JACK TO PUSH THE LEAF SPRING DOWN. IT IS SOMEWHAT UNSTABLE SO DO NOT PUSH OR BANG ON THE LEAF SPRING SIDEWAYS WHEN REMOVING THE BUSHINGS, OR WHEN WORKING AROUND THE LEAF SPRING. THE SPRING IS UNDER A LOT OF PRESSURE IF THE SCISSORS JACK FALLS OUT AND YOU HAVE A BODY PART BETWEEN THE BODY AND THE SPRING EXPECT IT TO SMASH AND BREAK ANY BONES IN YOUR HANDS OR ARMS THAT GET CAUGHT BETWEEN THE TWO IF IT LETS GO! No I was fine and did not do that, but some people who watch me work may decide to try this and not realize that could happen to them. This is not how a professional would do this, i'm not a professional, soooooo!!!!!!!
UPDATE: Looking back on how I did this I'd change how I did it by: Jacking the van up and Remove both tires, Upper Shock Bolts, Loosen the Upper Sway bar drag links, disconnect the Lower Sway bar Drag Links, remove the Lower Leaf Spring Bushing Nuts, unbolt the Rear Leaf Spring Mounting plate. That way you could use the hydraulic jack to lower the whole axle assembly at one time and possibly not even need the scissors jack. Don't for get to support the van body near or behind the axle before disconnecting the axle or lowering it. Also chock both front tires to prevent it from swinging when the rear wheels leave the ground. Let me know how it goes if you do this. Keith Read on.
DO THIS PROCEDURE AT YOUR OWN RISK. THIS IS HOW I DID MINE AND IT WORKED FOR ME. I HAVE YEARS OF EXPERIENCE WORKING ON CARS, I ACCEPT THESE RISKS WHEN I WORK ON MY VEHICLES. IF YOU DON'T KNOW WHAT YOU'RE DOING OR DON'T
WANT TO RISK IT THEN TAKE IT TO A PROFESSIONAL. Ok on to the entertainment of me changing my Leaf Spring Bushings.
Description: This is a video on how I changed my rear Lower Leaf Spring Bushings.
Parts I used: Mopar Bushing P/N: 0474 3040 AA-004
Tools I used:
- Three Jack Stands, two minimum.
- 2-1/2 Ton Hydraulic Jack.
- Caravan Scissors Jack.
- Two 6" 3/8" Drive Extensions.
- Two 3" 3/8" Drive Extensions.
- 6" 3/8" Drive Ratchet.
- 3" 3/8" Drive Ratchet.
- 1/2" to 3/8" Drive Adapter.
- 1/2" Breaker Bar.
- 19 mm 3/8" Drive Socket.
- 18 mm 3/8" Drive Socket.
- 15 mm 3/8" Drive Socket.
- 19 mm Combination Wrench.
- 18 mm Combination Wrench.
- 15 mm Combination Wrench.
- 4x4x12" block of wood for a wheel chock or a real wheel chock.
- 2x4x18" block of wood, used between frame and scissors jack.
- Two 2x4x8" blocks of wood, used between frame and jack.
- Wheel Lug Nut Wrench or Star.
- 6" 1/4" Blade Screw Driver.
- 12" Nail Prybar.
- General Purpose Grease, small tube to cover Rubber Bushings in and out.
- PB Blaster Lubricate.
Optional tools I used: To remove upper Shock Bolt from outside wheel well.
- 15 mm Ratchet Combination Wrench.
- 18 mm Ratchet Combination Wrench.
- 19 mm Ratchet Combination Wrench.
- Shop rag.
As always working on vehicles can be dangerous. If you perform this maintenance you do it at your own risk. If you aren't sure what you're doing get someone who is qualified to help you.
If you learned something and the video helped you please give me a thumbs up.
Best Wishes n Blessings Keith
Видео 2002 Grand Caravan Rear Leaf Spring Lower Bushing Change канала Keith Noneya
Показать
Комментарии отсутствуют
Информация о видео
Другие видео канала
 REAR LEAF SPRING SHACKLES REPLACEMENT 2001-2005 DODGE CARAVAN, GRAND CARAVAN, TOWN & COUNTRY
 How to Replace Leaf Springs and Lift your Truck
 Como cambiar Bujes ovalados de Muelle Voyager, Caravan, Town country. Muelles Toño
 2001-2007 Dodge Grand Caravan Rear Shock Replacement
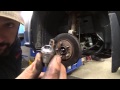 Dodge Grand Caravan Lower Ball Joint - Part I
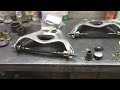 GM Control Arm Bushing Replacement Upper and Lower
 Dodge Caravan replacing right leaf spring
 Leaf Spring Bushing Replacement
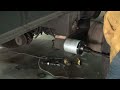 Hendrickson suspension bushing replacement on semi trailer
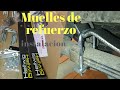 Muelles de refuerzo / helper leaf spring / suspension trasera reforzada / Tacoma 2008
 Chrysler Town & Country - Rear A/C Evaporator - Replacement
 Reforzando Dodge CARAVAN
 How to Replace Lower Control Arm Bushing Dodge Caravan or Chrysler Town & Country 2001 - 2007
 Dodge charger stabilizer bar bushings and end links - clunking noise (vol 4)
 Replacing Axle Beam On 02 Chrysler Voyager
 Breve restauración a Dodge Grand Caravan 2001 😍✔️☑️
 2000 ford ranger spring hanger
 Replace Broken Rear Leaf Spring - Toyota Tacoma
 How to replace F-150 crank position sensor
 Rear leaf spring replacement