E-drum Conversion Part 3 (Tom triggers)
Watch a video about building dual trigger systems for electronic drums with aluminium plates.
Find V-drum Tips on:
Facebook: http://goo.gl/sW6z3S
Twitter: http://goo.gl/svH95f
Webpage: http://www.v-drumtips.com
Sponsored by:
http://www.drum-tec.de/index.php?lang...
http://www.r-drums.com
http://blechking.de/
Download the wiring diagram here: http://www.v-drumtips.com/download/
2 lugs, including metal angles need to be applied to be able to measure the exact diameter. The angles are from r-drums. They get applied with m4 screws. It is best to also mount m5 screws. We measured the distance between the screws and the inner shell diameter. It is very important to not make the discs too big, as there has to be enough space to move them up or down without them touching the normal lug screws. They take away around 5 mm in this case.
We order the discs at blechking.de. This company is specialized in metal sheet cutting. We choose aluminium as material because of the light weight. The metal sheet should have a plain surface and not be thicker than 2 mm. The shape should of course be a circle. It is really important to submit the radius, not the diameter. Pretty simple. Now just press order and through the magic of an incredible shipping company, it will be delivered within a very short time. We ordered discs for toms and bass drum.
It is really tight. The circles appear to be a little bit too big. A circular can be helpful to determine the exact middle of the disc. I hope everyone paid attention in geometry class. The shells have 6 lugs, so we need to divide the cake into 6 equal pieces according to the lugs. The spot for the holes has to be marked too. The decoupler from r-drums has a dimension of 40 x 40 mm. That means we need to make a 40 x 40 square and the spots for jack plug and the cable clip. The spots need to be punch marked before drilling.
We drill a 4mm hole for the cable clip and 5 mm holes for the angles. The hole for the jack plug has to be as big as the jack plug winding. Fettling is required to remove the sharp edges. We made the mistake to not measure the inner shell diameter as accurately. As a result, we have to take away material near the large hole to create space for the lug screw.
Another big mistake was spray painting one side of the metal sheets with a cheap paint which will not last and does not look good. So we improvised and applied all inside parts to the painted surface. Of course after sanding. A pattern is needed to cover everything except of a square in the middle. It should dry for a few hours. Metall plates have the disadvantage to produce noise. This will lead to loud acoustic noises of the mesh pad.
A way to damp the discs and to prevent them from swinging is applying rubber sheets to them. The sheets are made with the help of patterns. There should be enough space for the rim piezo, jack plug, metal angles and the cable clip. Again the surface needs to be sanded before gluing the rubber. Spray adhesive is the best choice to glue on every kind of material. As you can see, the holes and the spot for the rim trigger stays free.
A test will proof if they fit before copy them onto the rubber sheets. This rubber material is called foam rubber and really easy to work with.
The rim piezo gets attached via foam adhesive dot with a smaller diameter to ensure a more sensitive trigger result. The dot needs to be smaller than the piezo. The decoupler is dividing head- from rim piezo and the rest of the shell. The dot is again smaller than the piezo. R-drums labels the ground cable of their piezos as it does not mean the black cable is necessary the ground cable. The polarity of a piezo can be interchanged despite the cable colours. The guys from r-drums measure every piezo with an oscilloscope and mark the ground cable with a white ring.
In this case the cables get shortened and marked again. We apply some heat shrinking tubes before continuing. We remove the protective layer near the hole for the jack plug. The jack plug and its nut are only made out of plastic in this case. So be very careful when using a wrench. The pieces need to be connected in a specific way. Find the download link to the wiring diagram in the description. We shrink the heat shrinking tubes near the hole to bundle the 4 cables.
The cable clip will be applied with an M4 screw and a few washers. The clip ensures that the cables are not moving and cause rattling noises or destroy their isolation. Now it is time to apply the metal angles. As the aluminium disc has to be a bit lower than the angle bottom, it is best to apply a longer m5 screw and an extra washer to lift the angle up. This depends on the position of the shells lug screws.
Видео E-drum Conversion Part 3 (Tom triggers) канала Vdrum Tips
Показать
Комментарии отсутствуют
Информация о видео
Другие видео канала
 E-drum Conversion Part 4 (Tom Pad Assembly)
 Cara Membuat Pedal Drum Dari Kayu 🥁
 DIY Drum Trigger
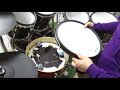 Test snare DIY multiple trigger (ATV aDrums style) with Pearl Mimic Pro
 How To Make a $5 Internal Dual Zone Snare Trigger EASY! Acoustic To Electronic Drum Conversion Cheap
 How to Make DIY eCymbal Pads from Plastic Plate for Electronic Drums
 DIY Electronic Drum Build - Cymbals + Demonstration
 Jobeky Drum Triggers Review (Side Mounted/Center Mounted/Kick Drum)
 HOW TO MAKE DIY E DRUM SET HOME MADE
 How I converted my custom E-Drums - Trigger, Prices and Links
 Cara membuat Drum set Elektrik 🥁🎶
![[V2] 3 ZONE RIDE BUILD | E Cymbal](https://i.ytimg.com/vi/1v_n4rh3WU4/default.jpg) [V2] 3 ZONE RIDE BUILD | E Cymbal
[V2] 3 ZONE RIDE BUILD | E Cymbal Roland eDrum Trigger Cones; Comparing and Repairing
 E-drum Conversion Part 5 (E-Bass Drum)
 DIY Sound Absorbing Drum Riser
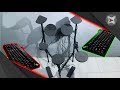 Cara Membuat Drum Elektrik Sederhana Dari Keyboard PC
 Adding Rim Piezo to PD-100 pad
 5 Ways To Convert Your Acoustic Snare Into Electronic
 DIY Electronic Drum Pads for Midi and simple drum kit