How to prepare photos BEFORE uploading to your website. By Karl Taylor
It's crucial that my customers and prospective clients see my photographs at their very best.
In the past, I printed my photos and carried them to meetings in a trusty leather-bound portfolio. How times have changed!
My website has now replaced this portfolio. I put a great deal of faith in my website's performance and ability to sell my professional photography services. I've actually stayed with the same service for many years because it hasn't let me down yet!
Unfortunately though, you can never control how people view your work, i.e. their screen resolution and color calibration, their office broadband speed etc. BUT you can certainly do your best to ensure your work is perfect before uploading.
Today I'm going to show you various image processes I complete before adding client photos to my photography portfolio website.
* I’m going to show you the image resize process
* Adding copyright logo
* Image sharpening
* Automation to speed things up script batch
* Processing things that will help your workflow.
I’ll be demonstrating using my own Squarespace portfolio website because I can display the images at a really high quality which is extremely important for my business clients.
Enjoy the video,
Karl Taylor
Get 10% OFF your SquareSpace Portfolio website right here: https://www.squarespace.com/karl/
Karl Taylor Education
https://www.karltayloreducation.com
Видео How to prepare photos BEFORE uploading to your website. By Karl Taylor канала Karl Taylor
Показать
Комментарии отсутствуют
Информация о видео
Другие видео канала
 Resize & Optimize Images for Web in Photoshop (also GIMP, Lightroom & Luminar)
 🎞 How Much Do I Make From YouTube Videos? PLUS How I make them BTS
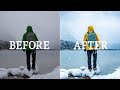 Editing YOUR Photos!!
 Website Images That Sell! Do☝️THIS, Not That!
 CREATING A GOOD HERO FOR YOUR WEBSITE: Free Web Design Course 2020 | Episode 10
 Family and Group Posing Tips
 How to become a professional photographer & get noticed!
 Where to Get FREE Images for Your Website | And Optimize Them!
 Is your online photography portfolio website working for you?
 Remove Shadow 20X FASTER in Photoshop! (Updated)
 How to fix dull food photographs | 10 minute Photoshop tutorial
 How to Optimize Images for Web
 Optimize Images for Website - WHY and HOW You Should be Optimizing PHOTOS
 PHOTO EDITING 101 FOR WEB DESIGNERS: Free Web Design Course 2020 | Episode 13
 How to Build Your Online Presence - Artist Portfolio & Online Shop
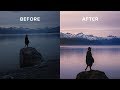 I Edit YOUR Photos!
 7 PHOTO PRINTING MISTAKES to AVOID (with examples)
 How to Upload Images to your Website│PopUp Business School
 How To Shoot Portraits For Beginners
 Make Your Images Bigger for Print