How to Install Disqus on WordPress
Step 1: Create Disqus account & register site 0:22
Step 2: Install WordPress plugin 1:13
Step 3: Manual Installation 2:01 OR Automatic Installation 2:37
Helpful Resources:
• Download Disqus WordPress plugin https://wordpress.org/plugins/disqus-comment-system/
• WordPress Troubleshooting and FAQ https://help.disqus.com/troubleshooting/wordpress-troubleshooting-and-faq
Transcript:
In this video, I’m going to show you how to install Disqus on WordPress.
Before we begin, make sure you have a self-hosted WordPress.org site. This tutorial is not for sites that are hosted on WordPress.com
Here is my blog. I’m going to be replacing the default WordPress comments with Disqus.
To get started, you’ll need to first create a Disqus account and register your site. Start by going to disqus.com and click “Get Started”
On the sign up page, create your account.
Select “I want to install Disqus on my site”
Enter your website’s name. This creates a unique URL for accessing the Disqus settings and moderation tools for your site. The part before “disqus.com” is your shortname which we will be using later.
Next up, select the plan that’s best for you. Let’s select the Plus Free plan.
Here’s a list of publishing platforms where you can install Disqus. When you click the WordPress logo at the top, you will find step-by-step instructions on installing the plugin. Let’s do that next.
We’re now in the WordPress admin. In this step, we’re going to download and install the Disqus WordPress plugin. Starting from the left sidebar, head to Plugins → Add New.
Search for “Disqus”. It should be the first result you find. We’ll be installing the latest 3.0 version.
The plugin is now installed so let’s activate it. From the left sidebar, let’s go to the new Disqus plugin settings page.
There are two ways you can install Disqus using the plugin: manual and automatic. Manual installation is generally faster while Automatic installation is easier if you’d like to use Comment Syncing or import your existing WordPress comments. I’m going to show you the manual method first.
When installing Disqus manually, you will need your site’s shortname, which you created earlier when registering your site. You can find it by heading over to your Disqus Admin. Click on Settings, select your site, and you should find your shortname near the top of the page.
Head back to the Disqus plugin settings in WordPress. In the Site Configuration tab, unlock the form fields first by clicking the lock icon at the bottom. From there, enter the shortname you copied in the previous step. And, that’s it. You’re done.
Finally, let’s take a look at Automatic Installation. If you’d like to use Comment Syncing, which lets you back up comments to your WordPress database, Automatic Installation makes that easy to do by creating the API application that is required for enabling the feature.
To get started, answer the questions in the prompt, copy the installation token, then head over to the WordPress Installation Page.
Select your site, paste the token into the field, and click install. You should see a confirmation message letting you know that installation was successful.
Ok, let’s check out Disqus on our site! Looks like everything is set up correctly. Go ahead and post a comment if you like. I hope you found this tutorial helpful. Thanks for watching.
Видео How to Install Disqus on WordPress канала Disqus
Показать
Комментарии отсутствуют
Информация о видео
Другие видео канала
 Introducing Badges: Start Rewarding Your Community All-Stars
 How To Use Moderation Profiles
 How to Import Comments to Disqus
 How to Pronounce Disqus
 How to Display Comment Counts on Your Site
 Disqus Moderation Panel - Product Tour
 6 Things To Do After Installing Disqus
 How to Install Disqus on Blogger
 How to Install Disqus Manually Using the Universal Code
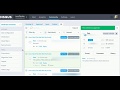 Shadow Banning
 Moderating Comments in VR - Hack Day at Disqus
 Discussion Best Practices
 Game Night VI Timelapse: Team Fortress Edition
 Game Night VI Timelapse
 More on Moderation
 Disqus: Become a Disqusser
 Stay a Little Longer Disqus Tools to Engage Readers
 Featured Comment
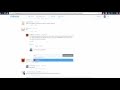 User Mentions
 Reply Notifications