- Популярные видео
- Авто
- Видео-блоги
- ДТП, аварии
- Для маленьких
- Еда, напитки
- Животные
- Закон и право
- Знаменитости
- Игры
- Искусство
- Комедии
- Красота, мода
- Кулинария, рецепты
- Люди
- Мото
- Музыка
- Мультфильмы
- Наука, технологии
- Новости
- Образование
- Политика
- Праздники
- Приколы
- Природа
- Происшествия
- Путешествия
- Развлечения
- Ржач
- Семья
- Сериалы
- Спорт
- Стиль жизни
- ТВ передачи
- Танцы
- Технологии
- Товары
- Ужасы
- Фильмы
- Шоу-бизнес
- Юмор
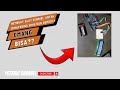
Connecting Arduino with Visual Basic VB.NET | Gas Leak Alarm Detector
Welcome to our tutorial on how to connect Arduino with Visual Basic (VB.NET) to create a Gas Leak Alarm Detector. In this step-by-step guide, we'll show you how to integrate Arduino hardware with VB.NET software to build a powerful and efficient gas leak detection system. Don't miss out on this exciting journey of combining hardware and software to enhance safety and security.
Step 1: Setting Up Your Arduino
First things first, let's ensure your Arduino is properly set up. We'll guide you through the necessary connections and configurations to get your Arduino board ready for the gas leak detection project.
Step 2: Writing Arduino Code
Learn how to write the Arduino code necessary for reading sensor data and detecting gas leaks. We'll explain each line of code, making it easy for both beginners and experienced enthusiasts to follow along.
Step 3: Building the Gas Leak Sensor Circuit
Discover the components needed to build a reliable gas leak sensor circuit. We'll provide a detailed schematic and explain the purpose of each component, ensuring a clear understanding of the hardware setup.
Step 4: Installing Visual Studio and VB.NET
If you don't have Visual Studio and VB.NET installed on your computer, fear not! We'll guide you through the installation process, ensuring you have the necessary tools to develop the software side of your gas leak alarm system.
Step 5: Creating the VB.NET Application
Now comes the exciting part – creating the VB.NET application! Learn how to design the user interface and write the code to communicate with the Arduino. We'll cover real-time data display and user-friendly features to make your gas leak detector efficient and user-friendly.
Step 6: Testing and Troubleshooting
It's time to put your gas leak detector to the test! We'll guide you through the testing phase and provide troubleshooting tips to address common issues. Ensure your system is functioning flawlessly before deploying it for real-world use.
Conclusion:
Congratulations! You've successfully connected Arduino with Visual Basic VB.NET to create a Gas Leak Alarm Detector. With your newfound knowledge, you can enhance and customize this project for various applications. Don't forget to subscribe, like, and share this tutorial for more exciting projects in the future. Happy tinkering!
Видео Connecting Arduino with Visual Basic VB.NET | Gas Leak Alarm Detector канала WR CONTROL SYSTEM
Комментарии отсутствуют
Информация о видео
27 января 2024 г. 20:41:00
00:03:29
Другие видео канала