Toilet Tank Leaks When Leaned Against, Rubber Gasket Seal at Flush Valve
If your tanks leaks near the toilet bolts, fix your toilet flush valve gasket under the flapper.
START - Shut off the water.
Then hold the flush handle down to empty the tank.
Sponge out the remaining water.
1. Remove the toilet tank.
Disconnect the water supply hose from the tank.
Unscrew the toilet tank to bowl bolts and nuts.
Lift the tank off the bowl and place on a flat surface.
2. Remove the rubber tank-to-bowl gasket sealing ring from the outside bottom of the flush valve.
Unscrew the nut that holds the flush valve onto the tank using large-jawed pliers.
Reach inside the tank and disconnect overflow tube, unhook the flapper chain to flush lever.
Pull out the remaining flush valve unit.
3. Examine the new threaded end inner rubber gasket flush valve to ensure it’s in place.
Insert the new flush valve into the hole in the bottom of the tank.
Thread the large nut back onto the valve and tighten it by hand.
Attach the flapper chain to the flush lever.
4. Adjust the new valve so that the flapper chain block flapper somehow.
Adjust the overflow tube height to a minimum of 1 inch below hole for the flush handle.
Trim the overflow tube if necessary.
Tighten the large nut with the big pliers to ensure a good seating, but less than one-half turn beyond hand-tight to not stress the porcelain.
5. Install a new rubber tank-to-bowl gasket sealing ring over the flush valve outlet for good seal.
Hold the top of the tank bolts from inside the tank with a screwdriver, and remove the nuts holding them to the tank with a wrench.
Install new tank bolts, washers, gaskets and nuts.
Tighten the nuts carefully to avoid damaging the tank.
6. Replace the tank.
Set the toilet tank onto the bowl.
Press down on the tank so the gasket seats properly; move it around so it seats right.
Slide on the new gasket assuring the tapered side facing away from the tank.
7. Tighten the toilet bolts
Use new rubber tank washers.
Insert the rubber washers in to the tank, then the bolts through the washers. Do not use metal washers inside the tank.
From under the bowl, hand-tighten the bolts with another washer and nut.
Tighten the toilet bolts alternately, first one side then the other until the tank doesn't wobble.
The tank will still move some because the rubber gasket is not supportive or firm.
NOTE: Don't over-tighten tank bolts because cracked porcelain.
8. Reconnect the water supply hose to the fill valve
Flush and check for leaks.
9. Place the tank back onto the bowl.
Thread on the tank-to-bowl nuts, tighten well for good seal from tank to bowl. Don't over-tighten the tank.
Clip the tube from the fill valve onto the overflow pipe.
Attach the water supply line and tighten.
Turn on the water to check for leaks and proper operation of the new flush valve.
10. Reconnect the water supply hose to the fill valve.
Flush and check for leaks.
Hi! I’m Blair Gilbert, aka MR. HARDWARE. As a third-generation hardware store owner, licensed builder, and finish carpenter, my mission is to help you “do it right the first time!” On this site, I share expert home and yard DIY advice in over 200 videos. I can fix and repair your problems.
Learn more at: https://mrhardware.com/
Subscribe: https://www.youtube.com/channel/UCmEcxaK-cblITb5Q6hbL7TA?sub_confirmation=1
Видео Toilet Tank Leaks When Leaned Against, Rubber Gasket Seal at Flush Valve канала Mr. Hardware
Показать
Комментарии отсутствуют
Информация о видео
Другие видео канала
 Furnace Starts Then Shuts Off - Flame Sensor? - Clean, Replace for $20
 Draft Prevention and Insulation Products
 Mr. Hardware’s First Tool Picks - Versatile, Affordable, Useful, Corded
 Easy Lawn Repair of Trench, Hide Damage in 1 Week from Sprinkler or Electrical
 How To Use the 4-Step Lawn Fertilizer and Weed Program
 Composting That Improves and Works
 Toilet - Parts Explained to Fix, Repair and How They Work and Operate
 Paint Rusted Metal, Use Phosphoric Acid & Clean Tacky Surface on Seawall
 Dielectric Union, Nipple Tray - Stops Crystals, Fix Hot Water Tank Plumbing
 GTO 1970 Convertible Bermuda Blue White Top 400ci 350hp
 Air Conditioner Not Cooling - Keep Bushes, Debris Clear Of Compressor
 American Standard Toilet Flush Handles - 4 Different Models Need to Know
 Sump Pump Hanging On Pipe, Chain in Narrow Pit as Backup Pump
 Best Stones for Walking Paths
 Inexpensive Undersink Water Filter
 Frost Free Faucet Freezes
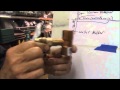 Lawn Sprinklers #1 Intro to System, Heads, Zones, Planning, Water
 Drill Hole In Glass Bottle, Ceramics, Pottery, Decorative Crafts
 Underground Downspout Strainer That Really Works
 Proof that Mortar Caulk Deniers were Wrong!
 Drain Pipe Blockage Cleared with Muriatic Acid - Sump Pump Deposits